How to Build an Herb Spiral With Old Bricks
This website is reader-supported - thank you! As an Amazon Associate I earn from qualifying purchases.
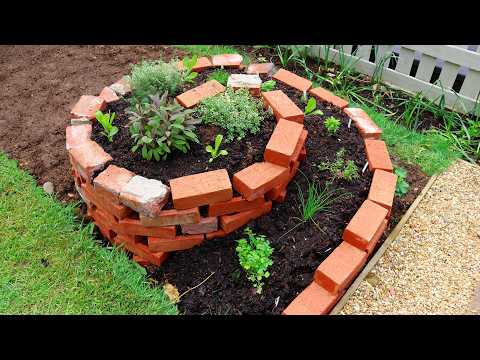
Want to grow more herbs in a small space? Stack bricks or stones in an elevated spiral and fill it in with soil and compost. Plants like sage and rosemary that love dry soil go at the top, while herbs that like it cooler and moister go at the bottom. You can create the growing conditions for many different types of plants with a herb spiral.

One of the smartest ways to grow herbs is in an herb spiral. Situated in a sunny location close to your home, they create micro-climates that allow you to grow many herbs within the same small space. Typically made of bricks or stone, it winds up from the ground in a small spiral mound. Herbs that like more sun and drier feet get planted at the top. Plants that like moister soil and a little shade go towards the bottom. The sun also heats it through the day, releasing that warmth through the night.
My herb spiral is filled with thyme, sage, stevia, parsley, cilantro, summer savory, fennel, chives, and calendula flowers. Incredibly, and thanks to the design, all of those plants fit in an area that’s five-foot-wide and five-foot-long. When it comes to planting yours up, you can plant almost any herb in the DIY herb spiral. However, do avoid planting any belonging to the mint family. That includes lemon balm, peppermint, or spearmint, as they will quickly take over and choke out your other herbs.
A Smart Outdoor Herb Planter
When I first came across this outdoor herb garden idea, it was in permaculture literature. I then saw a couple of herb spirals in person when visiting other gardens. The idea is a practical and fun way to grow many herbs in a small area. Herb spirals create microclimates and require much less watering than herbs in containers. The design is so clever that I had to build one for my home garden, too. I also included plans and photos of how to build it in my book.

Using Bricks to Build a Herb Spiral
Looking online, you may see herb spirals that people have built by mounding up the soil. When finished, some recommend placing stones on it to mimic a spiral. The issue with this is that it will create a low mound that could erode fairly quickly. The stones or bricks don’t stop rain from washing away the soil and are little more than decoration. My instructions below will show you how to build a more solid structure. One that will hold soil in place and create a stable mound that can retain warmth and give stability.

Use Bricks or Stones
You can also build an herb spiral for practically nothing. You don’t need much in the way of equipment, and the bricks you use can be reclaimed. Using brick in the garden gives an attractive look, but you can often find bricks being given away. The ones you see in the photo above were given to me by a friend. If you can’t find bricks, or they are too expensive, you could use stones, seasoned wood, or a mixture of materials. Go for anything non-toxic that won’t affect your soil’s nutrient levels or pH too much.

Planting a Herb Spiral
Once you’ve created a sturdy herb spiral, plant it with Mediterranean herbs, and those that like dry feet and full sun at the top. Plants that like more shade and moisture go towards the bottom. Avoid the mint family, though, since they have a tendency to take over and will outcompete the other herbs. Parsley or cilantro would be a good option for the bottom. Though I don’t have one, you could even build a tiny pond at the very bottom of the herb spiral and plant watercress in the soil adjacent.

One last thing I should mention. I planted flowers in front of the south side of the herb spiral. This is the area where the bricks are getting quite tall, and the dwarf sunflower, dill, and chamomile I planted here appreciated the support and warmth. In front of them, I sprinkled a mix of dwarf (short-growing) wildflowers. I love the effect, and you can see how I used the chamomile from the herb spiral in this nourishing chamomile skin lotion recipe. Here are a few more ideas I think you might like:
- Herbs to Grow for Skincare
- How to grow Rosemary
- Tips for an English Cottage Garden
- Get a copy of A Woman’s Garden

How to Build an Herb Spiral
Equipment
- garden gloves
Materials
- 125-150 bricks
- garden soil or topsoil
- organic compost such as garden compost or aged manure,
- herb plants
Instructions
- Find the best location for your herb spiral. It should be a convenient walk from your kitchen door, sunny, and, if possible, flat. If you build one on a small slope, level the ground before you begin.
- If the ground is clear of weeds and grass, you can begin building directly on the soil. If not, lay cardboard on the ground, covering everything growing.
- For the most efficient design, herb spirals should be 5-6½ feet (1.5-2 m) in diameter and 23-40” (60-100 cm) in height. If you live in a hot climate, make your spiral on the taller side since it will cast more shadow. The lowest end should be on the north side if you’re in the northern hemisphere and the south for the southern. That ensures that it gets a little more shade and moisture.

- Use bricks, or a sprinkling of flour, to create the outline of the design, ensuring the width of the growing area is at least twelve inches (30cm) wide.

- When you’re satisfied with the layout, begin building. Place a single layer of bricks on your design, then working from the beginning, skip 1½ or 2½ bricks in, and stack another layer, to the end. Keep repeating this until you’ve used up your supply, staggering the bricks to give the structure more strength. My spiral begins with a single brick at the lowest point and works up to seven in the center, but I’ve moved stones around differently to how you might do it. I also did a lot of adjustments at the end, moving bricks around until I was happy with how it looked.

- When you’re happy with yours too, fill the spiral with a 50-50 mix of soil and compost. I’ve used garden soil and composted horse manure in mine, but you could use garden compost, leaf mold, or another type of broken down organic matter to add moisture retention. The fill holds the spiral together, as will the eventual plant roots.
- When you’ve filled it to within a couple of inches (5 cm) from the top of the bricks, begin smoothing the soil. You want a gentle, downward slope spiraling from the top down.
- The last layer is the mulch. It can be anything from pure garden compost to straw but should be one to two inches (2.5-5 cm) thick on the surface of your spiral. Mulch keeps moisture in, excludes weeds, and if you’re using compost, it will also feed the soil and plant roots underneath.

- Water the spiral in, then plant your herbs in their respective micro-climates. Mediterranean herbs like thyme and rosemary at the top, and tender herbs like basil and parsley at the bottom. Plant them directly into the compost mulch, if you’ve used it, and give each plant the space it needs to grow. Water them in and keep the spiral watered regularly, especially during dry spells. Add a layer of compost to the spiral every year after.

Video
I love this so much, but before I start I have a couple of questions for you!
You mentioned laying cardboard if you have grass already, is this permanent & to build on or temporary to kill the grass before proceeding.
Also are you cementing the bricks together? If not is there any risk of the bricks falling out?
Kind thanks in advance!
Hi Katie, the cardboard will only last on the ground for a month or so before worms and microbes break it apart. It’s just there to help kill any grass or weeds, so they don’t grow through. As for cement, it’s not necessary and could actually be bad for drainage. If you build the herb spiral, then fill it, as shown in the instructions, then the soil and compost will stop the bricks from falling in. The bricks are very sturdy stacked that way and it would take a heavy impact to knock the structure down. Also, as time goes on, the soil and plant roots will settle in and help knit the structure together. I had to take the one in the photos apart when we moved and noted how sturdy it was, even under deconstruction!
Oh amazing advice thank you Tanya. I’ll let you know how I get on!
Have fun! I’m sure it will turn out beautifully :)
Hi, I made an herb spiral a couple of years ago after being inspired by yours. It’s been pretty easy and rewarding, however, this year (it’s spring time) I’ve begun having a bunch of fungus/mushrooms growing in it and even between the bricks. We’ve had a lot of rain recently, but is there something I can do to stop and prevent that? Also, will it affect the edability of the herbs? Thanks!
Hi Pamela, in almost all cases, it’s harmless to have mushrooms or fungi grow in your garden beds and planters. It doesn’t affect the edibility of the herbs or vegetables and usually signs of mushrooms will disappear over time. Good healthy soil always contains fungi, and, personally, I’d be concerned if I never saw signs of it! Also, if you put logs, wood chip, or branches at the bottom of planters or beds you’ll most likely see signs of fungi sooner rather than later. Fungi are nature’s clean-up crew for wood, helping break it down into humus.
Do you need to line the interior so soil does not wash out when you water? How does that work to keep the soil in place with gaps between bricks?
Hi Mary, and no, you do not need to line the interior of the herb spiral. I haven’t seen any major issues with soil or compost eroding out of mine, so please don’t worry. Remember, though the bricks look like they have big gaps between them from the outside of the circle, they are nearly touching on the inside.
How much space is required for each type of herb? I am very excited to try to build this and grow my own herbs?
Thank you,
Judy.
Hi Judy, it really depends on the herb and also the variety of the herb you choose. A friend made this herb spiral last year and planted a small rosemary plant at the top. By this spring, the rosemary had swamped the herb spiral! Look at the circumference of the final plant sizes you’re choosing and work out how many you can plant inside. Choose smaller varieties, when possible :)
I look forward to making one in my garden but I was also wondering how you laid out the herbs. I have a few in pots now but since I now have the room for more I was looking for the best way to put them in the spiral.
When you plant your herb spiral, place herbs that prefer drier soil and more sun at the top. Plants that need more moisture and shade go towards the bottom. Don’t plant mint in it, or lemon balm or any other spreading mint-family plant. Otherwise they’ll take over. Have fun with your planting but also keep in mind the final sizes of the plants and try to give them enough room.
This looks so good! What a fun way to add an interesting landscaping piece and some useful herbs!