Safely Cleaning Up After Soap Making
This website is reader-supported - thank you! As an Amazon Associate I earn from qualifying purchases.
How to clean up after soap making, including soapy pans, soap-encrusted stick blenders, utensils, and countertops. We cover both hand washing and dishwashing, and getting your equipment ready for your next batch of soap! This advice also includes ways to reduce mess, avoid irritating your skin, and whether you should use vinegar to neutralize lye.


I love making cold-process soap and have been sharing soap recipes on Lovely Greens for years. It’s more than just using the bars afterward; it’s the entire process of choosing ingredients, bringing them to trace, and then pouring the wet soap into molds. It makes you feel like a million bucks to have made that perfect batch. There’s only one downside to soap making – all the washing up afterward. You really can go through a mountain of pans, bowls, spoons, molds, and other equipment for even the simplest and smallest batch.
Cleaning up after soap making isn’t a fun chore to begin with, but you also have to be careful due to the lye you’ve used. Saponification (the process of oils transforming into soap) takes around forty-eight hours to complete. That means that directly after soap making, your equipment, your countertops, and perhaps your clothing may be covered with an oily and slightly caustic mess. Read on to learn how to safely clean up after soap making.
Wear Personal Protective Equipment
There’s a very good chance you’re reading this right after you’ve made a batch of soap—it could even be your first batch ever. The first thing I recommend is that you put your apron and rubber gloves back on. I recommend putting your goggles back on, too.

Dirty soap dishes, countertops, and other items remain caustic for up to two days. During that time, the residue on them can burn or irritate your skin and contaminate your kitchen. I know this from experience—when I first started making soap, I had quite a bad incident after hand-washing pans and utensils immediately after soapmaking.
I washed them without gloves, and all seemed fine until a few minutes afterward. That’s when my hands started feeling very dry and irritated. They worsened overnight, becoming painful, red, and peeling. Even if your pans are relatively clean before you put them in the dishwasher, they’ll still have caustic soda residue on them. It may not burn you immediately, but trust me, a week of reddened hands isn’t fun. Wear gloves.
Reduce Mess by Working Cleanly
Another important thing is reducing the mess as you work, rather than after. I run soap-making workshops regularly and see some very neat soap makers and others who leave their stations a bit messier. The latter is neither fun to clean up nor safe.

If you’re the kind of person who has spaghetti sauce on the ceiling, then be especially careful when making soap. Splatters of unsaponified soap can contaminate food, burn wooden surfaces, and fly off and land somewhere that a foot or paw could walk through.

Another reason to work cleanly is that any significant amount of soap residue will end up somewhere it shouldn’t. It could be the landfill or down the sink, clogging your pipes and septic tank. Pouring it down the sink may also mean it eventually enters the water system and the ocean. Tidy soapmaking reduces contamination, allowing more of the soap batter to be poured into molds.
Tidy Soapmaking Checklist
- Use a rubber spatula to scrape wet soap out of the pan and off utensils
- Use that same spatula to scrape liquid oils and other ingredients from containers as you work. Try to get every last drop.
- Work on kitchen countertops that won’t react with lye. Marble and wood are no-nos.
- Don’t use vinyl gloves or tablecloths. It’s not resistant to lye or essential oil.
- If you’re expecting a mess, line the countertop with wax paper (greaseproof paper).
- Be careful when stick blending. For small batches, keep the stick blender stationary while it’s pulsing. Only move it around when the blades are turned off.
Washing Immediately or Waiting 48 Hours
Once you’ve made a batch of soap, you have two choices for washing it up. You can do it immediately or wait 48 hours. Though there have been times that I’ve used the wait method, I really recommend that you get it cleaned immediately. There’s no time like the present.

The idea behind waiting 48 hours is that after that time, any soap residue will have finished saponifying and would be safer to clean. However, until that time is up, it will need to be kept in a safe place. I’ve seen recommendations to put everything in a plastic bag and stash it in the garage. Though easy and quick, there are downsides to doing this.

Aside from using a plastic bag, which some people might not like, the equipment is much harder to clean once it hardens. It’s literally solidified on, and everything needs to be soaked before washing. Forget putting it in the dishwasher, either, since that soap will create a creeping carpet of bubbles that will march its way out of the machine and onto your floor. I know this from experience.
The other downside is pure procrastination. Out of sight, out of mind, and you have a bag of dirty soap dishes cluttering your garage for goodness knows how long. Your partner will probably remind you of this regularly as that bag begins to accumulate dust.
Cleaning Stick Blenders
All the tips from here on out involve cleaning your soap-making equipment immediately. Hopefully, you’ve kept your workspace as tidy as possible, but when it comes to soap-making, there will always be a colorful, sparkly mess of some sort. Don’t beat yourself up about it.

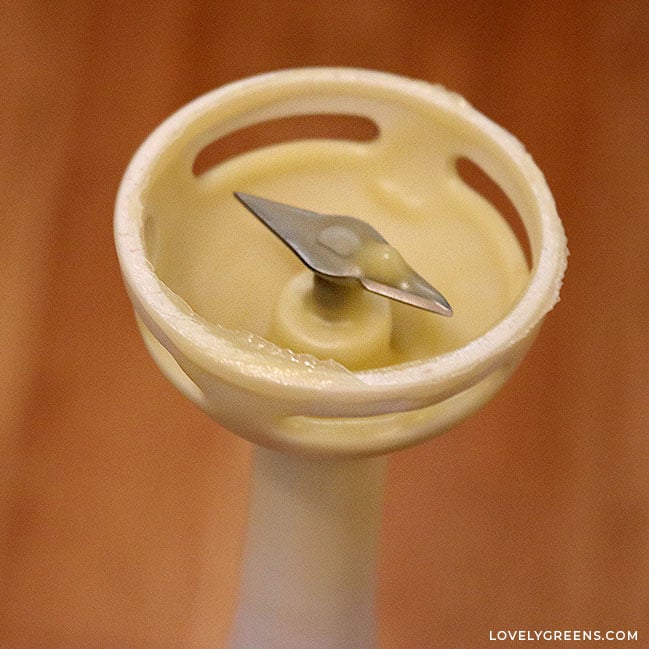
Stick blenders, also called immersion blenders, are extremely easy to clean directly after you make soap. Less so if the soap hardens on them. Use a spatula to scrape the soap batter off the exterior of the head and hopefully into your mold.
Next, fill a jug or a basin with hot, soapy water, and put the head of the stick blender in all the way so that it touches the bottom. Then, turn it on for a few seconds. Voilà, nearly all of the soap batter is out of the head. It may still be greasy after this, so set the head aside for a more thorough wash.
Cleaning Up Soap Colorants
One of the most challenging things to clean up is soap colorants. I personally don’t use dyes, but I imagine they would stain surfaces and clothes. Some spices like turmeric will, too, as will other natural colors, and they love sticking inside jars and containers.

If you use mineral pigments, these too can ‘stain’ but not in the same way. The tiny particles work their way into fabric, enamel surfaces, and even plastic. Some of my little plastic measuring spoons are permanently discolored from minerals, so I switched over to using stainless steel to make clean-up easier.
With colorants, wipe down everything with paper towels and dispose of them. If you have a spill on the counter, try to contain it before spraying and cleaning it. Otherwise, it can smear everywhere.
Prepping Equipment for Washing
To reduce mess and oil getting in your sink and plumbing, wipe down your pans, silicone utensils, metal spoons, and all other equipment with paper towels. Get them as clean as possible before they come anywhere near the dishwasher.

Aside from what happens after it goes down the drain, dirty soaping pans will turn your dishwasher into an oily mess. You’ll probably need to drain and refill it multiple times if you don’t wipe your equipment clean.
Handwashing & Dishwashing
After this, wash your soaping equipment as you’d wash your ordinary dishes—either manually or in the dishwasher. If washing by hand, keep gloves on and ensure that the water doesn’t splash onto your face or arms. It’s still slightly caustic, even if the pans and utensils are relatively clean.

After they’re rinsed, it’s safe to towel-dry and put them away with bare hands. The soap I use to clean dirty soapmaking dishes is either an eco-friendly dish soap or my handmade solid dish soap. Any dishwashing soap will be suitable, though.
One challenge I’ve encountered is that oil tends to stick to the inside of glass jars and plastic jugs. Even after handwashing, they could have an oily residue. You could use a bottle brush to get them squeaky clean, or if you have one, run it through the dishwasher. This does the trick for me.
Cleaning Countertops
After your dishes and equipment are sorted, you need to clean countertops and other surfaces. Again, using paper towels, wipe up any blobs or large messes and dispose of them. Then, spray everything down with your regular kitchen surface cleaner and give it a good wipe-down. Any residual lye on surfaces will eventually react with carbon dioxide in the air and neutralize itself—it turns into soda ash.
Should You Use Vinegar?
Some have heard that vinegar neutralizes lye and wonder whether it should be used. It’s not necessary, but a quick spray-down of counters with simple vinegar kitchen spray gives peace of mind.

For larger spills, please note that it takes a lot of vinegar (Acetic acid) to neutralize lye (Sodium hydroxide). One source estimates that you’d need four liters (about a gallon) of vinegar to neutralize 127 grams (4.5 ounces) of lye.
When you pour vinegar onto lye, also prepare for a lot of heat. That’s why you never put vinegar on your skin to neutralize a lye solution splash. The heat will severely burn you.
Further information
I hope these tips have answered your questions about cleaning up after making handmade soap. If you’re still unsure about something, leave your question as a comment, and I’ll do my best to clarify.

Also, if you’re new to making handmade soap and want to get started quickly, I recommend enrolling in my Natural Soapmaking for Beginners online course. I cover many topics there, including setting up your workspace, cleaning up after soapmaking, and step-by-step soap recipe videos.
Hi, and thank you so much for all your information. I have a friend who set up a soap making operation in my extra room.They are using crock pots. It’s been years since I’ve made any soap. So i’m just kind of assisting and relearning.Ask well as my friend who is learning from scratch.
My friend is of the mind that they are losing product. Instead, wash the crock pot in between batches. The exceptions in my friend’s mind is they wash it when they’re rebatching, or they’re changing recipes. However, if they’re making the same thing several times in a row, they just leave all the residue and start all over again on top of that because they figure, it’s going to melt anyway. Is there a reason not to do that? I mean to me, it just seems wrong. I’ve been looking for an answer to the question.But apparently i’m not phrasing it right and I can’t get the answer i’m looking for
Hi Tracy, good hygiene and soapmaking practices include beginning each batch with clean utensils and equipment. When you leave a soapy residue on items for long, there’s opportunity for hair, dust, insects and other contaminants to stick to it and end up in the next batch. It sounds like your friend is making hot process soap though and making several batches right after one another. In this case, I can understand not cleaning the crockpot basin. However, neither cold-process or hot process soap “melts” in the way that you might think. It will get softer and gel-like but will likely leave little chunks of soap that looks distinct from the soap around it. It would be safe to use but could look unprofessional.
My kitchen counter is a timber slab finished with tongue oil. What can I put down to protect it?
It sounds like a very lovely counter. I, personally, would not risk making soap on it since lye solution and caustic soap batter can permanently damage wood. Is the area around your stove also wood? If so, I highly recommend you setting up a soap making area someplace else in your home. Do you have a basement or garage where you can set up a soap making station? If there’s a sink nearby, it’s best.
Is it safe to wash soap making utensils/pans in the same dishwasher load as plates/silverware/etc?
It’s best to give them their own wash-rinse cycle so that any fragrance/essential oil and other soap additives are washed away. If your question is about lye-covered utensils/pans being in contact with kitchen tools and dishes, that’s fine. Lye does not stick to them and is diluted and washed away during the cycle.
I just finished a batch of soap making and i did it on my wood table with a towel covering it! When I went to wash my things in the kitchen sink I made the same mistake of no gloves and it burned a little. I immediately washed my hands. I am just paranoid of contaminating things in my kitchen while soap making because I live in an apartment and have no other place to do it. Is this a big issue or am I okay???.
Hi Monica, when exposed to air, lye solution reacts with carbon dioxide in the air and turns into sodium carbonate. It’s inert and also known as soda ash — the white powder that sometimes forms on top of soap bars. So to answer your question, dissolved lye that dries out on surfaces turns into harmless stuff if given enough time to react with the air. It also does not permeate surfaces or kitchen equipment.
As long as the supplies are thoroughly cleaned can they still be used for food?
For personal use soapmaking, that’s correct. There’s no valid reason why you should not unless the silicone/plastic has been affected by essential oils. Lye (caustic soda) does not soak into surfaces and if the equipment and utensils are thoroughly cleaned, they will have no traces of soap or soap ingredients on them.
I am just getting started on my soap-making journey and was wondering if, once the dishes have been thoroughly scraped and washed, if the dishwasher can be used to clean cooking equipment as well? Not shared soapmaking equipment, but a shared dishwasher. Thank you, this has been the best information I have been able to find on cleaning up everything!
Yes, no worries about that at all :)
I have been using your soap recipes for a while now. They Are truly my favorites! I use bottled distilled water in my recipes. Some of them have been developing DOS. I always make sure to clean all my soap making equipment 2-3 times. Because I live somewhere with hard water, the water does leave some white residue on my clean dishes. Do you think this could be causing DOS? How do I go about washing my equipment and bowls of this is the only water I have to wash them?
Possibly, but it may be the oils that you’re using. If any of them have a best-by date that’s six months or less from the date of soapmaking, it can lead to DOS fairly quickly.
Would you recommend having a stick blender specifically for soap making or is it safe to use it for food once it’s been washed (same goes for jugs or saucepans)?
A lot of soapmakers will say that you should have separate everything for safety’s sake, including stick blenders. As far as I can tell, this is an opinion rather than based in fact. There’s no residual caustic soda left on pans, containers, implements, and stick blender heads after you’re finished washing them. It’s not a substance that seeps into stainless steel, glass, ceramic, silicone, or polypropylene materials. So to answer your question, I don’t see why you shouldn’t be able to use the same stick blender and containers for soap making and the kitchen. Providing that they are carefully and thoroughly washed.
Does lye not harm the environment?
The small amounts left in soap making pan residue is broken down by natural processes in both soil and water. It’s not a major concern. Here’s more on Sodium Hydroxide (lye): https://www.arkema.com/export/shared/.content/media/downloads/socialresponsability/safety-summuries/Hydrogen-Peroxide-NaOH-Sodium-Hydroxide-GPS-2013-02-10-V0.pdf
Oils can cause havoc in our drains. I was bothered by using so many paper towels so I have moved over to old cloth scraps. After I wipe all pots and utensils with the cloth (approximatley 10″x10″- or whatever size you like) I wash everything with soap and water. After washing everything, I rinse my cloth in the final pot. I do NOT put all that oily water down into my septic, I have the luxury to dump it in the woods. At most it is only a quart of oily water. Nothing in my septic and nothing in my trash. Zero waste. I reuse this cloth many times.
Good tips. I attended a soap making course that should have covered this. At clearing up time we weren’t reminded about protection and although I kept my rubber gloves on, I’d pushed my jumper sleeves up and must have splashed some of the mix on my arm which caused a soreness like a rash later that evening. I emailed the tutor to say thanks for the course and suggested that she remind people of H&S at the washing up stage. She said she covered H&S at the beginning and that was enough. But she didn’t mention clearing up splashes. Another participant also burned his skin. Nothing major but not impressed at lack of care and bullish response, especially considering it was a pricy course with only six people on it. I stick to melt-and-pour at home. It’s also plenty of fun.
I found that spraying with rubbing alcohol and wiping with paper towel is a good way to remove most of the greasy stuff before washing them in hot soapy water.
Good tip. Rubbing alcohol can also be used on work surfaces to clean them up in the same way.