DIY Succulent Planter Using an Old Can
This website is reader-supported - thank you! As an Amazon Associate I earn from qualifying purchases.
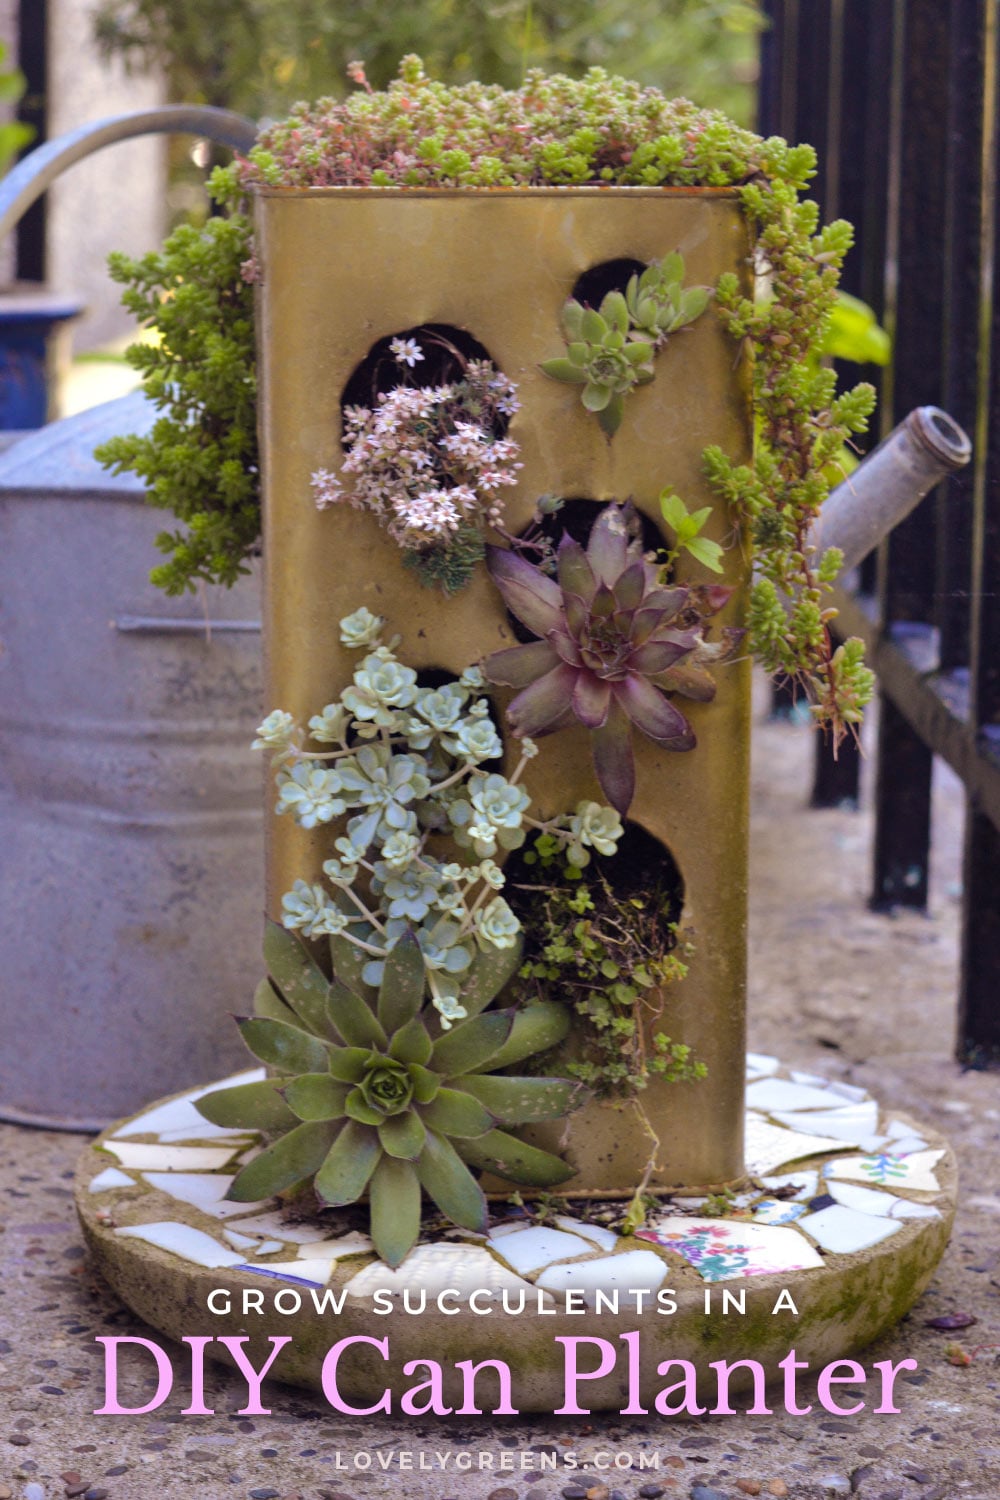
Use large metal cans as containers for succulents! With a few simple tools, you can pop drainage holes in them and use them as is, or create additional openings for plants. These step-by-step instructions will show you how to create a DIY succulent planter with six openings on the vertical side. It’s a beautiful piece that will look incredible in your succulent container garden.
Many old food containers can be converted into planters, and large metal tins are one of them. They can last several years in the garden, help retain moisture, and are cheap to source. Sometimes, you can find them at the recycling center or at restaurants. You can also buy them yourself, as with large tinned food, cooking oil, and coffee. They’re handy to use for storage and in the garage, but you can also use them to make handmade planters.
Metal tins are safe for plants, and they give you a way to grow plants without having to buy a pot. You can also cut holes in them so that you can plant several different types of plants in them at once. All you need to make this succulent planter is one large tin can. The bigger, the better. You’ll also need a few hand tools, potting mix, succulents, and, optionally, spray paint. It’s a great DIY project for giving old containers new life and looks great, especially when the sun hits the metallic surface.
Cheap Containers for Succulents
If you grow plants in containers, you’ll know how expensive planters can be. Fortunately, we can recycle lots of food-safe materials into handmade pots. Plastic, wood, and even metal. One material that’s easy to source and a good size for planting is large tin cans. Many restaurants buy oils and bulk foods in them, and they often hold a gallon or more of potting mix. If you ask businesses nicely, you can often get these cans for free, but you can also find them at a recycling center or a food wholesaler. I sometimes buy them for soapmaking, especially for my olive oil soap recipe.

Using Tin Cans as Planters
You may wonder if it’s safe to use tin cans as planters. Yes, it is! Metal does corrode and rust over time, but it’s safe for plants to grow in. My metal planters tend to rust at the bottom and break apart after a few years, but if you’re sourcing tin cans for free, who cares? By that time, the plant(s) will need to be repotted anyway, so you can use the opportunity to make a new tin can planter.

Choosing Succulents
Succulents are a wide and varied group of plants that seem to thrive pretty much anywhere they’re thrown. They grow well in lots of different situations, including containers, the ground, and places where other plants may struggle. In my garden, they grow happily on rock walls or in the cracks between paving stones. In decent soil, they can do even better.

When sourcing succulents for this project, you can use any type that will survive your region’s outdoor conditions. Those that are already growing outdoors are among the best, not only because they’re free but also because they’re suited to your climate. Succulent cuttings are easy to take and root easily if you push them into soil or potting mix.

For this succulent planter, I recommend choosing small types if you can, but larger types if you would like. They’ll outgrow the planter quickly, but you can trim any excess growth and replant it elsewhere.
Larger succulents, like echeveria and sempervivum (hens and chicks), also look great in contrast with mini succulents, such as sedums and crassulas. Using a variety of succulents that are different colors will also give your planter a real wow factor! Use what you have, though, and propagate what you can to save money.
Project Materials and Tools
- A large metal can
- An electric drill/driver
- Drill bits for metal (gold in color)
- Tin snippers
- Metal file
- Can opener (if the top needs opening)
- Succulents
- Metallic spray paint
- Potting mix
Make Openings in the Can
This succulent planter has an opening on the top and six openings on the side that plants can grow through. If the can you have has a top that needs removing, use a can opener. After that, make holes in the side of the can. If your can is round, you could do it all the way around. If it’s square, like mine, you could make them on just one side.

I estimate that the holes I’ve made cover about twenty percent of the vertical surface, and you could aim for that, too. It’s worth considering that the more openings you make, the faster the potting mix inside will dry out.
To make holes on the side, start by marking them out with a Sharpie. Next, drill holes all around the hole you’ve marked, and then snip the metal disc out with the tin snippers. My holes are about two inches in diameter. You could also use round-hole cutters that attach to your electric drill to create perfect holes, as long as the bit is suitable for metal. Many are meant only for wood.
Filing the Edges
After you cut them, the openings will likely have jagged edges. For safety and aesthetics, smooth them with a metal file. Wear gloves when you do this, and push the file away from you and towards the inside of the can. It doesn’t take long and gives you a smooth finish that’s safer to work with.

Adding Drainage Holes
Water needs an easy way to drain from the planter, so next, make some drainage holes. Use the drill to create small holes all over the bottom. I’ve made ten in mine, and they’re about an inch and a half apart. You can create even more if you wish, but don’t do less than this. Wet soil and potting mix contribute to root rot in succulents, so the more free-draining it is, the better.
Painting the Planter
The last step to creating the succulent planter is optional, but it’s a beautiful finishing touch. Though the brand print on the can might be fun to keep, you can spray paint over it, too. Some paints will help protect the metal for longer, and you can choose a color that matches your current decor.

I used metallic gold spray paint on mine, but you could use a different color. All you do is turn the planter upside down on a piece of cardboard and spray as directed. Spray only the outside of the tin and leave it to dry completely.
Fill the Planter with Potting Mix
After the planter is made and painted, it’s time to plant it. First, fill it with a free-draining potting mix and firm it gently. A special succulent and cactus soil is best, but you can also use a multipurpose potting mix. While you’re filling, it may come out of the holes in the front, but keeping the planter at an angle will help. I also recommend covering the surface you’re working on with cardboard or another material to make any spilled potting mix easy to clean up.

When it’s filled, turn the planter upright and press the compost down from the top. Add more potting mix and press again until it comes up to about half an inch from the top opening. Turn the planter back on its side with the holes facing upward, and block the top opening with something to keep the potting mix in place. A piece of wood secured with a string works well. Please don’t use tape, as you can see in my photo. When I removed it, it took the paint up with it, and I had to repaint the planter.
Planting With Succulents
With the planter on its side, fill the holes with succulent plants. Press them in gently and add more compost to tuck them in. Water them through the holes, then let the plants grow for at least a week, if not two, keeping them moist and in a warm, sheltered place. If you give them that time, they’ll anchor themselves in with roots and won’t fall out when you turn the planter upright.
DIY Succulent Planter
After the plants have established, gently turn your planter upright and remove the covering from the top. Plant it up with more succulents, and then place your recycled piece of living art somewhere that everyone can enjoy.
Mine is by the front door and brightens my mood each time I see it shining in the sun. No doubt the metal will rust over time, but that will only add to its handmade, recycled charm! Eventually, the container will need to be replaced, but I expect this one to last at least a couple of years.
More Succulent Ideas
Succulents are fun and easy-to-grow plants, and you can even grow them indoors. They need careful watering and misting to create humidity, but they do well in glass terrariums, small planters, and even larger pots. Here are some indoor succulent ideas to get you started:
- Sea Glass Succulent Terrarium
- Repotting Aloe Vera Babies (dividing aloe pups from the mother plant)
- Planting Succulents in a Wood Box
Hi Ann Katelyn — If you drill holes for drainage then it will leak when watered. If you don’t, then the bottom might rust? Maybe lining the inside with the bottom with a plastic lining might help though. The best way to find out is to try it and see if it works :)
Super cute and clever. This would make a great gift!
It would if you could bear to part with it!