DIY Self-Watering Planter (Step-by-Step Instructions)
This website is reader-supported - thank you! As an Amazon Associate I earn from qualifying purchases.
How to easily convert a plastic container into a DIY self-watering planter. With this self-watering system, you fill a reservoir through a side pipe, and it wicks moisture up to the potting mix above. It can dramatically cut down the time you spend watering, and you’ll also use less water since there’s little to evaporate from the surface. This is a great beginner project for those with travel plans or who want to save time in the garden.

Keeping plants watered is one of the biggest challenges when growing a container vegetable garden. It’s often difficult to gauge just how much moisture is inside a pot and whether it needs watering. Often, plants end up getting over- or underwatered, which leads to poor yields and sick plants. It can be incredibly frustrating. Then there’s the dilemma of what to do if you have summer travel plans or are growing crops inside a hot greenhouse or polytunnel. The solution to all these problems and more is to grow crops inside DIY self-watering planters.
With just a few tools and materials, you can convert practically any closed-bottom plastic container into one. Once made, you plant into the top, as you normally would with a container. There’s a pipe that juts out of the side, though, and you can pour water into it to keep the water reservoir at the bottom filled up. Instead of having to waer every day in summer, you can get away with watering once a week!
In this easy project, I share how to make a large self-watering planter, and the finished item will cost far less than a ready-made one. It’s meant as an outdoor container for growing vegetables or flowers, and it includes a full DIY video that shows you each step and the materials in detail.
Benefits of Self-Watering Planters
Self-watering planters save more than just time. They ensure the potting mix in your planters has the right amount of moisture and save water, too. This is good news since many of us are experiencing hotter, drier summers and have to find ways to be more economical with water in the garden. The reasoning is that because you’re not watering from the top of the planter, there’s less moisture to evaporate.

It stays at the bottom of the planter and lower levels of the potting mix. The top of the potting mix in self-watering planters often looks dry, and that’s because it is. The water is further down where plants’ roots need it most. Because the top of the potting mix is drier, it helps stop weed seeds from germinating there, too.
How a Self-Watering Planter Works
I’ve created this DIY self-watering pot to be as simple and economical as possible. I used mainly materials and tools that I already had on hand, and I urge you to do the same. If you don’t have one particular material or tool, you can use others once you understand how the system works. Basically, you create a hidden water chamber at the bottom of a planter. Through potting mix set in a perforated plant pot, this reservoir wicks moisture up and into the potting mix held above it.

The landscaping fabric, drain pipes, and plant pot I used to create this reservoir could be made with other items, though. Perforated empty drink bottles or solo cups, for example. The point is that you’re trying to create a water reservoir that holds a decent amount of water while being sturdy enough to hold the potting mix and plant up above it. Waterlogged soil isn’t good for plants and can cause root rot. However, the instructions and materials I use in this DIY project will ensure this won’t be an issue.
Planting a Self-Watering Planter
Once you’ve constructed this planter, you’ll need to fill it with a potting mix suitable for vegetables. Potting mix is a soil-less medium made from various materials and nutrients, such as compost, coco coir, perlite, and nutrients, depending on the brand. For vegetables, I use peat-free potting mix (confusingly called peat-free compost in the UK) that’s either marketed as multipurpose or for vegetables.

I also sprinkle organic fertilizer, such as chicken manure pellets, into the potting mix for especially hungry plants. Potting soil is often a different material that does not include soil. It’s not ideal to use actual soil in containers since it’s very heavy, dries out quickly, and compacts.
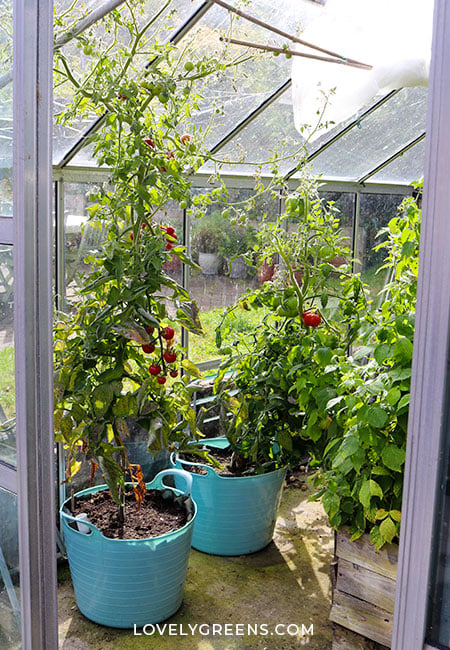
Once you’ve filled your DIY self-watering container with a potting mix, plant it like any other planter. Seeds are probably less suited for it unless you keep them watered from the top until they germinate and establish. Plants like tomatoes, melons, cucumbers, eggplants, or peppers are perfect for the size container I created for this project. It has a 40-liter (10.5-gallon) capacity, of which about a quarter to a third is the water reservoir. One large plant or several small ones would be a good choice.
Using this DIY Planter
Once planted, you’ll need to water your self-watering container far less than a standard container. How often you refill the water reservoir depends on the temperature and how much water the plant uses. Each scenario is different, and you’ll need to work out how many days you’ll need to top yours up. Once a week in summer is probably about right, and in spring and autumn, it could be far more time.

Fertilizing is probably a big question I’ll get with this project. If you’ve used fresh potting mix and have a quite young plant, you don’t need to fertilize initially. After a couple of months, you may want to give the plant a boost, though!

I mentioned chicken manure pellets earlier, and I’ll work them into the lower levels of the container so that plants’ roots can access them when they get large enough. If you want to use a water-soluble fertilizer, I recommend mixing it in a watering can and applying it to the top of the potting mix. If you put fertilizer in the water reservoir, it could turn the water into a murky, stinky swamp.
Smart Watering Ideas for the Garden
- How to Make DIY Ollas (low-tech plant waterer)
- Get a Self-Watering Raised Bed for your deck
- Water-Saving Tips for the Vegetable Garden

DIY Self-Watering Planter Step-by-step Instructions
Equipment
- hacksaw (or hand saw)
- electric drill (with a large drill bit)
- lighter (optional)
Materials
- plastic garden tub Optionally, a plastic planter, bucket, or container of any size. It must have a closed bottom.
- plastic plant pot The height should be 1/4 to 1/3 of the height of the plastic garden tub.
- perforated land drain pipe or more plastic plant pots the same height as the main one above.
- PVC pipe 1" diameter. Length should be 1-2" longer than the height of the garden tub.
- landscaping fabric or another fabric that will stop potting mix from getting into the water reservoir.
- potting mix (for vegetables) I'm using a peat-free multipurpose mix suitable for most crops.
Instructions
- Assemble the materials and tools, and if the tub or container that you're using is large, place it in its permanent place. It will get very heavy once filled with water and potting mix.
- Use a nail (or other device) to perforate the plastic plant pot with several rows of holes around it. The point is to allow as much water inside as possible while still keeping the pot sturdy. If you use a nail, heating the tip with a lighter will make it much easier to use to poke holes through plastic.

- Using a hacksaw (or another saw), cut the perforated land drain pipe into pieces the same height as the plant pot. Cut as many pieces as you can fit into the bottom of the garden tub with the plant pot in the middle.
- Cut the PVC pipe to be 1-2" taller than the garden tub. A hacksaw works great here, too.
- Place the plant pot and pieces of land drain pipe in the bottom of the garden tub. Using a drill, create a single hole at the same height as the tops of the pipes/plant pot. This will work as the overflow hole, and will stop excess water being in the planter.
- Place the PVC pipe inside the planter at the edge and at a slight angle. It will act as the planter's watering pipe. If your planter has handles, I recommend placing the pipe against one of them. It'll come in handy as a watering can support.
- Line the planter with landscaping fabric, pushing it down into the plant pot in the middle and around the PVC pipe. The fabric sits on top of the land drain pipes and should come up to the edge of the garden tub, at the very least. This liner is important since it keeps most of the potting mix from getting into the water reservoir.
- Pack the plant pot (now lined with landscaping fabric) with potting mix. This pot and potting mix will act as the wick for the water in the reservoir.
- Fill the rest of the container with potting mix up to an inch from the top.
- Trim the landscaping fabric so that it's flush with the top of the planter.
- Fill the water reservoir by pouring water through the PVC pipe. Keep filling until you see water flowing out of the drain hole. This is how you'll continue to keep your DIY self-watering planter filled with water.


Does your method work? Would have been nice to see the pot a month later with plants.
Question: How close does the bottom of the plant (the roots) have to be from the reservoir for wicking to occur?
It does! I’ll try to update this with photos, soon. You can see them throughout the growing year in videos on my YouTube channel from last year, though.
This looks great, I love the colour of the buckets!
Just one question though—are the poked holes in the pot so necessary? I would assume the holes at the bottom and the pressure of the water in the reservoir would do the job without the holes on the sides.
Hi Lara, the holes at the bottom of the plant pot help quickly saturate the potting mix inside. I understand what you’re saying about the holes at the bottom might being good enough for the job, but I feel that the holes make it far more effective and efficient. They’re not hard to make, either.