How to Make DIY Ollas (Terracotta Watering Pots)
This website is reader-supported - thank you! As an Amazon Associate I earn from qualifying purchases.
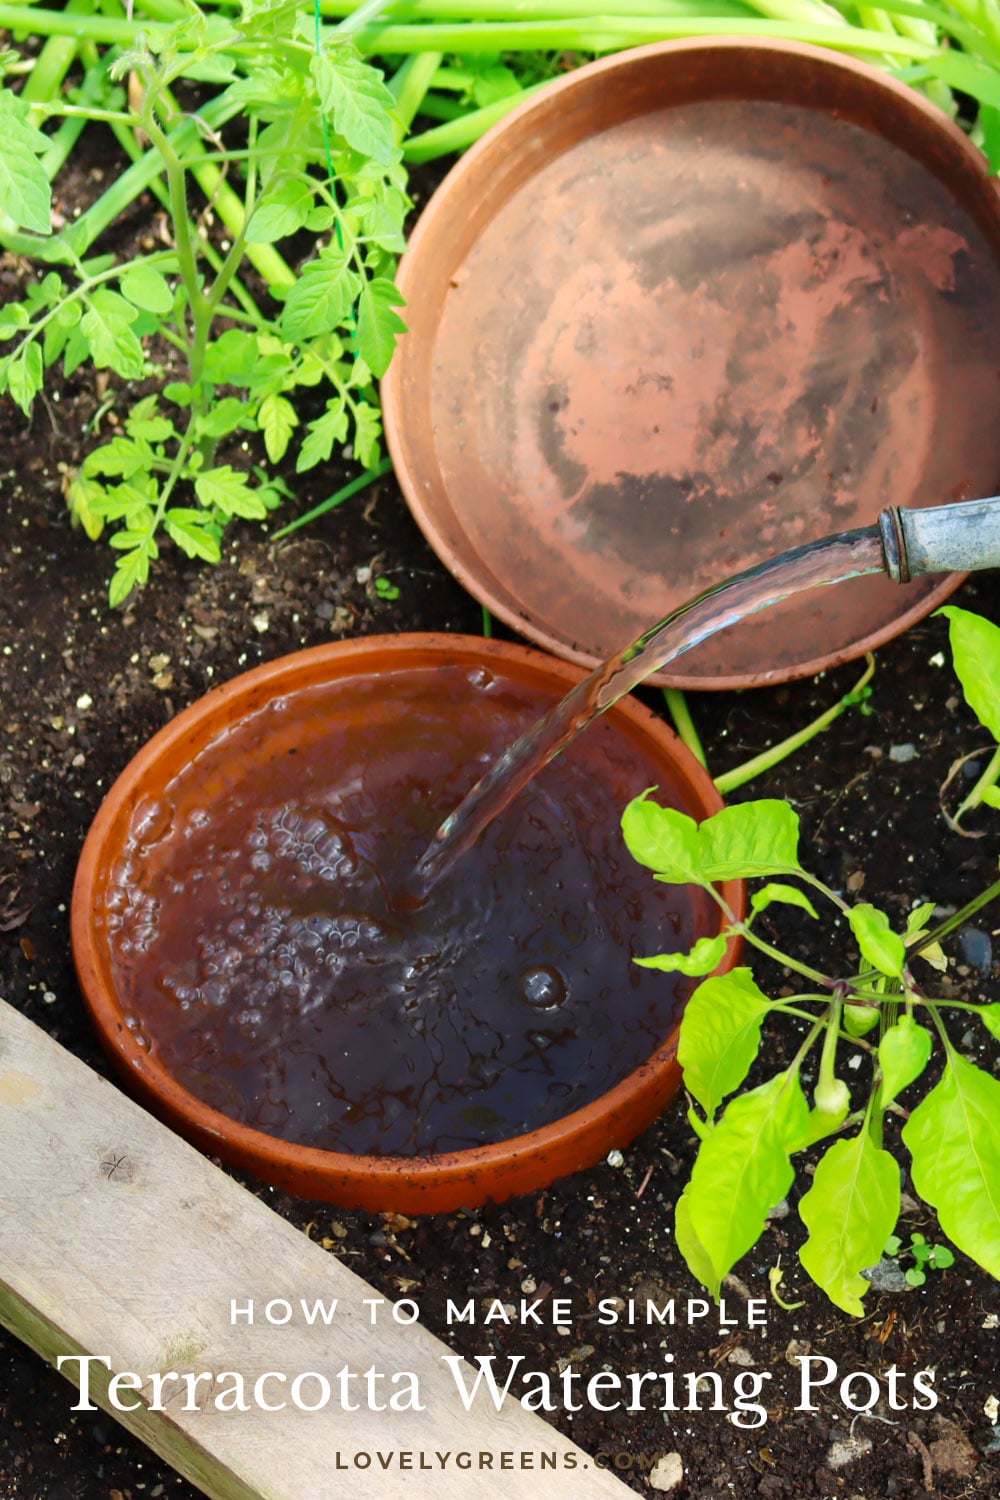
Ollas are terracotta watering pots that you can use to keep crops watered, even in drought-like conditions. You bury them in the soil near where plants grow, fill them with water, and they slowly release water to plant roots through the pot’s porous material. Here’s how to make your own DIY olla using a terracotta plant pot, tips on using it, and an alternative olla pot system that you can purchase.
Keeping plants and the garden watered through the growing year can be one of the most challenging aspects of gardening. It takes time, often needs to be done daily, and can even be difficult physically. Then there’s water wastage. Much of the water released by sprinklers is lost to evaporation, and using them, especially in arid regions or under such conditions, is not ideal from a water-conservation perspective.
One great way to keep plants watered while saving time and water is by using ollas (pronounced “oh-yahs” or “oya”). They’re an ancient but simple invention that uses unglazed terracotta pots buried in the soil near crops. Thanks to the porous nature of terracotta, they slowly release moisture to plant roots underground. We can even use this invention today by inexpensively transforming plant pots into DIY ollas.
Ancient Terracotta Watering Pots
Ollas are a low-tech watering system for all types of plants and gardens. They’re not a new invention; evidence shows that ollas have been used to water crops for over 4000 years. They likely originated in China and northern Africa and then spread to the New World and other regions. In Spanish, olla means “pot” or “cooking pot,” but the word’s use dates back to its Latin roots. Ollas used in agriculture are unglazed clay pots used strictly for underground irrigation.
You can use olla in traditional garden beds, raised beds, container gardens, planters, planter boxes, and even indoors. However, their most common use is in the vegetable garden. Pumpkins growing in the ground benefit from them, as do tomatoes growing in the greenhouse. They’re useful for growing any vegetable that needs a lot of moisture or grows in soil that dries easily. Small ollas, called plant watering spikes, are even becoming popular for houseplants.
Did you know that unglazed clay vessels can be used as low-tech air conditioners and refrigerators? They’re called zeer pots and work through the moisture on terracotta pots evaporating in hot temperatures. This process cools the air around the pot, much like sweating helps to cool our bodies.
How to Use Ollas
To use ollas, you bury them in the soil so that the water they contain sits at the same level at which a plant’s roots grow. Traditional ollas look like urns with a large, round reservoir for holding water and a narrow neck. Sometimes, the neck is short and flush with the top of the reservoir. Sometimes, it’s long, so the olla is better at watering deeper roots. Either way, you bury them so that only the top inch or two pokes up from the soil.

You then fill them with water and seal them with a lid to stop water from evaporating from the top. For the DIY option, this lid is a plant saucer. For modern commercially-made ollas, it could be a terracotta or plastic lid. Underground, the water in the pot travels through the terracotta, moistening the surrounding soil. If plant roots are within reach, they’ll grow up to the pot and latch onto it, drawing moisture directly from it. It’s a brilliant idea, which is why I feature ollas in The Best Way to Water Your Vegetable Garden.
How Many Ollas to Use
If you’d like to use DIY ollas throughout your garden, plan to have one large (1-gallon) olla per large plant, two medium plants, or a circular row of smaller plants around the pot. That can mean quite a few ollas, but you’ll have more space to work in an open-ground garden. Raised beds will have less internal space, so you want to ensure plants have enough room for their roots to grow. You’ll need a more creative planting design or get a drip-fed olla system like the one I use in my polytunnel raised beds.

Ollas are best suited for watering large vegetable plants such as tomatoes, eggplants, and beans. They’re also great for watering young trees and shrubs in their first year. You can grow smaller vegetables around them, too, but you’ll need to plant them within a couple of inches of the pot. I’ve squeezed five lettuces around a large one before and two chard plants around another. I also found that watercress thrives around ollas. They love moist soil, and I have a big sprawling plant growing around an olla in one of my Birdie’s beds.

The best way to use ollas is to place a large one within the roots’ reach of one to three vegetable plants. For example, a single olla with a gallon (4 liters) capacity per pumpkin, two tomato plants, or three bean plants.
Bury the olla in the ground before planting your vegetables to prevent damage to their roots. Then, all you have to do is keep them filled with water and the opening covered. The cover keeps water from evaporating and stops small animals and insects from falling in and drowning.
Water Seeps Through Terracotta
Ollas are always made from unglazed terracotta, and both sides of the pot must be unglazed. They could be custom-made pots, spikes, cups, or inexpensive terracotta plant pots. Though the material looks solid, terracotta’s structure is like a microscopic mesh that allows moisture to seep through. The amount of water that seeps out is subtle but enough to wet the soil around the pot over time.

I shared a timelapse showing how this happens a couple of years ago. It doesn’t take long for a terracotta pot filled with water to become damp outside. As the soil around the pot absorbs moisture from the damp pot, the wicking process begins. The drier the soil around the pot, the faster water travels from inside the pot to the soil.

This wicking is done through a process called soil moisture tension. The soil’s moisture level wants to be similar to the moisture level inside the pot. So, if it’s been raining and the ground is wet, the water stays in the ollas and isn’t drawn out. When the soil dries out, water is drawn through the porous terracotta into the soil. Usually, the moisture doesn’t travel far from the pot and is concentrated in an inch or two around the olla.

How to Make DIY Ollas
Equipment
- spade (to dig the olla into the ground)
Materials
- unglazed terracotta plant pot 2 quart (2L) capacity or larger
- plant pot saucer plastic is best, but terracotta works
- mounting putty or a champagne cork, concrete, or another material to fill the plant pot's drainage hole
Instructions
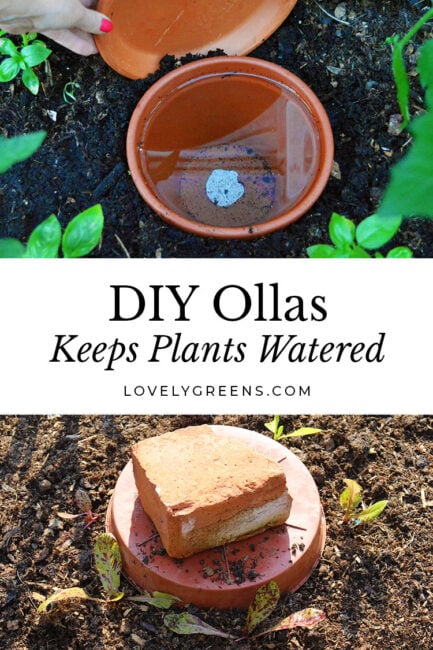
- Choose a terracotta plant pot that can hold at least two quarts of water. A larger sized olla can last much longer between refillings. Smaller ollas can be more effective for smaller spaces and raised beds, though. Also, ensure the pot is unglazed – no paint or glaze on any part of it. Otherwise, it will not work as a DIY olla.
- Most plant pots have a drainage hole at the bottom. Fill this hole so that water cannot leak through. I've tried various materials, and my favorite solutions are non-toxic mounting putty and a champagne cork. You could remove either and use the pot used for plants again if you want to. Duct tape works, too, as does moldable putty which hardens. A more permanent solution is to fill the bottom of the pot with concrete*. I made one like this seven years ago, and it works a treat!

- Next, bury the pot in the soil within about 6-12" of where you plan on growing a plant. Ensure that the neck of the pot is above the soil surface.
- Fill the DIY olla with water and cover it with a lid. I used terracotta plant saucers in the past, but I've found that plastic ones work much better.
- Plant your crops within range of the olla and keep them watered from the surface until they're established. Keep the olla topped up that entire time so that the plant senses the water source and can grow roots towards it.
- Top up the olla so that it never fully empties. The frequency of filling times varies based on the size of the olla, time of the year, number of plants planted around it, and other factors.

Video
Notes
Ollas Water Plants Underground
It used to be that many of us could only see ollas in museums. However, they’ve caught on in the gardening community over the past few years, especially among people who garden in arid climates. Spain, the South of France, Mexico, Arizona, and California—these are places where ollas can make a real difference in the garden. I live in a temperate climate, though, and I still find ollas extremely useful. I mainly use them in my greenhouse and polytunnel, but they’re useful outdoors, too.
Instead of watering the soil’s surface, ollas help you deliver water directly to the roots. That means you can bypass watering the soil around plants and stop losing moisture to evaporation. Though you can now buy very effective and modern olla irrigation systems, ollas are also easy to make from inexpensive terracotta pots. That makes them simpler, more accessible, and potentially more cost-effective than drip irrigation.
Ollas are still regularly used in arid regions like India and Latin America and are especially effective at helping grow water-hungry crops like squash. If an olla is buried within reach of the plant’s roots, you don’t need to rely on rainfall to keep the plant watered.
The Best Way to Install Ollas
When installing ollas, it’s best to bury them in the ground first, then plant crops near them. That way, you won’t damage plants or root systems, and you can get your spacings right. If a plant’s roots grow long enough to reach an olla, it can benefit from the moisture it provides. If the roots can’t grow that far, the olla won’t help the plant. Regardless, you need to water the plants manually until they grow large enough to develop an extensive root system.

Also, ensure that the neck or rim of the olla pokes up from the ground when you bury it. This makes it easier to fill and helps keep soil from falling inside. Once filled, ollas work because plants sense moisture and grow their roots towards it. When I dig up ollas from around my tomato plants, the holes left are completely lined with roots. Seeing that has made me realize that the plants’ roots get moisture not only from the soil around the pot but also from the pot itself.
Distance Between Ollas and Plants
Ollas need to be reasonably close to plants for them to work. If they’re not within reach of a plant’s roots, the olla cannot benefit the plant. This means you’ll need to understand the root system sizes of different crops. Also, some crops have big root systems that will swamp out other plants. You may intend to use a single olla to water multiple plants, but it could turn out that only one benefits.

In my garden, I tend to place one medium (2-quart) DIY olla between two tomato plants. So that’s one olla servicing two plants planted two to three feet apart. I’d use one large olla (1 gallon) per plant for those that need more growing space, like squash, melons, and pumpkins. I recommend spacing DIY ollas a foot away from most larger vegetable plants.

I sometimes also use DIY ollas to grow smaller crops, like lettuce or basil. Once it’s buried, you can plant seedlings or sow seeds around the pot’s edge. Since their root systems are smaller, lettuce, leafy herbs, and other salad greens must be within a few inches of the olla. Four or five plants per olla is fine if you can still get the olla lid up to water it. If an olla is so close to a plant that it’s difficult to open and fill it, it could be an issue.

Spacing is more Flexible with Olla Cups
Not only do I use handmade ollas, but I also use purchased ones. When I installed the Thirsty Earth olla system, I buried the cups, zigzagging them along my raised beds about two feet apart. Each year, when I plant the beds, I place the young plants about six inches from them. Most could be a little farther away, but it’s a space-conservation decision, too. The tops of the ollas often get covered in bushy plant growth, but this is not an issue. The cups are drip-fed from lines, so I don’t have to water each one manually.
What Size Plant Pot to Use
Traditional ollas are often large pots holding anywhere from one to eleven liters (one quart to three gallons) of water. If you’re in the market to buy ollas, the bigger, the better, in my opinion. Solitary one-liter ollas aren’t that big and would probably only be suitable for a single Swiss chard plant (or similar-sized plant). Try to use it with a squash, and you’ll be refilling it every day in the summer. Not much time-saving there.

For DIY ollas, the pot you choose should ideally hold at least 2 quarts (2 liters). A full gallon (4 liters) is even better. Smaller containers need to be filled with water more often, and the smaller surface area means fewer roots can attach to the pot. If you use smaller pots, they probably won’t be as effective. In addition to needing to be filled more often, they won’t be able to water as deeply.
When to Fill Ollas with Water
Your plants will stay watered if you keep your ollas topped up. The surface soil might look dry and dusty, but the underground water reservoir keeps your plants from going thirsty. How often you fill ollas depends on their size, the time of year, the plants using them, and how dry the soil is. On a hot summer’s day, a small olla placed next to a water-hungry plant can empty quickly. Larger ollas can hold more water and don’t need to be refilled as often.

To understand how often to check your own ollas, it’s best to check in on them regularly throughout the growing year. Your garden, climate, plants, and ollas may be different from mine, so they may need a different watering schedule. Figure that out, and you’ll know just how long you can leave them without topping them up. That could be very useful for when you’re planning a trip. Another thing to know is that the type of lids you use can impact how often you’ll need to fill your ollas. A terracotta lid will allow more evaporation than a plastic lid.

As for the DIY ollas I make, they are eight inches in diameter and can hold just over two quarts (two liters) of water. In spring, I bury them in the beds where I grow my tomatoes and check the water level regularly. In the height of summer, the water levels in the ollas can drop by about an inch a day. Ollas buried in containers tend to lose water quicker than those in the ground, so you may find that the same ollas need less refilling in your garden.
Buy Thirsty Earth Ollas
If you want to start using ollas, there are a few options. You can make them yourself using terracotta plant pots, which is both easy and inexpensive. If you’d prefer, you can also buy olla pots and olla watering systems. Individual olla pots can be beautiful but very pricey. I decided against them when considering an irrigation system for my polytunnel.
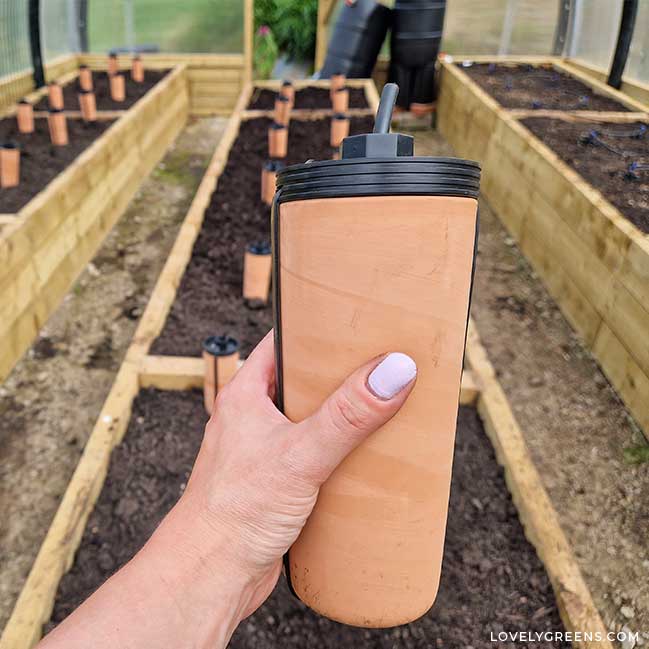
Instead, I installed the olla watering system from The Thirsty Earth. They’re a system of small olla cups connected by gravity-fed lines that distribute water from a larger reservoir or your mains. That way, you don’t have to fill each pot yourself.

The cups in the Thirsty Earth system I use hold only half a liter (2 cups), but they’re constantly fed water via a drip line. As long as the big water reservoir they’re attached to is full, the smaller cups will be, too. In the summer, I fill the big tanks that feed the olla cups once every 7-10 days. In spring and autumn, there are longer gaps between fill-ups.
If you get them too, you’re welcome to use my discount code lovelygreens for 10% off.
Using Fertilizer in Ollas
I’ve also been asked if you can put plant feed into the water. This may seem clever, especially if you make DIY fertilizers, but I’d advise against it. The nutrients will pass through the pot’s walls with the water, but they’ll also stew in the pot, making for a pretty nasty experience when you open the olla up next. Best to apply liquid plant feeds directly to the soil using a watering can.
Overwintering Ollas
Once buried, you can leave ollas in the ground if your soil doesn’t freeze in winter. If it does freeze, lift the ollas and store them in a dry, frost-free place. Terracotta left outside will absorb moisture, and if it gets cold enough, it can freeze, crack, and break. You can rebury ollas in spring before planting.
More Smart Gardening Ideas
- 70+ Perennial Vegetables to Plant Once and Harvest for Years
- DIY Self-Watering Planter (easy project)
- How to Use Black Plastic to Kill Weeds
- Make DIY Seed Starting Containers
simplicity and logic is best
My ollas drain fast. A few are thin walled, and I wonder if I can coat them with an oil or paint to slow the water seepage or loss.
thank you Andy
Hi Andy, do you have commercially-produced ollas or homemade? In any case, coating them with anything would reduce how effective they are for plants. It would be better to keep them topped up or to make ones out of thick terracotta pots.
I used this last year with great results. I tried both duct tape and plumbing putty. The duct tape stuck to about 50% of the pots. That’s when I replaced with plumber’s putty and that worked fantastic. Looking forward to the day I commit to a Thirsty Earth system :)
The [eafl id="93499" name="Thirsty Earth 10 Cup Set" text="Thirsty Earth system"] is an easier way to use ollas, but definitely an investment. I’m glad to hear that you’re getting on with the DIY ollas and thank you for the duct tape feedback!
Duct tape would be okay for flowers, but it’s not food safe at all. I looked at a lot of materials to see if they are food safe and settled on the kind of paraffin wax that’s used in canning. I’m not sure how it will hold up, but it’s completely safe to use around food plants. I’m getting increasingly nervous about the chemicals that go into garden watering products, especially those made of flexible plastic.
Hi Tanya – this website and your advice on Olla pots and it’s use is the best I’ve read – so informative and the additional Qs & As at the bottom of the page are great!
I was given several Olla pots as gifts which worked great in London, UK- you would think we got enough rain but no – my garden and raised beds dry out so fast even with a good combination of soil mix and mulching and regular watering in the Summer.
After discovering your website and needing more Olla pots and not want to pay those very high prices, I used my existing terracotta pots and with delight, most worked but 2x do not – they looked the same as the others but just do not need filling up so not irrigating the soil, I read below of soaking in vinegar and water and will try that immediately but if it does not work do you have any other solutions of how to remedy this please? Many thanks.
Hi Meritta – happy to help! Custom-made ollas can be unaffordable but it’s so easy to make them from terracotta pots, as you’ve seen. As for the two pots that don’t seem to be working – the pores seem blocked by something. Possibly an unseen treatment to the outside? Try the vinegar soak then let the pot completely dry out and test that it’s working like I do here. If the pots don’t get wet on the outside, I’d reserve them for plant pots and get new terracotta pots from the garden centre.
Terracotta pots should not be overfired to fulfill their purpose. If they are overfired, they become less porous, or rather, much less porous, which will prevent your plants from getting the water they need.
When you order your pots from your trusted potter, tell them they are for watering plants, and they will fire them to the appropriate temperature for this purpose.
Las macetas de terracota para que cumplan su función no deben estar cocidas en exceso. Si están muy cocidas dejan de ser porosas o, mejor dicho, son muchísimo menos porosas, lo que hará que tus plantas no puedan conseguir el agua que necesitan.
Cuando ordenes tus macetas a tu alfarería de confianza diles que son para regar plantas y ellos las coceran al punto adecuado para esta finalidad.
Can I add soluble or liquid fertiliser to the olla water? Does it leach through in the same way?
Technically, yes, but the entire inside of the pot would likely become a cess pit of bacteria, slime and other filth. I wouldn’t recommend it.
We’re trying these out for the first time this year so far I’m loving it (as are the squashes we put them with). One question- the roots of one of my courgette are invading its olla pot – do you think it matters? Thanks
All of your plants will grow their roots right up to the pot with time. They’re like moisture-seeking missiles! It’s completely normal and what you want :)
You are mistaken about the origins of the word “olla.” Rather than Latin, “olla” comes from Arabic. In Arabic, “olla” is the word for the large clay vessel we know with the same name. It’s an old Arabic word that is still used today. I’m interested to know the source of this word’s incorrect etymology. These vessels are still commonly used in the Middle-East for farming and also have a more visible everyday use that has changed very little for centuries. “Ollas” were the drinking fountains of the ancient past. Today, as back then, they are often placed on stands at corners or near homes or shops. They are filled with water and outfitted with a cup or dipper for the public to drink from. Since the Middle-East is very hot one can understand the utility of this custom. Thank you for your post.
It is Arabic but spread through Latin to Spanish, as did many other words. So you could say it comes from Arabic via Latin and Spanish to be most accurate.
I made ollas for my tomatoes and placed them as directed in the video, and have covered them with rocks on top. Somehow the earthworms keep finding their way into the pots. I am constantly rescuing worms from drowning, but can’t save them all. I’m worried that I am losing too many worms in the ollas, and I feel badly:( Suggestions?
I’m so sorry to hear that! Slugs are attracted to the sides of mine too and I sometimes find them inside, but not dead. If you’ve not done so already, make sure that the lip of the olla sits about an inch from the top of the soil’s surface. For a lid, choose a snug one and these days I use plastic pot saucers since they help reduce water evaporation from the top.
Thanks for the great article. I am having trouble though. I bought Pennington unglazed terracotta pots from Walmart. I closed the hole with putty and filled it up. The water line did not move at all and there was no water around the pot. I buried it, same thing. I have a small olla bottle from Back to the Roots. It works perfectly. What am I doing wrong?
I’m not familiar with the Pennington pots but it seems that the only issue could be with them. Try another pot – generic terracotta pots are best.
Maybe they’re overcooked.
Overcooked pots don’t work; they don’t provide enough water, or hardly any at all.
Look for pots that visually have an earthy tone and that produce a rather deep sound when you tap them with your knuckles.
Quizás estén demasiado cocidas.
Las macetas demasiado cocidas no funcionan, no entregan suficiente agua, o prácticamente nada.
Busca macetas que visualmente tengan un tono terroso y que cuando las golpees con tus nudillos te devuelvan un sonido más bien grave.
Awesome! The armchair scientist in me is curious how much water a tomato, pepper, broccoli, etc actually draw up each day, and if the olla oozes enough to the roots removing the need to ‘hose’ water. What size were the terracota plants in your video? The saucers around here are all terracotta…where would a person find a plastic lid the right size to make a tight seal (the pot saucer would be looser). Great video!
It really depends on the plant, climate, temperature, size of plant, time of year, and so many factors. A small tomato plant in spring will use less water than a mature tomato plant in summer. My ollas are about 8-12″ in diamter. Here’s where you can buy plastic pot saucers.
Also, ollas seep water slowly but that’s not really how plants access the water source. They sense the moisture being released and then grow their roots up against the pot. In ollas, plant roots pull water directly from the pot. So if your plant is too far away that it can’t grow its roots up to the pot, then the olla is of no use.
I’m going to go through my cabinet for orphan plastic lids that have lost their bowls!
I use 12-liter terracotta pots.
I plant four tomatoes around them, about 25 cm from the rim.
I live in a part of Spain with very, very hot summers.
My pot supplied water to those four plants for eight days, although in the end, when the water in the pot gets too low, the plants suffer.
Ideally, based on my experience, the pot should always be as full as possible. This way, I calculate that four tomatoes drink 12 liters in five or six days. That’s equivalent to 500/600 ml of water per tomato per day. This way, you’ll have beautiful plants.
For the lids, you can buy polypropylene honeycomb sheets and cut them yourself to the appropriate size. Also, if you choose a transparent sheet, you’ll be able to see the water level without having to remove the lid.
Utilizo macetas de terracota de 12 litros.
Planto cuatro tomates alrededor, como a 25 cm del borde.
Vivo en una parte de España con veranos muy muy calurosos.
Mi maceta abastecía de agua a esas 4 plantas durante 8 días, aunque al final, cuando el agua de la maceta está demasiado baja las plantas sufren.
Lo ideal, según mi experiencia, es que la maceta esté siempre lo más llena posible. De esta manera calculo que 4 tomates beben 12 litros en cinco o seis días. O lo que es lo mismo: 500/600 ml de agua para cada tomate/día. Así tendrás plantas hermosas.
Para las tapas puedes comprar plancha de polipropileno alveolar y recortarlas tú mismo al tamaño adecuado. Además si eliges una hoja transparente podrás ver el nivel de agua sin tener que destapar.
I just learned of Lola pots.
I’d like to use them by my established perennials & roses. I think they would be more lush w an additional water source, esp in the harder to water areas. Your thoughts? I’m in Western SD so it definitely freezes in winter.
I’m stumped on the size & Esp stumped on the needing to dig them out every winter- then refrig them back in, in the spring. Maybe they aren’t a good idea for perennials???
They are a good idea for perennials in climates that don’t freeze. You’ll likely need to lift your pots each winter and store them somewhere frost-free to keep the terracotta from freezing and potentially cracking in the ground. Digging them up from around perennials can disturb the roots. Drip irrigation may be a better solution for your roses and perennials!
I went to the dollar store, picked up some terra cotta pots and dish along with sticky tac.
Made the ollas today and stuck them in the garden. I am hoping it works well.
Hi! How could I utilize olla pots for a large 3 compartment fabric bag that I have . I have 1 tomato plant on the ends but the middle compartment is empty. Could I use a olla and place it in the middle compartment? Even if there are fabric walls separating each compartment? These a adult plants at this point.
I don’t think that would work — the fabric walls would inhibit plant roots from being able to access the olla in the middle compartment.
I meant to make ollas to plant with three lavender shrubs. If I remove them in winter will it hurt them? Thanks
Hi Marilyn, lavender is pretty hardy and drought-resistant — you most likely don’t need to use ollas with them. If you did, I don’t see that removing them in winter would harm the plants. As long as you refill the hole with firmed in soil so that the cold doesn’t get down to the lavender’s roots.
This is just an idea I came up with because I like to repurpose instead of throwing away. Repurposing is just a way to get more for your money. I believe in the philosophy of spending once and using it 2 or 3 times. Several years ago I decided to repurpose my gallon milk and distilled water jugs for the garden. I put 4 holes in the bottom corners(1 in each corner) then cut out the opening of the bottle to about 2 times bigger than it was so it would be easier to fill with the water hose. Now granted it is plastic so the water can not got thru the sides, but I only put them as deep as the straight side walls. They lasted a couple of years before the sun would make the tops brittle. Going into the 3rd season, I would have plenty more jugs to replace those that were brittle.
Hello! I am in zone 7a and also a huge fan of ollas. Last year I read this post and loved it! But I was trying to think of a way to be more efficient with space for the olla to plant ratio. Have you ever tried terra-cotta watering spikes? They are essentially an olla on a smaller scale. You place the terra-cotta spike into the soil as you would a traditional olla, and the place a bottle filled with water upside down into the opening. I have found this works really well for multiple reasons. Because the bottle is above ground, you can see the water levels as the ground absorbs the water so you know when to refill without having to constantly check into a pot. Also, the spike is tremendously space efficient and I can place however many I would like amongst the plants. This can also pose a downside as the smaller size means less water and more frequent fill ups, but that also depends on the site and how the ground absorbs the water. Generally even in the hottest and driest months of summer, each bottle is filled maybe twice a week (about an 8oz glass soda or water bottle – also a great way to reuse materials). My tomatoes, cucumbers, and watermelon (all very thirsty plants) did amazingly well with this method.
Just thought I would pass this along. I would love to know what you all think and if you have tried this as well!
Will this work for potted trees?
There are probably better waterers for potted trees and container plants out there than these. A wine bottle filled with water and popped into the soil for one! Ollas are better for in-ground, raised beds, and large planters.
What an awesome idea. Summer is practically over, but I want to try this for next year. Do you think it would work with bucket plantings too? Maybe use a smaller size pot next to the edge of the bucket? Thanks!
Olla’s have made the world of difference to our large garden. I use little ones like this with the lid in stryrofoam boxes with my seedlings. Thank you for the blu tak tip! I was using cork but they are hard to come by. I in the middle of four seedlings seems sufficient.
I have since connected 2 pots together and fill them via drip irrigation tubes and t-connectors slotted into the hole of each top pot, that are all fed by gravity water collection barrels off the roofs of surrounding chook and garden shed. I just turn on the barrel faucets to fill rather than carrying buckets (only because my garden is an acre)!
Eva, this is a great idea, thanks for sharing!
Eva, can you send me a picture of your set up? I’m having a hard time visualizing (sorry). My garden is also large, and far away from the house, so I also use rain barrels to water it.
Thank you in advance, Jeanne
Thanks – I always was going to make my own olla by “gluing” 2 pots together.
But just using one pot with maybe a cork in the bottom and a clay saucer might be a lot simpler – especially if one can spare a few more feet in their garden that wider-mouthed pot might use
Absolutely :) Also, most plant roots will grow the depth of a single pot rather than the depth of two. The way ollas work is not to water the soil but to create a reservoir for plant roots to latch onto and drink from directly. If you use an olla, have a close look at the end of the season when you pull it out of the ground. It will have roots all over it!
Do you need to remove the pots in the winter if your garden is prone to frost or freezing?
Yes, if you’re worried about that, and your area has freezing temperatures in winter, it’s best to store them in a shed or at least outdoors raised off the ground.
I just started with option 1 yesterday in middle Tennessee, raised bed. An 8 quart pot with the infomercial waterproof tape that I have a leftover roll of. It is within a foot of 4 small tomatoes and a squash plant. It may overtax the olla but the water held overnight. I watered yesterday before trying the olla and our soil is still a little damp from extensive rain and lower than normal night lows and daytime highs this spring so I expect wicking to be a little slow for a few days. Exciting experiment. Now if I can just figure out hydroponics for some lettuces and greens in our little Aldi bought greenhouse.
We have done this with our raised beds for the last couple years. The ollas work great. I use a bigger size with tomatoes and larger vines and smaller ones distributed through beds for things like strawberries. I still water at the surface level many times in our hot summers and I have some recessed plastic pots with holes near tomatoes for deep watering once a week or so. But it’s really nice to know that they have a consistent, slow release option to keep them from drying out.
I’m thinking in the future I might run rope or nonwoven tote bag material out of them to enhance the wicking effect. Have you ever tried this?
So good to hear! With ollas, the idea is that the plant roots latch onto the sides of the terracotta and draw water directly through it. No wicking through fibers is necessary :)
Will liquid fertilizer leach through the pot. I use a kelp base fertilizer for some of my veggies. Thank you!
I wouldn’t advise it since the standing water inside the pot, and the pot itself, will get mucky and filled with algae and unwanted microorganisms.
why do you need to pour concrete in the pot? wouldnt it work otherwise? thank you
I believe the author was just presenting an alternative for those who were looking for something more permanent.
Terracotta pots normally have a drainage hole in the bottom, so without something to plug this hole all the water would quickly drain out the bottom instead of slowly seeping through the clay.
Correct :)
To stop the olla from sweating through the bottom. You want the roots to reach the water through the sides of the olla.
I’m just wondering what kind of surface area one pot would cover?
It doesn’t water the soil in that way since only the inch or so around the pot will be moist. Plant roots will seek out the moisture and eventually latch onto the terracotta pot. Place an olla about a foot from each of the plants you want to keep hydrated.
Can I get clay pots anywhere? Or do I need to make sure that I purchase them from specific places? I want to make sure I know if some have lead, or something. And, are terra cotta pots generally unfinished? Sorry if these are silly questions. Thank you. Your post is great, and very helpful!
You can get unfinished terracotta pots from many places. They’re made for the garden and do not contain heavy metals like lead, so don’t worry.
I hope you found some terracotta pots!
If by chance you haven’t, they can be found in a multitude of places.
-Walmart or Target Garden Centers
-Craft Stores ie:
•Michael’s
•Hobby Lobby
•JoAnn’s
-Any local Nurseries
I hope this helps you and any others that may see your question.
The Home Depot and Lowe’s too.
Very helpful, thank you!
Thanks so much for this video. I’m doing this tomorrow. We are on level 4 water restrictions in NSW, Australia due to drought and can’t use hoses at all now. No rain in sight either. Thanks again.
You may have to soak the whole thing in water first. I don’t know why, but terracotta sometimes needs to have water thoroughly permeating it before it can wick efficiently. Other times it doesn’t. Who knows! Happy gardening!
I have an old Terra gotta pot that I used a few years ago, and then after the season I stopped using it. I decided to put it to use again, but I can’t tell if the soil is absorbing anything. I feel around the pot but it feels dry and the soil around it is not really wet. I know it’s not glazed. It is because the pot is old?
Maybe the pores are closed up. Might need unclogging first with some vinegar and water and soaking or something along those lines.
I love this. Very nice and classy.
I was thinking about using wine bottles, since I recently discovered how plant nannies work. Do you think I could just put some putty in the wine bottle and poke a hole through it? It would be a botella instead of an olla!! :)
Thanks for your help!
Hi Melanie, I’m not sure the putty would work well but you can get terracotta fittings to put over the neck of a wine bottle. They make them into instant plant nannies.
Funny that the word for bottle in Spanish is botella and also olla is Spanish for pot.
How big an area will one pot, the size in the video, service?
It’s less about the area and more about the plants. You should aim to have your pot within reach of the roots of 1-2 [tomato] plants. They’ll grow onto its surface underground and drink directly from the pot.
Thumbs up. Love the planter watered
What a wonderful idea. I love it. The lids can be removed during a rain to collect rain water and being even more conservative. I’m excited to make my own and get them in the garden. Thank you for sharing this fantastic idea.
You’re so welcome Edith :) Good idea for rain collection too!
I actually used plastic lids and picked holes in them so when it rains it will collect water
I have extremely hard water. Will it keep the pot from sweating?
Good question! The minerals in hard water has a tendency to accumulate on the outside of terracotta pots. I’m not sure if it will stop moisture from seeping through, though, but imagine that it would. If in doubt, use rain water for your ollas.
Good question! The minerals in hard water has a tendency to accumulate on the outside of terracotta pots. I’m not sure if it will stop moisture from seeping through, though, but imagine that it would. If in doubt, use rainwater for your ollas.
I make my olla’s out of two terra-cotta pots siliconed rim to rim and fill them through the hole on top. I just silicone a small tile in the bottom hole to seal it. Then cover the top with a saucer to keep the dirt out.