How to Make Homemade Candles
This website is reader-supported - thank you! As an Amazon Associate I earn from qualifying purchases.
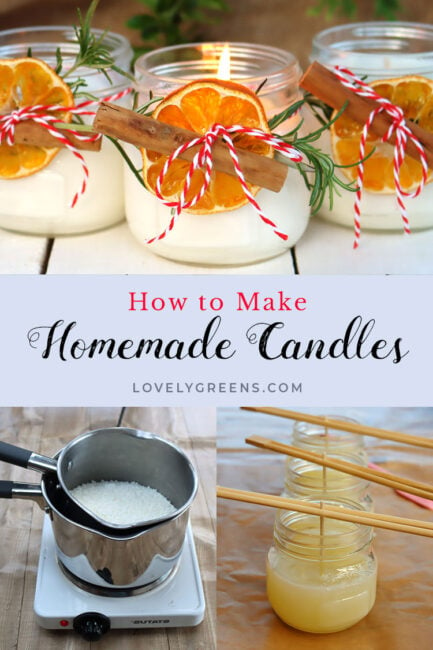
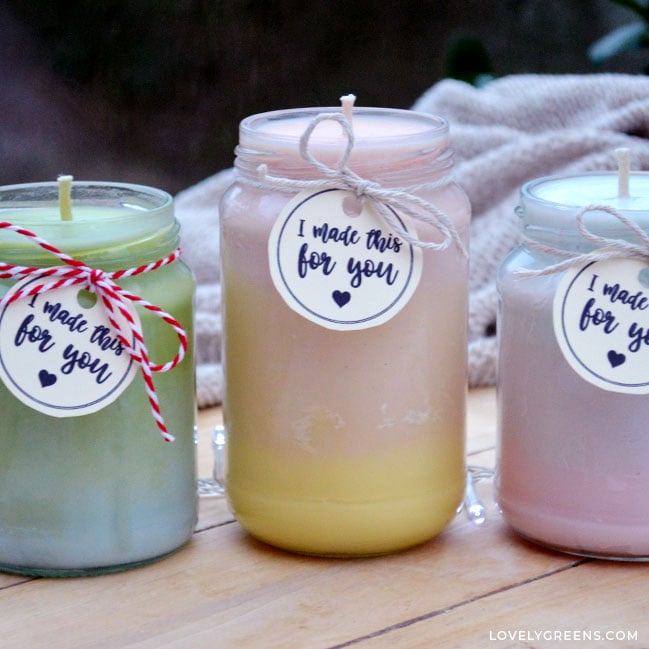
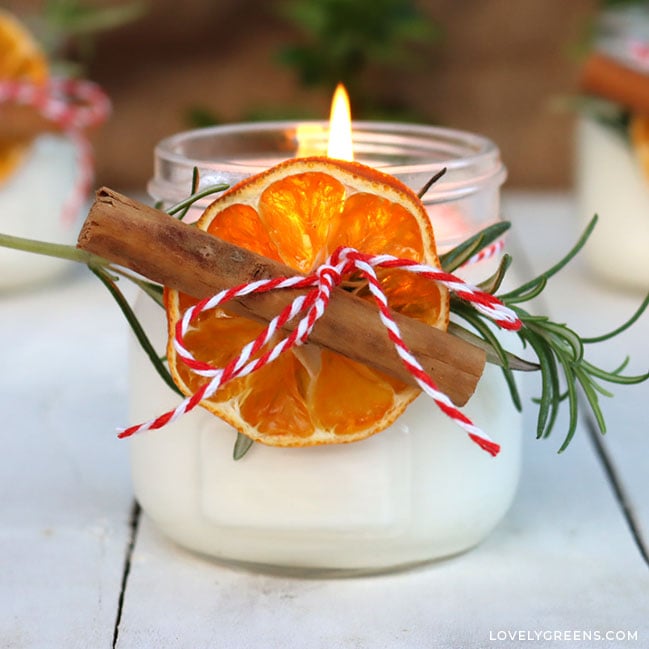
Learn how to make natural wax homemade candles in Mason jars. This project is simple and creates three 8-ounce candles that you can dress up with festive decorations. You can also scale the recipe up to make more candles at a time.

Container candle making is relatively easy once you get the hang of it. It involves melting wax, stirring in fragrance, and pouring the mixture into a container fitted with a wick. After they harden and cure, you can use the candles or decorate them. I love using labels and ribbon on mine when I give candles as handmade gifts.
It sounds simple enough, but you need to pay attention to temperature, materials, and technique. Doing so will ensure they look and perform their best. Let’s go through the basics of making natural wax container candles, then, at the end, we’ll go through how to make homemade candles. They have a festive, Christmasy scent and decoration, but you can choose another fragrance and style, if you wish.
Making the Best Homemade Candles
You don’t really need much equipment or that many materials to make small batches of homemade candles. What you do need is to make sure you have the right ones to help you make the best ones possible. Good candles have a long burn-time, a good throw (if they have added fragrance), a wick that optimizes wax burn, and a smooth finish.
Too many candle-making tutorials are created by people who haven’t agonized over creating product-worthy candles. I put my hand up to say that I have! I’ve had weird, uneven finishes on the tops, wicks that weren’t correct and caused tunneling, and problems with candles not smelling strong enough. Unprofessional candles don’t sell well, so I’ve had to make many changes over the years. Let me share my tips for making the best homemade candles possible.
Choosing the Best Wax
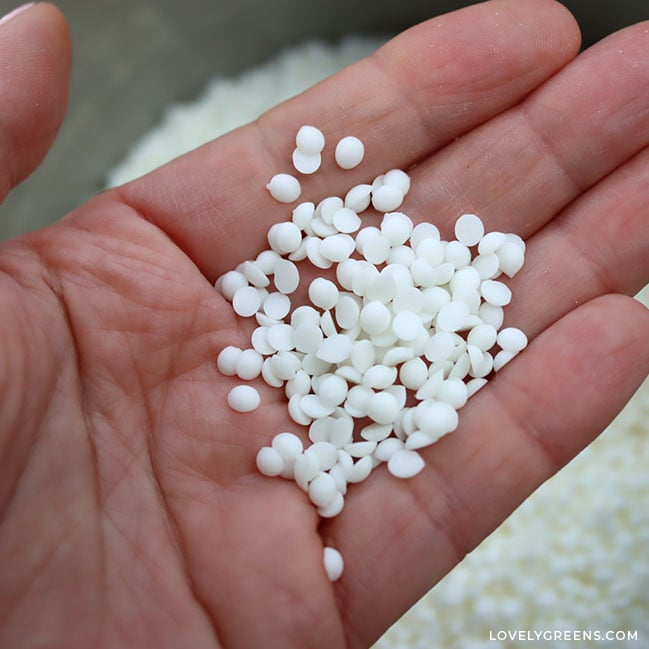
The most common wax to make candles is paraffin wax, followed by soy wax. Then, there’s beeswax, coconut wax, and rapeseed (canola) wax. It’s possible to make candles with many other types of wax, as well as blends of different waxes. The wax(es) that you choose for your candles should reflect your ethos, what’s locally available, your budget, and who the candles are intended for. It can get complicated.
To make natural wax candles, you will need to skip using paraffin wax. It’s made as a by-product of the petroleum industry and is considered synthetic, non-renewable, and not natural.
Beeswax candles are rustic and traditional with a natural beeswax scent. However, even though I’m a beekeeper, I reserve my precious beeswax for making lip balm, furniture polish, and other home products. My three colonies don’t produce a lot of extra wax, so it’s not viable for me to use it in candles. Beeswax also doesn’t hold extra fragrance well, and I want my candles to appeal to a broader customer base, including vegans.
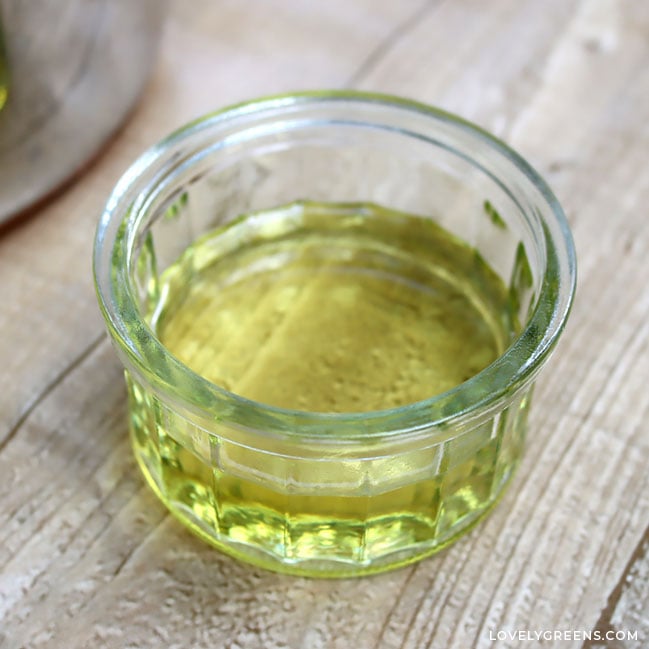
Plant-based waxes like soy, coconut, or rapeseed (canola) wax are much easier and cheaper to use than beeswax. They can be scented and colored, and are easy to use to make container candles. They also clean up easily, so you don’t have to worry that much about dribbles on the kitchen counter. I mainly use sustainable European rapeseed wax, but soy wax is the most widely available.
Containers for Homemade Candles
Once you have a candle wax in mind, turn your attention to the type of container you want to use. You should not make candles in any container that can melt or catch fire. That leaves two main materials you can use—metal or glass.
Metal tins are among the best options, and the most economical are old food tins, as long as they aren’t lined with plastic. If you notice a white film inside, it’s an epoxy BPA lining that can catch fire and/or emit fumes. You can also purchase aluminum candle tins that come with lids, which is what I use for Lovely Greens candles.
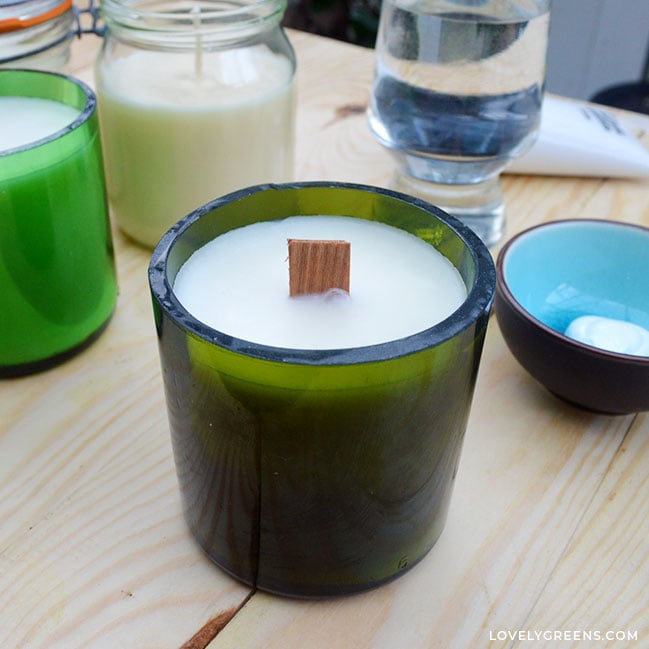
Glass containers also work well, provided that the glass is strong and thick enough not to get too hot or break. Thick-walled canning jars are the best option for homemade candles, which is why I’ve recommended them in the tutorial further below. You could also use wine bottles to make wine bottle candles, as long as you’re able to cut them without chipping or cracking them.
It’s also possible to use recycled jars from the supermarket, but be careful with those. Most glass used for food jars is fragile and weak when it comes to heat. You don’t want the glass to break while you’re burning a candle. If you do use recycled jars, choose those that contain food that has been hot-packed and that have no chips or imperfections. Lastly, I would only consider using glass containers for plant-based natural wax candles. It burns at a far lower temperature than beeswax.
Choosing the Correct Wicks
I suspect that using the wrong type of wick is one of the most common issues people have when making candles. It’s easy to make because it’s not well known that wicks come in different sizes, are made from various materials, and are for specific types of wax. They’re also made to burn a wax pool of a specific diameter.

If you use a wick that burns a small diameter, and you use it to make a candle with a much wider diameter, you’ll get an effect called tunneling. That’s when there’s a pit created in the middle of the candle when it burns. You’ll also notice that the flame is smaller and the candle’s fragrance is weak. That’s because the small flame isn’t able to vaporize the scent as efficiently.
If you use a wick made for a much larger diameter candle than the one you’re making, your candles can be unsafe. They can burn very hot, have a large flame, and cause the container to get hot or crack. They also use the wax up much quicker and cause the fragrance to burn off before it has a chance to vaporize.
Wick Recommendations for Natural Wax
For homemade candles using natural wax, such as soy wax, opt for cotton wicks explicitly made for them. I’m in the British Isles and prefer using Wedo VRL or Wedo ECO wicks. I also sometimes use wooden wicks. The best wicks for natural plant-based wax in the USA are ECO wicks and CD wicks (Stabilio). Whatever wick you choose, ensure it’s the right size for the container you use and make sure that it comes with tabs.
In the homemade candle project below, we use soy wax in a glass container that’s about 2.75-3″ (7-7.5 cm) in diameter. The best wicks for these include, by brand, ECO 12, Wedo VRL 22, and LX 16 or 18. To be sure, though, measure the inner diameter or your container and match it to the manufacturer’s recommendations for wick size. Also, make sure to buy wicks long enough to fit in your containers and come out far enough to be clamped by chopsticks or another centring device.
Candle Fragrances
Aside from the light, fragrance is one of the best things about candles. I suspect that most people wouldn’t consider buying a container candle unless it was scented. Fortunately, there is a wide range of candle fragrances to choose from and most work in soy wax and other plant-based waxes. Typically, you would use an 8-10% fragrance load in your recipe, but always check the recommendations from both the wax supplier and fragrance manufacturer.
Essential oils, though natural, aren’t the best choice for homemade candles. Though they might smell nice in a candle when it’s cold, once lit, essential oils burn off and don’t really give the scent throw that you’d expect—they might even smell bad. For that reason, I either make unscented candles for home use or use fragrance oils. They are not natural, but they provide the scent that most people love in candles.
Fragrance Safety
If you use fragrance oils in candles, be aware that they are synthetic perfumes that can irritate your skin if they come into contact with it. Always wear gloves when working with fragrance oils. You should also never pour them down the drain, since they can harm aquatic life—everything that goes down your drain eventually ends up in the land or the sea. Once they’re mixed into wax in the correct percentage, they’re relatively benign for most people, though.
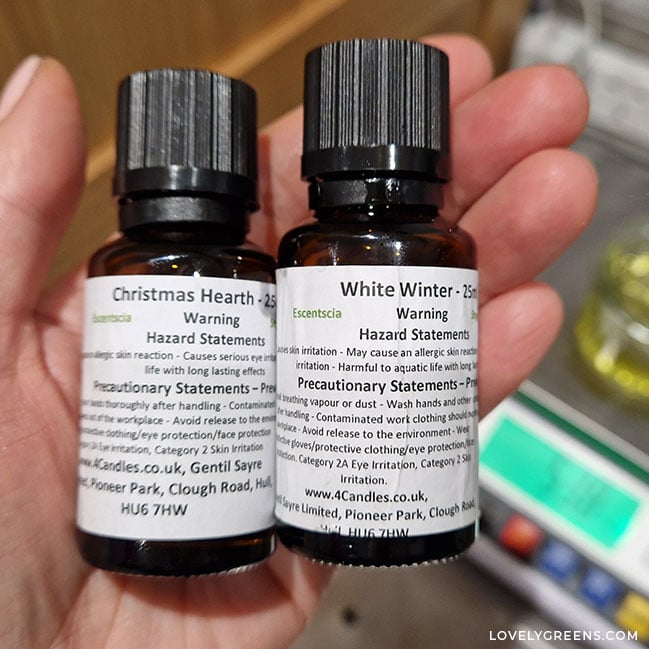
I recommend using those that are phthalate-free, contain no metals, and have proper documentation. They should have a material safety data sheet (MSDS), be IFRA-compliant, and spell out any allergens that may be present in the fragrance. These will be provided in the documentation. Always adhere to the recommended maximum fragrance loads, too, and inform recipients if your homemade candles contain allergens.
Candle Colors
Though I’ve had experience with using color chips to tint candles, such as in these DIY ombre candles, I tend not to use them. They’re an extra ingredient that isn’t natural since they’re made with FD&C or D&C dyes. Most of my candles are the lovely, creamy natural white of the wax itself.
Some candle makers do tint their candles with natural dried extracts such as turmeric, spirulina, paprika, and beetroot. I’ll be honest—I’ve not tried this before. If you do, please be aware that they can affect the candle’s wax, wick, and scent throw.
Candle Making Temperatures
Up to this point, I’ve mainly focussed on homemade candle materials. There are a couple of things you do need to know about temperatures and technique, though. Candle wax and fragrance are two completely different materials that we need to blend together at the optimal temperature. We also need to pour the wax at a certain temperature, too. These temperatures will vary based on the wax you use, and that information should be made clear by the manufacturer and/or supplier.
The reason for this is that if you add fragrance to the wax when it’s too hot, it might evaporate off. If you add it to wax that’s too cool, it might not mix in properly. When pouring wax into containers, temperature is a major factor. If the wax is too hot, it can cause frosting, cracking, and sinkholes in the candle. If it’s too cold, the wax might not set correctly, causing both aesthetic and functional issues.
Single Pour vs Double Pour
Even if you do everything correctly when making candles, you can still run into issues—especially aesthetic ones. Soy wax and other natural waxes can shrink when they cool, causing cracks, dimples, sinkholes, and wick wells. It can be incredibly frustrating. Even running a heat gun over the surface doesn’t even them out, and doing that can affect cold throw (how a candle smells unlit) anyway.
The solution is to make candles using the double-pour technique. Instead of completely filling the candles in one pour, only fill them about 85-90% of the way. Then let them fully harden. After that point, pour a second thin layer of wax on the top of the candle to hide any imperfections. We’ll use that technique to make the homemade candles below.
How to Make Homemade Candles
Equipment
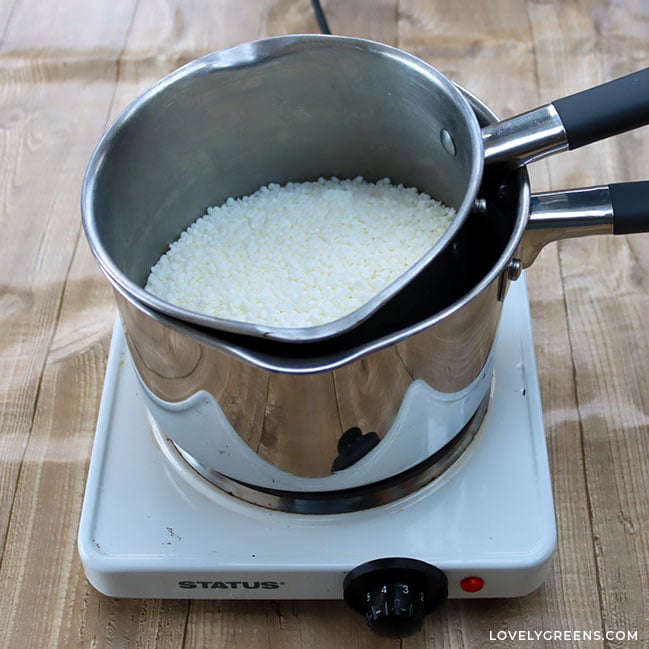
- 2 two stainless steel pans (one able to fit inside the other) (to create a double boiler)
- 3 half-pint canning jars (Mason jars, Kilner jars, or similar)
- 3 pre-tabbed wicks (* ECO 12, Wedo VRL 22, LX 16 or 18)
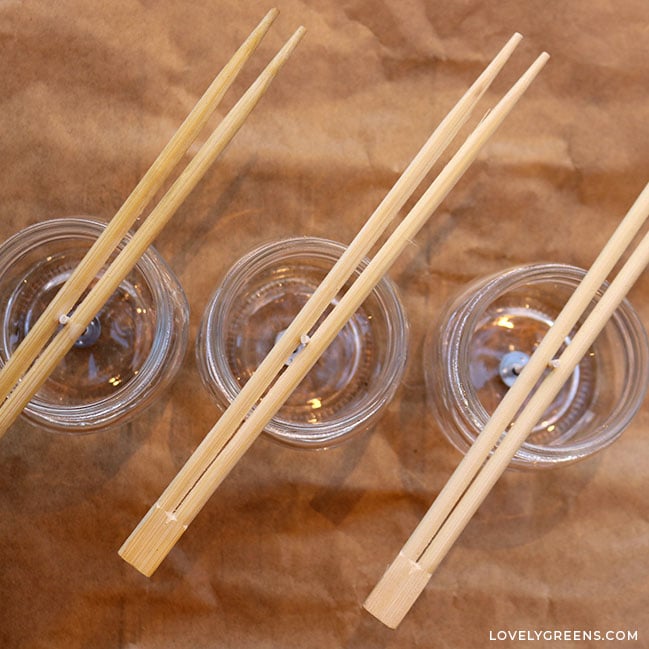
- 3 unbroken chopsticks (or clothespins)
- digital kitchen scale (or measuring cups and measuring spoons)
- silicone spatula (or spoon)
- pouring jug with spout (optional)
- greaseproof paper (or newspaper / optional)
- hot glue gun (or wick stickers/tabs)
Materials
- 4 cups soy wax 525 g / or coconut wax or rapeseed (canola) wax
- 10 tsp Christmas fragrance oil * 54 g or 50 ml / or another fragrance suitable for candles (optional)
- baking twine optional
- dried orange slices optional
- cinnamon sticks optional
Instructions
Preparation
- Gather all the materials and equipment in the place you plan to work. Though optional, you could cover surfaces with grease-proof paper (or newspaper) to help with clean-up. However, plant-based waxes are generally easy to clean up with hot soapy water.
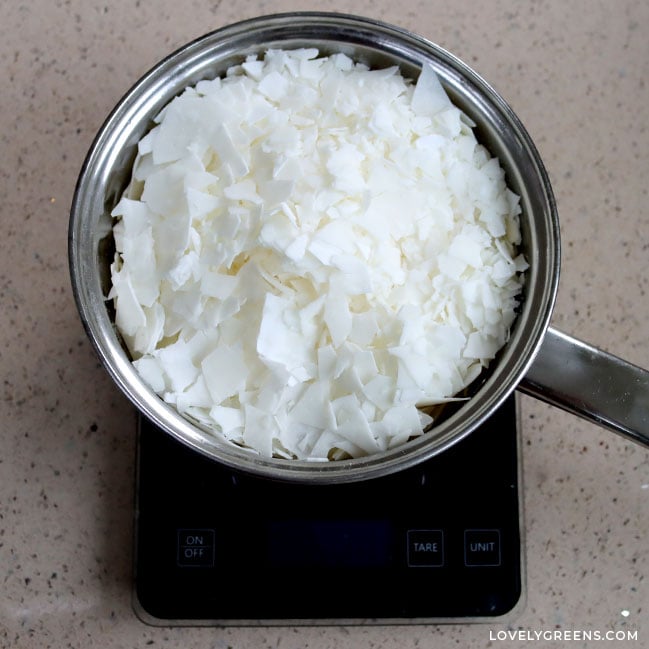
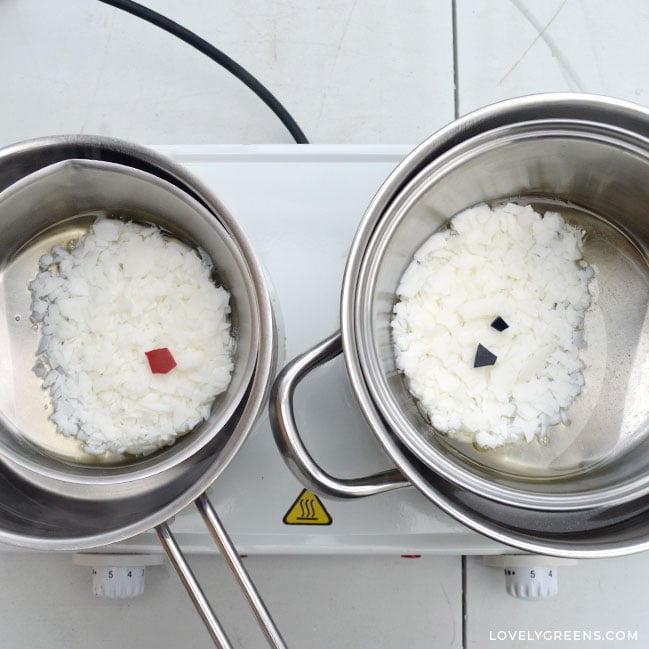
- Measure the wax into the smaller pan.

- Measure the fragrance oil into a small glass or ceramic dish. Keep it out of reach of children or pets.
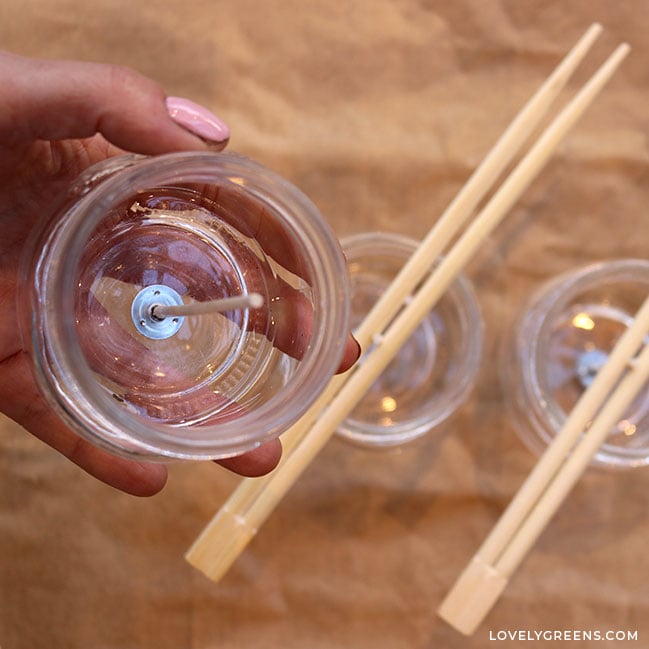
- Center and adhere the wick tab (the metal end of the wick) to the bottom of each jar. Use a hot glue gun, wick stickers, or glue dots.
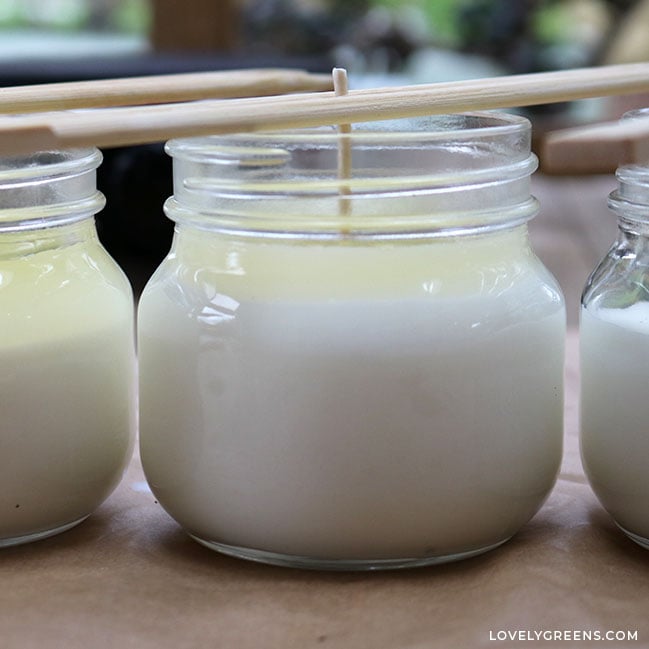
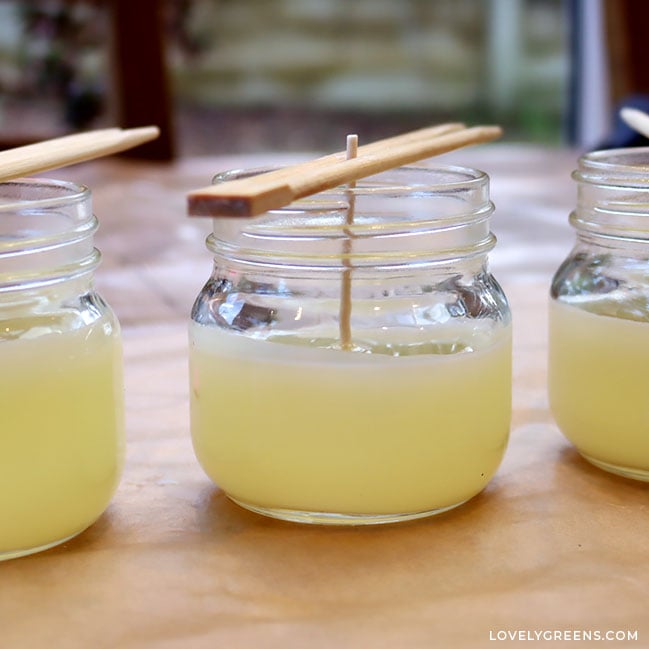
- I recommend using unbroken chopsticks or clothespins to hold the wick vertically. You could also wind the wick around a pencil or popsicle stick. Once wax is poured in, the wick may slump over if it's not held up.

Make the Candles
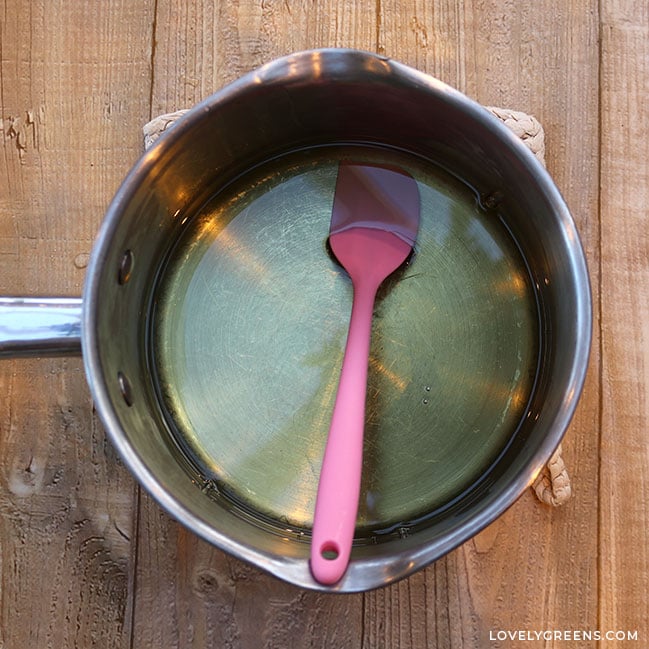
- Melt the wax gently on indirect heat. Fill the larger pan with water to a quarter-full and bring it to a boil. Lower the heat to medium and then float the smaller pan containing the wax on the water. Don't allow water to get into the smaller pan.
- Melt the wax until completely liquid and clear, then take the pan out and set it on a potholder.
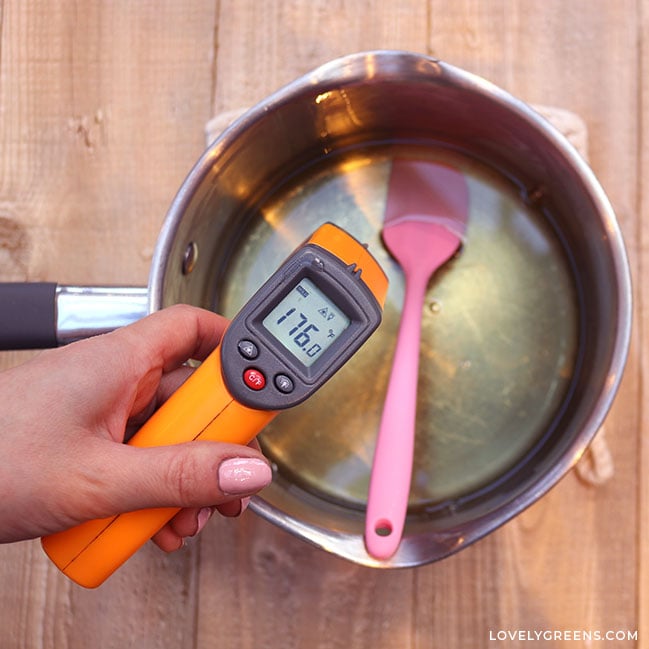
- Take the soy wax's temperature—you want it to be 180-185°F (82-85°C)*. At this temperature, pour the fragrance into the melted wax and stir well.
- Stirring regularly, reduce the wax temperature to 135-145°F (57-63°C)*.
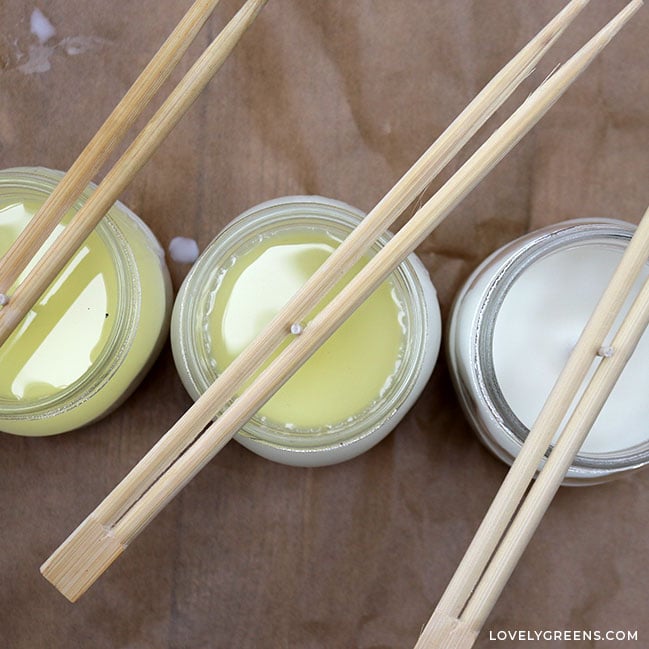
- When the temperature is right, stir and then pour the wax into the candle containers. Either directly from the pan or by transferring it to a pouring vessel. Only fill the containers with about 85-90% of the wax you intend to pour into them. You'll have wax left in the pan at this point—just set it aside until later.
- Allow the candles to cool and harden completely at room temperature. This can take several hours, but I tend to leave them overnight. When they're fully cooled, you might notice that some of the tops aren't smooth, but don't worry. Covering them will be easy with the two-pour method we're using.
- When the candles have hardened, remelt the leftover wax to 135-145°F (57-63°C)*. When at that temperature, pour it into the candle containers, topping them up and covering any imperfections.
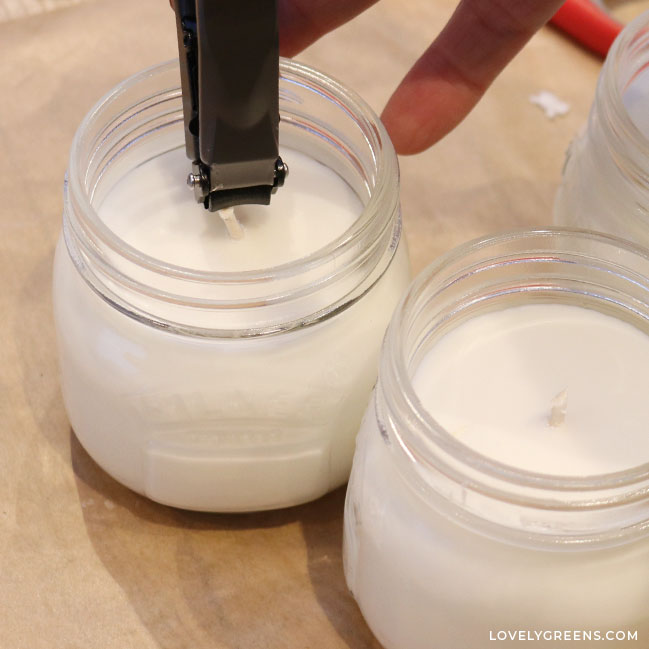
- Allow the candles to cool and harden, undisturbed and at room temperature. After a day, you can remove the chopsticks and trim the top of the wick down to 1/4" (6 mm). If it's awkward to use scissors, you can use sharp nail clippers.
- You can start using homemade candles two days after making them, but the scent will be much better if you cure them first. To do this, leave the candles uncovered or with the lids only lightly covering them, and let them sit at room temperature (68°F/20°C) for two weeks. That's it. That one little step boosts your candles' fragrance and scent throw.
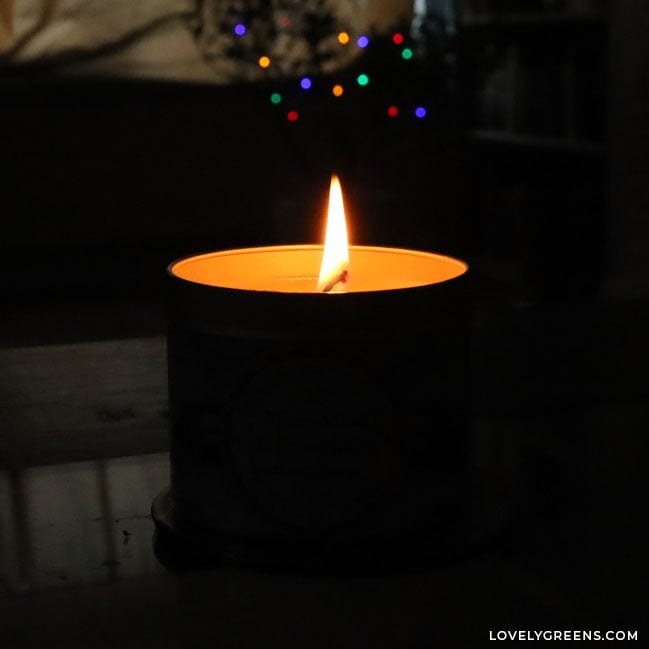
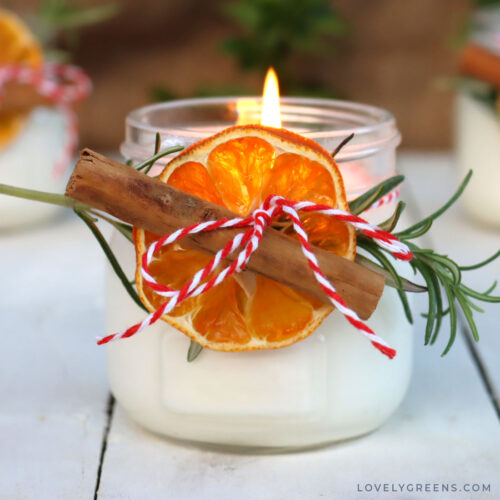
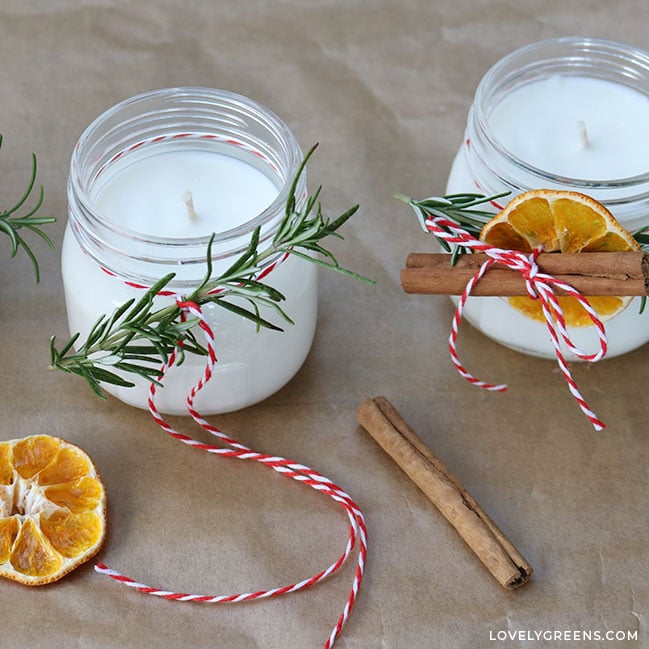
- To make them look lovely as gifts or products, decorate the jars with labels, ribbon, string, dried fruit, and spices. Whatever your decorations, adorn them so that they won't catch on fire and/or recommend to the recipient to remove them before lighting.
- Homemade candles don't have a strict best-by date, but the fragrance will be at its best if you use them within two years of making them.
Hi can I add color with the fragrance.
Hi Kara, yes you can. Professional candle makers don’t tend to use natural candle colorants (paprika, turmeric, etc.) since they fade, clog wicks, and cause other issues. That’s one reason most eco-candles are left their natural white color. However, if you don’t mind using them, you can get candle wax dye in various colors to add to your batches. They are solid chips that you to put in the soy wax to melt together.
Tks so much Tanya. I will definitely try out your easy candle making recipe. Sounds great. Tks also for sharing.
You’re most welcome, Yvonne :) If you have any questions or need help, just let me know.