How to Make a Wooden Trug with Pallet Wood
This website is reader-supported - thank you! As an Amazon Associate I earn from qualifying purchases.
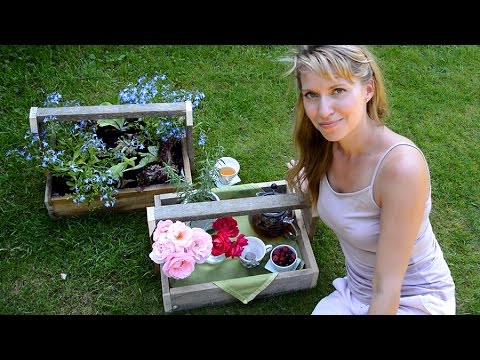
Instructions for how to make a wooden trug that you can use for garden storage or as a planter. This is a beginner level wood working project that requires basic skills and tools.

I recently came across an old strawberry trug in an antique shop. As much as I’d have loved to buy it and bring it back home, it was just too large for my luggage. I kept coming back to it though and in the end came to the conclusion that I could make it myself. And I could probably make it out of pallet wood.
I love making projects out of pallets because A. the material is free, and B. I love transforming simple materials into beautiful pieces. So instead of bringing back the original trug, I brought back a photo of it and an idea. Then this week I broke down a single pallet and was able to make two complete trugs from it – one that I’m now using as a rustic indoor decor piece, and the other I have planted up with Lobelias and lettuces.

Wooden Trug Project Materials
Now on to the tutorial! I also have a YouTube tutorial video for this project so please check it out if anything is unclear. The materials and tools I used are:
- 1 Wood Pallet – with seven planks across the front
- Additional piece of wood for the handles – width of 13/16″/2cm and a height of 1.5″/3.8cm
- Jigsaw
- Hammer
- Electric screwdriver & stainless steel screws
- Ruler / Measuring tape
- T Square – this is a tool that helps create square (90 degree) edges
- To line the trug to use as a planter: plastic lining or landscaping fabric
The full project comes with instructions below and a DIY video that you can watch above. If you’d like to make two trugs, like I’ve done, find a pallet that has seven or more planks across the front side. Using a jigsaw, cut the planks off as you see in the photo below. At the end you’ll have fourteen smaller planks from the front side.

Pallet Projects for the Garden
Pallet Wood Safety
Before I continue on with how I made them, I’d like to first make sure that you’re aware of the dangers of using the wrong pallet wood for your projects. Pallets are essentially wooden platforms that are used for transporting goods all across the world. To ensure that foreign pests are not spread from region to region, pallets are either sprayed with insecticides/fungicides or they are heat treated.
You definitely don’t want to use wood that’s been chemically treated if you’re going to bring it into the house or use it for outdoor furniture or planters. You can avoid them by keeping an eye out for a stamp that you will find on every pallet. If you see the initials ‘DB MB’ it means it’s been chemically treated and if you see ‘DB HT’ it’s just been sterilized with heat.

The basic structure
My pallet had planks of two different widths of the seven original planks, the top, bottom and middle ones were slightly taller than the other four. These taller pieces I’ve used for the sides of my trugs and the eight other planks make up the bottoms.
You’ll see in the below photo that the planks that were cut off only account for part of the project and that the second trug is missing two of its sides. No worries because you can flip the pallet over and take more wood off the back.
Cut the planks on the back side and you’ll have an additional six planks – with my pallet, these were the same height planks as the taller ones from the front side. That worked out perfectly because then I could use two of the best ones to complete the sides on the second trug. The other four pieces are used to create the verticals that hold the handle on.

Plank sizes and numbers
Once cut I then measured each piece out and cut it to the specs listed below. The width of my A pieces was 16″/41cm if that helps you to make your own. Your wood might be differently sized so I’ve just left general measurements rather than exact.
I also need to point out that the handle for my trugs is the only piece of wood that did not come from the pallet. It has a thickness of 13/16″/2cm and a height of 1.5″/3.8cm.

Creating an angled ‘Picket’ edge
To create the ‘Picket’ cutout on your C pieces, center the handle (D) in the C pieces and measure the space leftover at either side. In my case, I had an inch to spare on either side. Whatever measurement you have, multiply it by 1.5 and then make a mark further down the plank. Connect the measurements to form a triangle and you have your angle for cutting. You’ll make these cuts on both your C pieces.

Screws or Glue?
To put the wooden pieces together you have two main options – glue it or attach them with nails or screws. I opted for screws because I wasn’t sure at the time if I’d like them both to be outdoor planters.
I wouldn’t use glue in that case because I wanted to grow edible plants in them and was concerned about contamination. If you do go for the gluing option, you’ll need clamps to keep the planks in place while they’re drying or you’ll have a nightmare of a time.

Putting it together
The first parts I screwed together were the C and D pieces which together form the trug’s handle. Align the ends of D into the cut out ‘Picket’ parts of C and screw it in place. Use two screws/nails on either side if you don’t want the handle to turn at all when you pick it up. This entire piece will slip over the edges of the box part when you’re finished building that. Next, screw the box together. Pallet wood isn’t perfectly square and can often be warped and bent so don’t be too concerned if it doesn’t fit together precisely. We’re aiming for trendy rustic here right?

Fitting the handle over the box
Slip the handle component over the box, center it, and screw it into place with two screws on either side. Can you believe that your trug is now complete? Easy as pie and it really doesn’t take very much time at all.I’m choosing to leave my trugs unpainted for now but am considering staining the one I’m going to have in the house.
My second trug I’m using as a planter so I’m leaving the wood as is so reduce any paint contamination when growing my edibles. Now, if you’re planning on planting your trug up with decorative plants, feel free to glue the trug together and paint it up as you see fit. I’ll bet it would look lovely in a bright color and it will also reduce the chance of getting any splinters in your hands from handling it.

Lining the Planter
There’s just one final step you’ll need to complete if you do end up using the trug as a planter. Line the sides and bottom with an impermeable material such as plastic and secure with pins or a staple gun. This lining will help protect some of the wood but also keep moisture in. Because the trug is relatively shallow, it has a high likelihood of drying out, especially in hot weather.
For drainage, poke holes or cut slits along the bottom of the plastic where you can feel the seams between the planks. To plant up, remove any cats from the trug and fill in with compost. Plant the trug up how you’d like, water it well, and then make sure to place it in a prominent place so you can show off your handy work to all your visitors!


How to Make a Wooden Trug
As far as projects go, this one is relatively simple and I feel that most people will be able to complete it within a couple of hours. Have fun and if you do end up making the trugs I’d love to hear how you got on! Leave me a message below or email me with a photo. I can’t wait to see how you decorate and plant up your own rustic pallet wood trugs.
And if you enjoyed this tutorial, check out my very popular post on how to make a Strawberry Pallet Planter out of a single wood pallet. It’s another project that looks great but that I think pretty much anyone could make.

Great gardening tips Tanya- just getting started with mine & the guides you’ve published are really helpful.
As a wood machinist who has recycled many pallets I never know what the stamps meant until now.
Safety tips – please take care when using power tools with long hair- tie hair back or tuck it under a hat. It will very quickly wrap around a drill and could cause a very painful injury; also take care when using a jigsaw as it might cause similar problems.
You make this look so easy. I would like for you to put your in a scunchy or clip, to be safe using tools.
Tanya,
what kind of saw are you using to cut the pallets?
Thanks
There’s a link above in the post — it’s a Jigsaw
Love the garden trugs! The pallet wood gives a nice vintage/distressed look. Have you ever tried this idea with wooden wine crates? They look so chateau-chic.
I’ve had a look for wine crates on the island but they’re expensive compared to making boxes for free using pallet wood! Cost is one of the reasons I made this project – pallets are free.
Hi Tanya,
Thanks for the inspiration to make some trugs! Just a thought though, you were lucky not to split the wood at the ends (I wonder what screws you used?) next you could time try drilling clearance holes (same width as your screws), I think you'll find it it much easier to get the screws in and no chance of the wood splitting. The screw heads usually sit flush as well, looking neat.
If you want to make lighter trugs, look out for what they call 'single use' pallets (rather than the standard EURO pallet), Single use pallets are only used, yup, you guessed it, once. So they are made from thinner timber and best of all they are clean! I get mine from a local tile store (ceramics come in all sorts of fancy sizes that don't fit onto the EURO pallet.
Stay well
Ian
p.s. I'm a carpenter (just in case you were wondering lol!)
Thanks so much for the tips Ian! Lighter trugs could come in handy for carrying and the tip on single use pallets is fantastic. And you’re absolutely right about clearance holes – they’ll definitely lessen the chances of the wood splitting.
Brilliant Tanya.. i have a small version for my Essential oils.. but i have 2 pallets which i started sandpapering last year…. still in the garage due to the winter.. will be used as shelf for pot plants. Gosh you are full of ideas and a genius.. I like people like you.. original ideas. bravo.
Thank you so much! And enjoy making the pallet shelf for your plants…I've seen some great ideas out there :)
Very great inspiration. Thank you for your nice blog :-) You have a similar hobbies than me. Petra from Nevsedni dny :-)
I'm really pleased you enjoy the posts on my blog Petra! Thanks for visiting :)
These are great tanya, I use my trugwhich I bought whne harvesting…are these a little heavy for that?? I think i will give this a try if the right sort of pallet turns up at the allotment for any takers however i don't have all the fancy electris tools you do so it may take me a little longer to make. I will be sure to let you kow If I make one though!
These are too heavy for ordinary trug use Tanya…they're more for decor or for use as a planter. If you made it with lighter wood then it would be more suitable for carrying around.