How to Make DIY Lotion Dots
This website is reader-supported - thank you! As an Amazon Associate I earn from qualifying purchases.
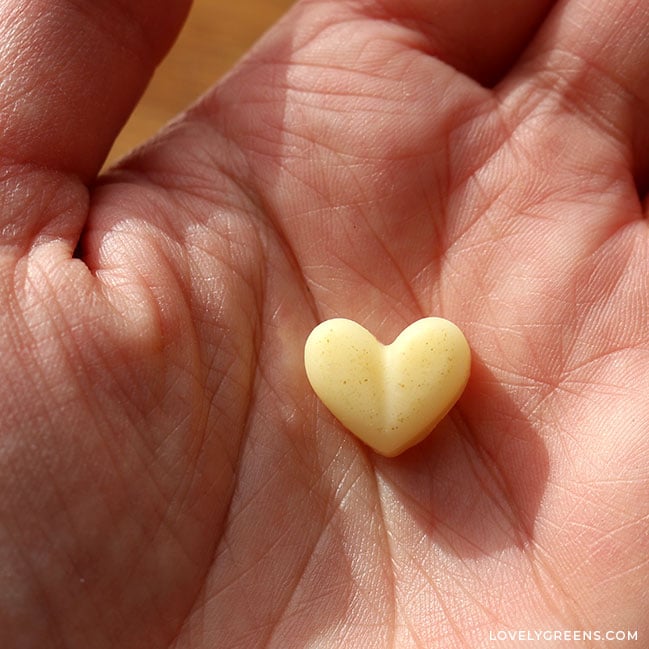
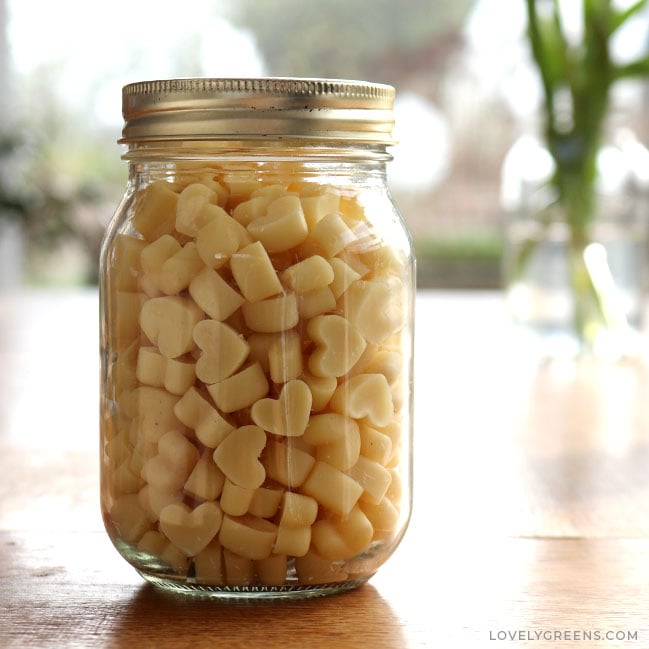
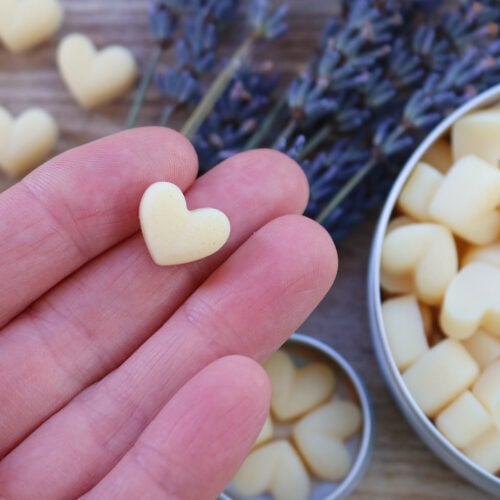
Lotion dots are tiny lotion bars that you use individually to condition and protect dry skin. Here’s how to make them using a non-greasy lotion bar recipe and the sweetest heart-shaped molds. This recipe makes about 255 DIY lotion dots, which is enough to fill a pint-sized jar.

Lotion dots are getting people excited! Especially those who are fans of convenient, easy-to-make skincare and already use lotion bars as moisturizers. Both lotion bars and lotion dots have been around since at least the 2010s, so they’re not new. They did kind of fall out of fashion, but are now making big comebacks.
If you’re not yet familiar, they are oil-based, preservative-free moisturizers. Because you can make them with natural ingredients, they’re popular among those who aim for a green, zero-waste beauty regimen. The only difference between the two is that lotion dots are just tiny versions of lotion bars. Just that size difference is a big bonus for convenient use and hygiene!
Each lotion dot is just an extra mini bar that you use up completely in a single use. So, instead of pouring them into larger molds to firm up, you use tiny silicone molds or pipe them out individually. You make lotion dots for convenience, for travel, and because they are just so darned cute!
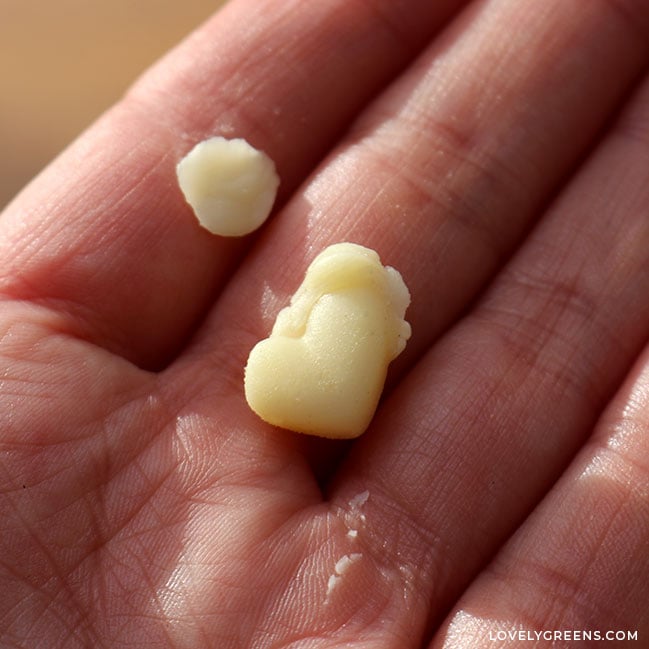
When your skin feels dry, take one in your palm, massage it until it softens, then rub it in until it’s fully melted. They’re the ultimate self-care item for on-the-go or when you’re trying to conserve product.
Lotion Bars vs Lotion Dots
If you’ve ever used a lotion bar, you’ll know how great they are for conditioning your skin. They’re solid moisturizers you make by melting together nourishing oils and wax and allowing them to harden. To use them, you roll them between your hands and massage the melted oils into your skin. Then you store the rest of the bar in a container for the next use. Most makers pour lotion bars into silicone molds meant for soap bars, so they’re quite large.
In my experience, lotion bars are a bit too heavy to use on your face, but they are excellent for hands and body. Especially during the cold, hard days of winter. With a good recipe, your skin will feel a pleasant, waxy coating immediately after use. Over ten to fifteen minutes, the lighter oils and butters have a chance to absorb, and your hands will feel moisturized but not greasy.

Recently, DIY lotion dots have been gaining attention, and the idea is simple. Instead of one large lotion bar, you pour the recipe into tiny individual molds. They are the perfect size for single-use and portion control, and you can store them in smaller containers, ideal for putting in your handbag or suitcase. Because they’re individual, they’re also more hygienic and better for sharing.
Natural Lotion Dots Ingredients
You can use any solid moisturizer recipe to make lotion dots. However, you formulate a good recipe for lotion dots so that the oils, butters, and waxes used remain hard at slightly above room temperature. You don’t want them to melt in your pocket or handbag. If you can easily squish a finished lotion dot with your finger, you can bet that it will melt at the first opportunity.
That’s why the recipe below has a 1:1:1 ratio of wax, butter, and oil by weight. It’s a good formula for resilient lotion dots that will also feel good on your skin. Once made, you can store them in a container or hold them in your hand, and they don’t melt immediately. Once you start rubbing and massaging them in your hands, they soften and eventually melt, allowing them to be fully rubbed into your skin.
The types of ingredients I used in the recipe also feel less greasy than other oils. Though shea butter, cocoa butter, and coconut oil are popular in lotion bars, they can feel quite oily after use. Avocado oil and mango butter are excellent oils for lotion bars (and homemade lotion dots) because they feel drier yet still condition your skin. I’ve also included lavender essential oil for a natural scent and colloidal oatmeal for soothing and moisturizing the skin.
Coloring Homemade Lotion Dots
The recipe card lists alternative oils and butters, and you can leave the essential oil and oatmeal out if you wish. Although I do not include a colorant in this lotion dots recipe, you can tint them by infusing the oil(s) used with a skin-safe herb. Color ideas include calendula for yellow, indigo for blue, and alfalfa for green.
If you want to make lotion dots in different colors, use a separate mold for each color. The scraping you’ll need to do to get the mixture into each cavity can otherwise muddle the colors.
Though other lotion dots recipes include micas or mineral pigments, they are not considered natural ingredients. Some common ones include violet mica powder for purple and ultramarine pink for pink. These ingredients are non-toxic, and I don’t have a major problem with them, but to keep things simple and natural, I’ve left them out of this recipe.
If you do use them, keep in mind that these colorants are used to make mineral makeup, such as eye shadow. Use too much, and they can leave a color on your skin. If I were to formulate this recipe to include mica, ultramarines, or oxides, I’d start with just 1/32 tsp. Mix that into a little of the avocado oil and add it after the oils are melted and mixed together.
Scenting Lotion Dots
This recipe includes lavender essential oil at 1% by weight. This is enough to create a lovely scent while staying within safe leave-on usage rates—generally 0.5-1% for essential oils. If you wish, you can leave the essential oil out or replace it with something else. Just ensure that the fragrance is skin-safe and doesn’t exceed the product’s usage rates for lotions and other leave-on skin formulas.
Below are a few other scent ideas if you’d like to make a single batch of lotion dots with different essential oils. If you have a tough time deciding on a scent, have a look through these essential oil usages for soap making. It provides complementary scent ideas for each one.
| Blend name | Scent | Essential oil amounts |
|---|---|---|
| June Bouquet | feminine and floral | 28 drops rose geranium (1.25 g), 12 drops neroli (0.52 g), 10 drops chamomile (0.46 g) |
| Twilight Forest | sweet and woodsy | 30 drops ylang ylang (1.43 g), 20 drops cedarwood atlas (0.94 g) |
| Vibrant Lavender | great for a morning boost | 40 drops lavender (1.78 g), 23 drops grapefruit (0.98 g) |
| Orange Grove | citrusy and floral | 35 drops orange (1.49 g), 20 drops lavender (0.89 g), 10 drops neroli (0.44 g) |
| Spicy Provence | a beautiful blend of florals | 40 drops lavender (1.78 g), 23 drops rose geranium (1.02 g) |
More Zero-Waste Skincare Recipes
There are so many different types of lotion dots that you can make. Depending on the scent and additives, you could make an entire range and market them as calm dots, zesty dots, glow dots, and blossom dots. The possibilities are endless! Also, if you have leftover ingredients from making lotion dots, you can make these additional skincare recipes:
- Herbal Lip Balm Recipe
- Coconut Oil Body Butter Recipe
- Soap-less Face Cleanser (Angels on Bare Skin Dupe)
- Sweet Orange Soap Recipe (cold process)
Natural Lotion Dots Recipe (mini lotion bars)
Equipment
- two stainless steel pans (one able to fit inside the other) (double-boiler)
- large baking tray (to support the mold)
- measuring spoons (stainless steel) (optional)
- gloves (nitrile or rubber) (optional)
Materials
- 84 g beeswax 9 TBSP + 1 tsp or 50 g candelilla wax
- 84 g mango butter 6 TBSP + 1.5 tsp or shea butter or cocoa butter
- 84 g avocado oil 6 TBSP + 0.5 tsp or sweet almond oil or apricot kernel oil
- 2.5 g colloidal oatmeal 3/4 tsp – optional
- 2.5 g lavender essential oil 3/4 tsp or 75 drops – optional
Instructions
Preparation
- Work with clean and dry equipment and in a sanitary environment. Before starting, wash your hands thoroughly and consider wearing gloves. They help stop contamination and fingerprints on the finished lotion dots.
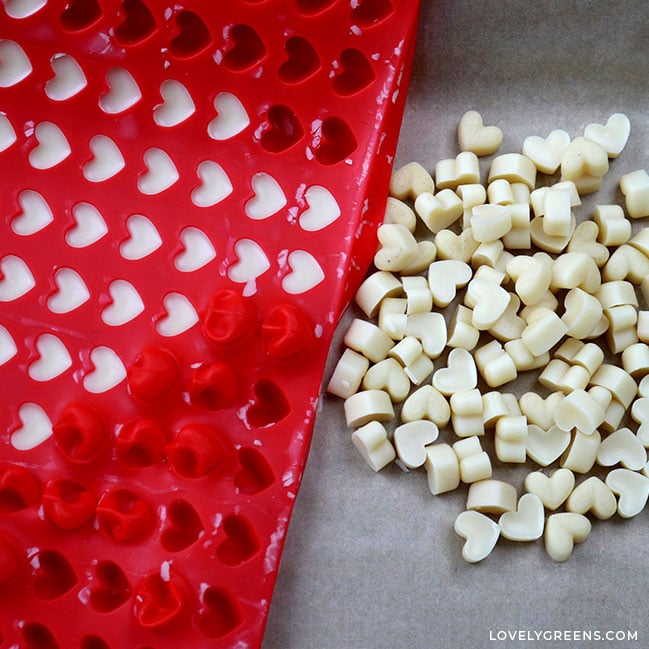
- Prepare the ingredients and set out the equipment and mold. The mold is large, very flexible, and will be challenging to move once filled. To help, I recommend setting it on a baking tray lined with greaseproof paper.
Make the lotion dots
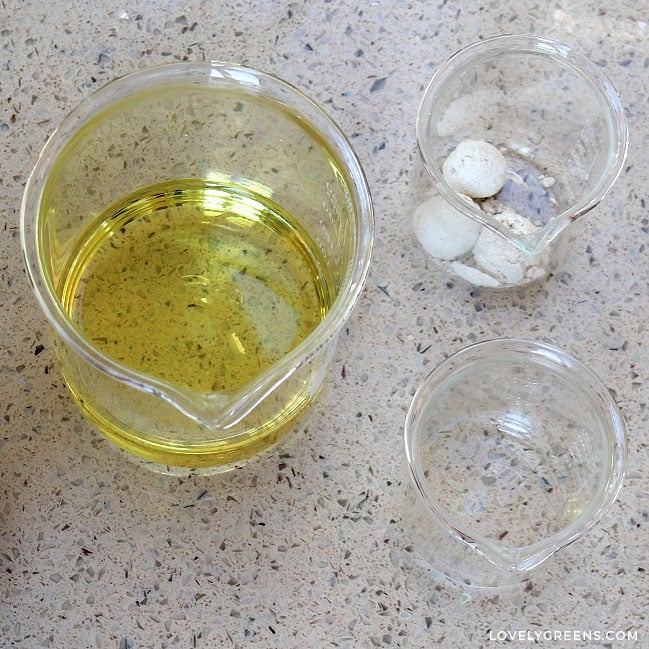
- Place the colloidal oatmeal in a small dish and pour in a little of the avocado oil. Stir until it's fully mixed in, and no lumps remain.
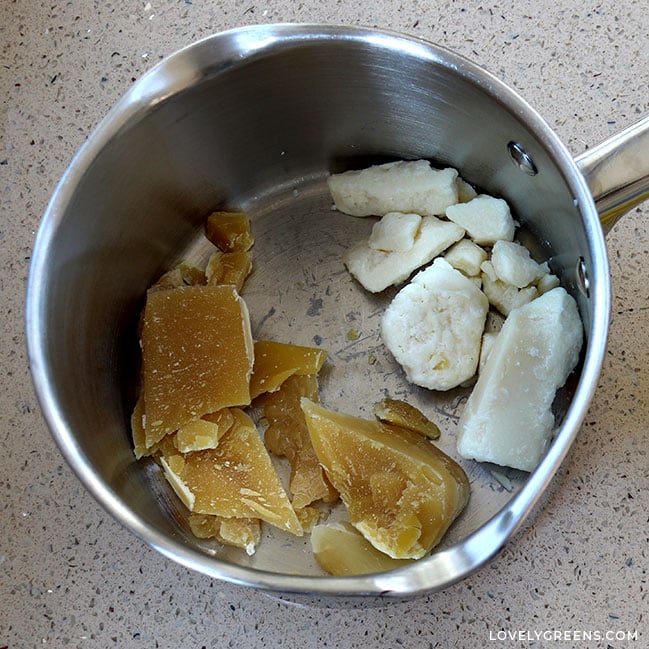
- Measure the beeswax, mango butter, and remaining avocado oil into a small pan.
- Melt the oils using the double boiler technique. Float the pan in another pan that's 1/4 full of simmering water. Keep the temperature on medium and don't let water splash into the oils.
- When the oils are fully melted, take the pan out of the other pan and set it on a pot holder. Working quickly, stir in the colloidal oatmeal slurry and essential oil. Stir until fully mixed in.
- Pour the melted lotion bar liquid over the silicone mold. It will begin solidifying, so work quickly to scrape the liquid into each cavity.
Cleaning up the mold
- Some of the mixture will end up coating the top of the mold. You have a couple of options for cleaning it up and getting it inside the cavities. The easiest way is to use a heat gun to gently melt the material that's solidified on the mold's surface. Once liquid, scrape it into the cavities.
- The other way (demonstrated in the video below) is to scrape off as much excess lotion bar material from the mold and any from the greaseproof paper that the mold is sitting on. Place it back in the double-boiler, remelt, and gently pour it into the mold's cavities.
Creating professional and consistent products
- Once the cavities in the mold are completely filled and the lotion dot material is used up, allow each one to cool and harden. It doesn't take long, but it's best to wait at least an hour before trying to pop them out.
- If the visible surface of each lotion dot looks rough or uneven, you can gently melt it. Doing so will help the surface to settle and cool evenly. You can either use a heat gun or place the mold in the oven on the lowest setting.
- Once fully melted, turn the oven off and take the lotion dots out to cool. You can leave them to cool at room temperature, though some people prefer putting them in the refrigerator to speed things up. Refrigerating can also help reduce future graininess and bloom from the butter used in the recipe.
Packaging and shelf life
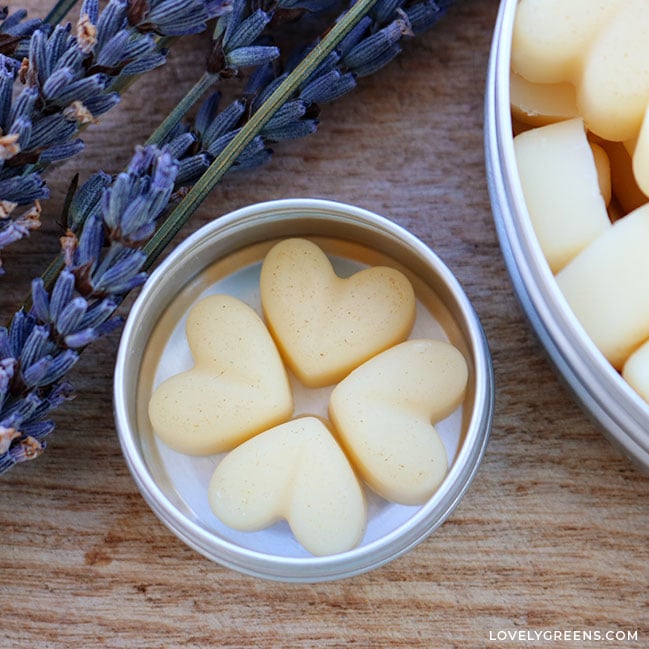
- These natural lotion dots can be stored in cosmetic jars, cosmetic tins, Mason jars, cosmetic sachets, or recycled containers. Clean and sanitized Altoid tins or lip balm containers work well. Make sure to label your containers with the contents and ingredients if you plan on gifting them.
- This lotion dot recipe has a best-by date of up to 18 months. Check the best-by or expiration dates of each ingredient you used to make them. The closest date you see is the best-by date of your finished lotion dots.
Hi Tanya,
I followed your recipe to the t, but I find that the lotions dots don’t melt very easily. I was wondering if I can re-melt them and add something to make them a little easier to soften up in my hands. Any ideas?
Otherwise they are lovely. They look good and make my hands feel very nice.
Hi Valerie, if you adjust the recipe so that they melt quicker in your hands then they can also melt quicker in their storage container. If they are left in a warm car, market stall table, or in direct sun then the dots can melt. Even a tiny amount of melting could mean that when they cool again and harden, they’ll stick together. However, as long as you’re keeping your lotion dots in a climate controlled space, such as in a cool-ish house, feel free to reduce up to 3/4 of beeswax in the recipe with mango butter.
Thank you so much for sharing this recipe. I am your big fan. 👍
You are so welcome, Justine :)
Thank you for the recipe. What are your thoughts on using Kokum or a combo of Kokum and Cocoa butter in this recipe? The goal I’m seeking is reducing melting and sticking together in the higher heat summers. Also would tin or glass containers be best?
Thank you!
Hi Jeanne, replacing half of the cocoa butter with kokum butter is an excellent way to make them more heat resilient. Kokum butter is also a drier feeling oil so your lotion dots will feel even less greasy, too. I wouldn’t replace all the cocoa butter, though, since it’s a much nicer feeling oil and gives a nicer glide.
Hi Tanya! Looking forward to making these. I would like to add color. Would adding natural colors reduce its shelf life? For example, adding turmeric to make it a lovely gold or beet root powder to make it pink. I’m not sure if adding food grade items will be safe altogether, especially because it’s a lotion and will stay on the skin. Thank you!
Hi Gaby, I think it would depend on the colorant. Most people making colored lotion dots seem to use mineral pigments or micas, which have a long shelf life. When it comes to natural powdered colorants, the main issue is that they will discolor or fade over time. It’s the same issue that you’ll find when making naturally colored soap. Some ingredients, like activated charcoal and turmeric, could potentially stain or dirty your skin. Clay powders could color lotion dots, but I’d worry if they would cause over drying or a powdery feeling. What I’d probably do instead, to naturally color lotion dots, is to make them with infused oil. You could steep the avocado oil in a variety of natural colorants such as calendula, alkanet, or alfalfa, then strain it and use the colored oil to make the recipe. I’m releasing an infused oils for soapmaking guide on Monday that you will want to check out for ideas. Many of those ideas could work for lotion dots, too!
Thank you very much! Will definitely check it out.
I tried making the lotion dots but messed it up somehow. Didn’t purchase the items you showed at the bottom of the recipe and bought the wrong ones.
Don’t know if it was because i bought the bees wax in blocks rather than the little pieces or if because i did the measuring by tablespoons rather than weight.
If I try again I’ll have to re-purchase the mold that you have rather than the 3 smaller ones and buy different bees wax plus a new mold. I also will try making 1/2 the recipe. The ones that did turn out, I find take a long time to melt in my hand; is that normal?
Hi Vivian, yes, the lotion dots don’t melt on contact with your skin but need to be massaged and encouraged to melt. That’s what makes them resilient and not melt too quickly when stored. As for the recipe, If you plan on making skincare recipes and handmade soap I HIGHLY encourage you to buy a digital kitchen scale. You’ve experienced the reason why—volume measurements like tsp and cups cannot accurately measure the exact amount of solid/chunky ingredient that you need. A scale will make your life so much easier when making this recipe and others :)
Hi Tanya
You have probably put this up somewhere in your newsletters, but can you tell me the best place to buy all the ingredients for the mini lotion bars and also other ingredients to make your soaps etc. I get confused sometimes with companies saying pure, natural etc. Amazon have so many items it makes my head spin sometimes.
Perhaps you can let me know where you buy your soap making, etc. items.
Thanks in advance
Hi Lorraine, I think you’re in the UK? If so, use the links in the recipe card – they link to products that I’ve chosen specifically :)
It’s the first time I made anything like this. It came out so well. I have dinosaur jelly molds for my grandchild, and I used it to make her some lotion dots. I think she is going to be so impressed.
Thank you for this recipe. I’m sure I will use it many, many times again.
I’m so glad to hear that you not only had such a good experience making my lotion dot recipe but that you took the time to leave such a great review. Thank you, Greta, and I hope your granddaughter loves them, too!
Hello Tanya,
Thank you so much for sharing this recipe. I had all ingredients of this recipe and tried it. It’s an instant hit. Certainly loved by my sister, mother(83yo) and daugther. I loved the heart-shaped dots hence used a smaller (55 cavity) molds and made a 100g recipe with Neroli oil as EO. Smells great and stays , souply sticky for about 15mins and after that the skin feels great.
I keep trying many of your other recipes , but did not take liberties to post a comment. I love all of your natural recipes. Thank you once again, have a great time
Thank you so much for taking the time to be in touch and to share your feedback. It means a lot to hear that you love this lotion dot recipe but also the other skincare recipes I share, too. I adore neroli essential oil, too—great choice!
Hi, Want to try these. Like the non water approach. 10-15 min seems inconvenient to wait for melting? Any way to successfully reduce that time? I get your newsletter.
Hi Mary Jean, it doesn’t take that long for them to melt but rather for it to fully absorb into your skin. I currently have the exact DIY lotion dots in the photos of this recipe on my desk and just took one out to use on my hands. It took about a minute and a half to squish, melt, and rub into my hands fully. My hands feel slightly tacky right now from the beeswax in the recipe, mainly. However, after about 10-15 minutes that feeling is completely gone. Lotion dots are highly conditioning because they are loaded with oil, butter, and wax and excellent for dry skin and hands.
I’ve not made these, but my 5 stars are for the great idea! I’ve made soap and lotions for decades and am very excited about making these. So the molds and the oats are in my cart to buy! Thank you for this.
Thanks so much Karey and I hope you love making them!
I am excited to try this! Are there differences in texture or moisturizing using either Shea or cocoa butter? I would like to use ingredients I already have. And fyi, the mold is out of stock but I’m sure I can easily substitute another. Thank you for another great recipe to try! Will review once I make it.
You’re most welcome, Juliann :) And yes, just use another mold meant for dog treats and gummy candies. The cavities will be the right size. As far as your question – oils, butters, and wax do not moisturize your skin, per ce. Only water-based ingredients add moisture to our skin. What lipids do is soften the skin and and wax helps the skin retain oils and the moisture already there. Shea butter is a wonderful conditioning oil and I use it a lot in lip balms, body balm, and other skincare. It can feel “greasy” though, which is why I used mango butter in this recipe instead. Cocoa butter is another conditioning oil that smells great (chocolately) but it, too, can feel a little heavy. If you have very dry skin, you may want that, though.
I like the idea of colloidal oatmeal in this recipe however my supplier’s guide is water soluble, will the oatmeal remain ‘active’ suspended in oil base? Will it sink to the bottom? Thanks for sharing your recipes and ideas
Hi Coral, and excellent question. You’re right that colloidal oatmeal gives the best benefit in water-based emulsions or just added to a bath. Just seeing how ordinary oatmeal expands and releases its goopiness in water when you make breakfast helps illustrate that activation. However, suspended in oil, very fine colloidal oatmeal does give a silky slip, very mild exfoliation, and light soothing in lotion dots and lotion bars. If you used lotion dots on damp skin, colloidal oatmeal can activate and help soothe eczema and redness, if that is what you are after. As for whether it sinks to the bottom, yes, it can but the amount varies based on how quickly the lotion dots set up. If you look closely at the photos, you’ll see tiny brown dots on the front face of each lotion dot—that’s a small amount of the oatmeal. I cooled these at room temperature but if you popped them in the fridge to cool, it would help keep the oatmeal suspended throughout.