How to Make a Willow Obelisk (Willow Plant Support)
This website is reader-supported - thank you! As an Amazon Associate I earn from qualifying purchases.
This cottage garden project shows you how to make a willow obelisk using bendy willow whips. It’s a natural plant support that takes a couple of hours to make and is perfect for use as a bean teepee, a sweet pea wigwam, and other climbing plants. Full DIY video instructions are included.

Garden obelisks are plant supports that give plants that like to climb a framework to grow on. Think of them as a garden tower covered in vining leaves, flowers, vegetables, berries, or fruit. You can use them in the garden, in large containers, or indoors for houseplants to grow up.
Though you can purchase them ready-made, I honestly think it’s more fun and less expensive to make your own plant supports. That’s why I’ve shared these step-by-step instructions for constructing a simple willow obelisk. You begin with freshly cut willow rods, and after a couple of hours, you can have them woven into strong and attractive garden obelisks for your climbing plants. After you learn how it’s done, it will take much less time.

If you’re feeling particularly crafty, you could elaborate on the design by using other weaving techniques. Or you could weave the three-rod wale into a spiral rather than bands. Ready to get started? The full instructions are below, along with a full DIY video if you get stuck. I’ll also take you through a bit about willow, the full weaving process, and how to use garden obelisks.
Make a DIY Garden Obelisk
You can make garden obelisks out of all kinds of wood, and you may have even seen them made from decking planks or ladders. They’re triangular in shape, with pyramid tops, and are often painted to prolong their lifespan and look nice. Those types of obelisks can be very effective, but they can also be expensive to make if you have to buy the wood and materials new.

The DIY garden obelisk you’ll learn to make here is made of bendy wood you can grow and harvest yourself from your garden. That makes it practically free to make and perfect as a sustainable garden solution. It’s amazing what you can make for the garden with sticks and twigs!
We’ll get to the materials in a bit, but you can rest assured that you will not need screws, a drill, or any other hand tools. This is a natural garden DIY project, and willow garden obelisks have probably been made the same way for hundreds of years. That’s probably why woven garden obelisks are a cottage garden MUST.
Using a DIY Garden Obelisk
In the garden, many plants grow perfectly well without support. Then you will have plants that like to climb and vine. Think morning glories, beans, peas, grapes, sweet peas, and clematis. All of them need a framework to grow up and across, so you’ll need to provide them with a trellis. It could be a fence-post-and-wire solution (like this blackberry trellis), netted tunnels, or a wooden garden obelisk.

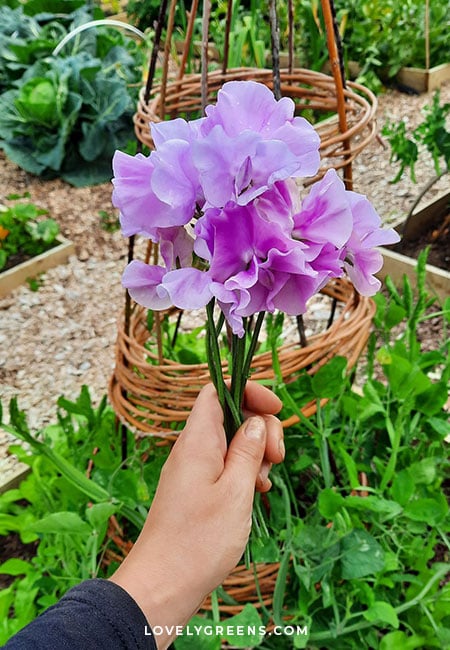
For plants that like to grow up, such as indeterminate tomatoes or beans, you need to provide vertical supports for them to climb. A DIY garden obelisk made of willow can be an excellent tomato cage, sweet pea wigwam, bean teepee, or even a cucumber trellis. They also look great, so while they’re supporting your crops, they can also be stunning cottage garden decorations.

The garden obelisk that I’m about to show you how to make has vertical rods that you can push into the ground. You can either plant after you’ve situated it, or push it in around a plant that’s already in the ground. Use string to train the plant to the obelisk initially, if you wish, since it will give plants a head start in discovering their new support.
Materials for a Willow Garden Obelisk
- 80-100 willow rods
- Large bucket
- String
- Scissors
- Secateurs (Pruners)
This DIY project involves weaving a garden obelisk from about eighty willow rods. If you’d like to weave a fourth band around the middle, you should plan to use about a hundred rods. I use green willow for weaving, which means the rods are either freshly cut or slightly dried over a period of a week or two. If you order willow, it may arrive dried out, though, and will require soaking in water to make it pliable. In that case, speak with the farm that supplies you and follow their instructions.

I’ve also had some questions on the YouTube video of this project that have asked about other materials. Not everyone has a supply of willow on hand, but I’m sure you could use other types of bendy wood. That includes hazel, bamboo, and even ivy and other vines. The vertical supports should be strong and firm, though, and the weavers flexible. That means that if you do choose to use bamboo, you should use freshly cut bamboo for them rather than the rigid stakes available to purchase.
Growing Willow for DIY Projects
Though you can sometimes purchase willow rods from farms, the best source of them will be your own garden. Willow is a family of hardy trees that includes around 400 species. They prefer moist soil and are useful as hedges or in helping to dry up boggy land.

If you leave a single plant to grow, it will grow upwards and branch out into a normal-limbed tree. However, if it’s annually coppiced (cut at ground level) or pollarded (cut further up the trunk), then you can harvest many straight rods from each shrub every year. Many stems can emerge from the same cut area on the trunk, as you can see in the image above.
There are many types of willow, great for basket weaving and making garden features, so you can have your pick. Some are beautifully colored, such as red dogwood, or are very supple, like Black Maul Salix triandra. However, the best willow for basket weaving is probably the Basket Willow, Salix viminalis. This straight and bendy willow has greenish-gray bark and can grow rods between 9-20 ft (3-6 meters) tall. You can grow and use whatever type of willow that you’d like, though.
Harvesting Willow for Weaving
Harvest willow rods each year during the dormant season, usually November to early February in the northern hemisphere. Willow shoots grow tall and form a single rod in their first year, and that’s when you want to cut them. If you leave rods to grow on a second year, they’ll begin forming side branches, which you’d need to cut off.

To harvest willow rods, use secateurs to cut them from the tree as close as you can to the old wood. You can use freshly cut willows, but it’s better to leave them in a dry place, such as a garage or shed, to dry for about a week before you use them. Drying them slightly reduces the shrinkage you’ll get in the weave as the willow garden obelisk dries completely.
If it’s only a short drying period, it won’t affect their flexibility too much either. If you use freshly cut willow in your creations, do expect to see the weave loosen a little, though, over time. As willow dries, it shrinks in thickness and can turn a darker color.
How to Make a Willow Garden Obelisk
Once you understand the basic principles of the three-rod wale, this project will be a breeze. To make it even easier, ensure you have all of your materials and equipment on hand and ready to go. It also helps to have a second person helping you to get the initial three rods woven into your verticals. They have a tendency to want to pop out initially, and having someone help hold their bottom ends while you get that first weave in will speed things along.

A pro tip for this project: sort your willow before you begin. Create one pile for the thickest, straightest, and longest rods. Make a second pile for the smallest and thinnest, and a third pile for everything in between. Use the rods from the first pile for your verticals, the little rods from your second pile for weaving the band at the top-most (and smallest in circumference) band, and the medium-sized rods for weaving the other bands. The thicker a rod is, the less bendy it will be.
To make willow more flexible, you can also put some “spite” into the rod. All this entails is moving your hands down the rod, bending and molding as you go. Slightly bending it helps break down the fibers inside the rod, making it more flexible.
Making a Circle with the Verticals
The first step in this project is to arrange the verticals in a circle to form the sides of your wigwam. They need to be secure, so I recommend driving the verticals directly into the ground where you want the obelisk. If you’re not sure where it’s going, or if the weather is terrible and you want to work inside, place them in a bucket filled with soil, sand, or another material.
Each vertical should be about 4 inches apart, with the thickest part of the willow pushed into the bucket. I used 11 verticals to fill my plastic garden trug, but you may need a different number.
Weaving on a Template
Before we carry on to weaving the verticals, I have a couple more ideas for you. First, if you plan to use your obelisk inside a container, use that exact container to place your verticals and create the obelisk. That way, it will fit perfectly.

You could also weave a willow obelisk using a template. They’re probably better suited for those who want to make many obelisks or who want precise vertical positioning. The first way is to use a cardboard box. Use a pencil to mark out where you’d like the verticals to be placed in a circle. Then push the willow rods through.
The other way to do this is to create a wooden template. Mark out the diameter you’d like your obelisk to be on a wooden board. Then drill pilot holes large enough for the willow to fit through, spacing them about 4 inches apart. Making a wooden template is a good way to produce many garden obelisks of the same size.
Trimming the Verticals
Trimming the bottoms of the verticals is optional, but important if you’d like to display the willow’s natural tips as the obelisk’s finial. I’ve done so in this project, and you’ll notice that the top of the obelisk includes the tapered ends of the willow rods covered in tiny buds. I love that look! But to get it, you’ll need to take your verticals out of the bucket now and line each top piece up with the others.

To do this, line up the tips of each of the rods, then follow the rods down to the thicker ends. Cut them so that the rods are the same exact length. Doing this means that the shorter verticals will determine the final height of your garden obelisk, but it will also create a lovely natural top decoration.
After cutting the rods, place them back into the bucket in their original arrangement and proceed to the next step. If you decide to skip this step, your obelisk will have a finial comprised of long and short tips of the willow rods. You could leave it like that or cut them off a couple of inches above the tie you’re about to make in the next step.
Securing the Top of the Obelisk
Willow obelisks angle up from the ground to provide stable plant support that withstands all weathers. The angle of willow garden obelisks is a gentle curve that finishes on the top with a tie and a filial—the top decoration. The tie can be made with string, but a small piece of willow will be stronger and look nicer.

Find the thinnest piece of willow in your bundle to create it. Work it with your hands to be flexible and as bendy as possible. Next, place about three to four inches of the thicker end against the verticals, where you’d like your tie to be. Wrap the rest of the piece of willow around this vertical bit of itself. When you get to the end, tuck it into itself to create a tie.
Weaving the Bottom Band
Once the long verticals are secured at the top, you can begin weaving the bottom band. In all, you can usually create two to five bands of woven willow to give the verticals the strength to support growing plants. When using a bucket to weave an obelisk, the lowermost band is placed at the bottom, along the edge of the container.

If you’re making the obelisk in the garden, it’s best to weave the band so it’s at least a few inches up off the ground. That way, it provides stability but won’t rot as quickly as if it were in contact with the soil.
Weaving The Three-Rod Wale
Begin by using the three-rod wale technique to create a 4-6-inch-tall bottom band. The three-rod wale involves weaving three rods simultaneously. It’s easy to pick up and will give your willow garden obelisk strength, stability, and a pleasing woven pattern. It can also be quicker than weaving just a single rod at a time.

Start the three-rod wale by placing the thickest ends of three rods just behind three consecutive verticals. Next, take the far left rod and pull it across the face of two of the verticals to its right, then thread it behind the third and then back out. Then move back to the rod at the far left (the original middle rod) and do the same—across two, and behind one. Continue the same ‘across two, and behind one’ with the last rod. Keep repeating this process, always weaving the left-most rod.
How to Add New Rods
When one of your weavers gets too short to reach across two and behind one, then you need to add a new rod. Select a new rod about the same size as the previous one and insert it into the weave. Place it on top of the one you’re replacing, and tuck it behind the last vertical that the old one is placed behind to give it a foothold. There will be other weavers on top of the new rod (from the other two pieces) and they’ll hold it into the place too.

Then continue weaving as you were. For that next weave, you’ll go across two and behind one with both the new weaver and old weaver in your hand. As you weave, twist the old one over the top of the new one, and it will hold better. If there’s a twiggy little end that sticks out, just tuck it in however best works. See how to add a new rod to the weave in the video here.
Once that first band is around six inches tall, stop adding new rods to the weave. Finish off by tucking in the ends of the last ones into the weave.
Creating the Round Template
At this point, you can really see your garden obelisk coming on! You’ll need to create at least one more band to give the structure stability. However, if you push down on the obelisk from the top, you’ll see that the structure bows out above the first band. That means that the structure can bow out as you weave the second band, and you’ll end up with a barrel-shaped obelisk. Thicker around the middle than at the bottom. To avoid this, you can create a round template to help the verticals stay straight.

Take a piece of willow and twist it into a circle slightly smaller than the container’s diameter. Twist it around itself, and it will hold form, as I show in the video. Afterward, use string or clamps to secure it to the inside of the willow obelisk. It should be placed above where you plan on constructing the second band, and below where you’ll place the third band. Keep the circle as level as possible, and it helps to tie it onto each of the verticals.
Weaving the Middle Band
The middle band of woven willow is a little trickier to get started than the bottom rung. There is no support from the container lip to hold the three starter rods in place! If you can, ask a second person to hold the ends of the three rods in place while you start a new three-rod-wale at a distance below the circular template you’ve just tied to the obelisk verticals. Allow for the height of this second band, which should be four to six inches tall.

If you don’t have a second person to help, you can do it yourself. There may be ends popping out, but just hold it together and get it started the best you can. Though I haven’t used one, a clamp may be useful for holding those three weavers in place initially.
Weaving the Top Band
Creating the top band(s) is almost exactly the same as weaving the other two. The only difference is that you use the thinnest willow rods from your bundle. The smaller the diameter of your band, the more difficult it is to weave the rods around the verticals. This top band can be smaller or the same size as the one under it.

Final Project Advice
When you’ve finished weaving the top band, your willow garden obelisk is complete! You can pull it out of the container and be amazed at how sturdy it feels. At this point, you can remove the circular frame template (or leave it on, if you’d like) and make adjustments. Willow is very forgiving when it’s relatively fresh, but once it dries, it can become hard and rigid.

You can begin using it right away in the garden to grow your climbing plants. Push the legs into the soil, then plant around each vertical. Be aware, though, that pushing green willow into the ground and leaving it there can stimulate the willow to grow. So, unless you remove the bark from the ends of the bottoms of each of the verticals, you could end up with a living willow obelisk. It wouldn’t be great for growing other plants, but it could be an interesting garden piece in its own right!

To avoid growth, store the garden obelisk in a dry place, such as a shed or garage, and let it dry out for a month or two before using it. As it dries, the willow will darken and harden. If you’re making garden obelisks in winter, this is a great option since you probably have little growing that needs a garden trellis for a while.
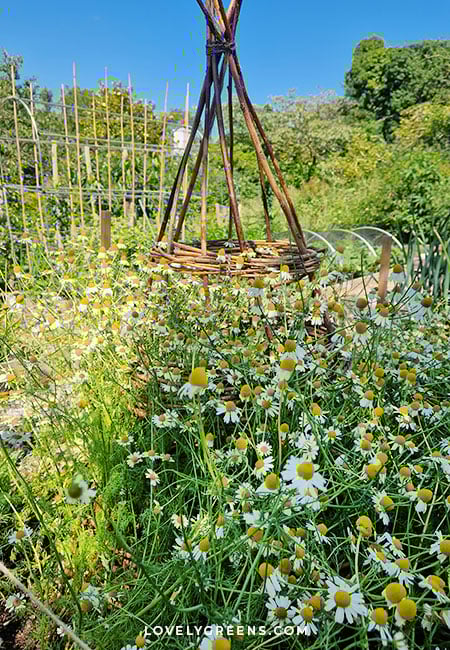
Then, when spring arrives, use homemade willow obelisks to grow peas, sweet peas, beans, and many other climbing plants. You can sow seeds at the base of it or plant young plants near each vertical. They’ll be scrambling up the structure in no time!