Natural Rosemary Soap Recipe with Cambrian Blue Clay
This website is reader-supported - thank you! As an Amazon Associate I earn from qualifying purchases.
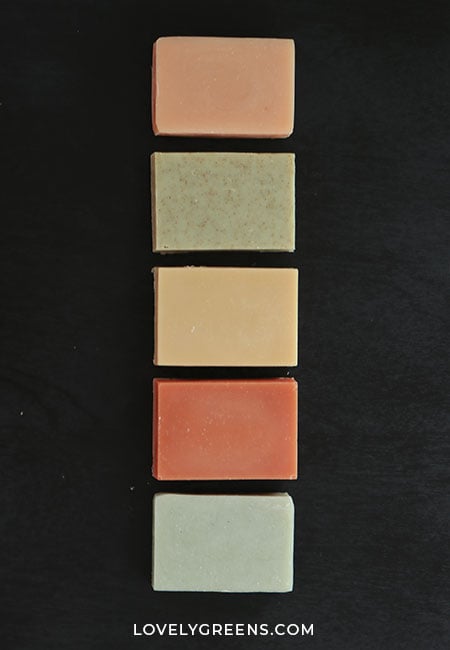
Recipe and instructions for using fresh herbs and colored clay to make natural rosemary soap. It’s a blue-green hue, thanks to Cambrian blue clay, with a gorgeous scent and pretty pieces of rosemary leaves throughout. Cold-process soap-making instructions are included, along with a DIY video.


This is a natural soap recipe that blends together two special ingredients—rosemary and Cambrian blue clay. Rosemary, in two forms, adds scent, decoration, and anti-bacterial properties. Cambrian blue clay is a cosmetic ingredient that can tint soap a soft green-to-blue. It also has oil-drawing properties that benefit those with oily skin. Together, the herb and the clay create a beautiful rosemary soap, whose bars you can use on hands, body, and face. The recipe includes all-natural Vegan oils and is suitable for intermediate soap makers.
What I like about this recipe is that it’s very gentle, cleanses well, and looks attractive. Though I’ve created the recipe specifically for oily skin, it’s suitable for everyday body use with those with normal skin. The rosemary essential oil smells incredible, and you could use homegrown rosemary to personalize your bars.
Cambrian Blue Clay as a Soap Colorant
You may have found this recipe through my popular piece on naturally coloring soap with clay. There are many wonderful natural ingredients you can use to add color to soap, but some have other attractive properties as well. Cambrian blue clay is a natural element mined from the Altai region in northwest Russia, and it naturally colors soap shades of green to blue.

You use it in relatively small amounts in cold-process soap recipes—typically about 1 teaspoon per 1-lb (454 g) batch. It can clump and leave speckles in your bars if you add the powder straight to the soap batter, though. This is why you either add it directly to the lye solution when you make it, or mix it with a little distilled water and add the slurry later. Either before or after trace.
Sourcing Cambrian Blue Clay
I created this soap recipe in 2018, and at that time Cambrian blue clay was a very niche ingredient. A Russian friend gave me a box of it from the manufacturer Fitokosmetik (Фитокосметик) and I was wowed by the lovely soap coloring possibilities. Since then, true Cambrian blue clay has become rare and the product I used seems discontinued. The last box I was able to buy was over a year ago and they don’t list it on their website any longer.

There are many other sellers of Cambrian blue clay, Serbian blue clay, Russian blue clay, and others on the internet—usually selling on Amazon or eBay. However, all that I have seen are fake. Clays do not morph color in soap recipes and the reviews I’ve seen of all the current products indicate that the pretty blue powder turns cold process soap gray or brown. This indicates that the clay is probably adulterated with micas or other ingredients that don’t hold up in cold process soap.

Currently, the only places to source Cambrian blue clay seem to be large manufacterers who supply to large companies, not the average home soapmaker. So, I unfortunately would advise caution when making this recipe. If the clay you use is fake, you will not get the green or blue colors promised.
Color, Scent, and Decoration
If you can get quality Cambrian clay, you will be excited to use it as a natural soap colorant. I certain am! Besides the lovely earthy green-blue it gives, clay can also add cleansing and detoxing qualities to soap. It’s not as strong as if you were using it as a face mask, though. You will get more from the rosemary essential oil, which is also the ingredient that scents this soap recipe.

Like clay, rosemary oil kills bacteria, especially Propionibacterium acnes, the type that causes pimples. That makes rosemary ideal for gently treating problematic skin. However, the essential oil is the more important rosemary ingredient in this recipe. Most people think that essential oils are scented herbal perfumes, but they’re actually concentrated plant essences with therapeutic properties. Just the smallest bottle of rosemary essential oil requires pounds of rosemary leaves and a complicated process.

The fresh rosemary pieces in this recipe are for decoration and very light exfoliation. Even if they are green when you add them, expect them to dry to a very dark brown. When chopping the rosemary for this recipe, I recommend getting the pieces as small as possible. This is to avoid large pieces becoming scratchy, soggy and unappealing when using the soap. You can also leave the rosemary leaves out completely.
Beginner Soapmaking Guidance
If you’re new to making natural handmade soap, you need to be aware that this is natural chemistry. Cold process soap making uses a caustic ingredient called lye, sodium hydroxide, that requires safety measures and careful handling. After 48 hours, the lye has completely transformed into harmless soap, but until then, caution is necessary.
The free soapmaking series gives a good introduction to what to expect from ingredients, equipment, and cold-process soap recipes. It will give you a good foundation for making all handmade soap recipes, including this cold-process rosemary soap recipe. One section that’s especially important to read is the one on equipment and safety, since it will prepare you to work with lye.
- Natural Soap Ingredients
- Soap Making Equipment & Safety
- Easy Soap Recipes
- Step-by-Step Cold Process Soap Making

Natural Rosemary Cold-Process Soap Recipe
Equipment
Materials
Lye solution
- 64 g sodium hydroxide 2.28 oz (also called lye)
- 115 g distilled water 4.06 oz
- 1 tsp sodium lactate Optional (it helps harden bars quicker)
Clay mixture
- 2 tsp Cambrian blue clay 3 g / use another colored clay if you wish
- 6 tsp distilled water 30 g
Solid oils
- 140 g coconut oil (refined) 4.94 oz (31%)
- 25 g shea butter (refined) 0.88 oz (5.5%)
Liquid oils
- 190 g olive oil (light colored or pomace) 6.7 oz (42%)
- 75 g sunflower oil 2.65 oz (16%)
- 25 g castor oil 0.88 oz (5.5%)
Add after trace
- 4 tsp rosemary essential oil 14 g / 0.49 oz
- 3 tsp rosemary leaves (chopped finely) optional
To prevent soda ash
- rubbing alcohol in a spray bottle
Instructions
Prepare your Soap Making Station
- Cold-process soapmaking is chemistry, and this recipe uses lye. Lye is a caustic substance that is completely neutralized in the soapmaking process, but it can be harmful if not handled correctly. Please read this soap making safety guidance before proceeding.
- Ensure that your kitchen workspace is clean and set up with all of your tools, ingredients, and equipment. Please also prepare yourself by wearing long sleeves, closed-toe shoes, goggles, and plastic gloves. Soap making is fun but also chemistry so you need to work safely.
Make the Lye Solution
- A couple of hours before you make soap, put on your goggles and gloves, and make the lye solution. You should do this in a well-ventilated area and try not to breathe in the steam. Measure the sodium hydroxide (lye) into a container and the distilled water into a heat-proof jug.
- Pour the sodium hydroxide into the water and stir very well. It will be very hot at this point, so be careful. Set the jug somewhere safe and leave the lye mixture to cool to just above room temperature 27 °C (80 °F).
Prep Work
- While the lye solution is cooling, measure the solid oils in the pan and the liquid oils in a jug.
- Finely chop the rosemary. Fresh leaves are better for this recipe, but dried is fine. The rosemary pieces eventually add dark, dried specks to your bars and you can feel them as you use the soap. If they're not small, they may feel scratchy. You can also make this recipe without the rosemary leaves if you wish.

- In a ramekin, mix the clay with the extra water. The extra water amount helps mix the clay into the soap batter and it also stops the clay from making your soap crack.

Melt the Solid Oils
- When the lye solution is room temperature, stir in the sodium lactate. The amount listed is for liquid sodium lactate so if you're using powdered sodium lactate, just use half the amount given.
- Place the pan of solid oils on the hob and turn it on to the lowest heat setting. They will melt quicker than you expect, so stay with the pan, moving the oil around in the pan to help speed up melting. When there are a few small pieces of solid oil still floating, take the pan off the heat and set it on a potholder. They'll melt with the residual heat and some gentle stirring with your spoon/spatula.
Add the liquid oils and clay
- When the solid oils are fully melted, pour the liquid oils into the pan of melted oils. To minimize air bubbles getting in, try pouring the liquid oils onto a clean spatula held over the pan of oils. Use the spatula to get every last drop out of the jug then stir the oils together gently.
- Next, pour the clay mixture into the pan. Use a spatula to scrape all the color out of the container and into the pan. Don't be alarmed if you see blobs of color at the bottom of the pan.
- Take the temperature of the pan of mixed oils and clay. You're aiming for around the same temperature as the lye solution, but they can be a few degrees higher of 27 °C (80 °F). If they're too hot, floating the pan in cool water whilst stirring helps to cool them quickly.
Bringing the Ingredients to 'Trace'
- When the temperatures are right, pour the lye solution through the sieve and into the pan of oils.
- Carefully place the head of the immersion blender (stick blender) into the oils. Insert it at an angle so that any air inside the head can escape as you submerge the head. Air trapped inside the head can create air bubbles in your soap.
- The next step, bringing the ingredients to trace, is best shown in the video at the bottom of this recipe. Have a watch to understand all the steps better, but especially this one.
- Stir the contents of the pan gently, using the immersion blender as a spoon. Then bring it into the center of the pan and hold it against the bottom of the pan. Not moving the immersion blender, pulse for a couple of seconds. Then gently stir. Keep repeating this pulse then stir process until the soap thickens to a light to medium trace. You'll see just the faintest trace marks on the surface of the soap and it will still be pourable. Stop blending, tap off the immersion blender's head, and put it aside. You will not use it again.
After Trace
- Add the rosemary essential oil and gently stir with a spatula until completely mixed in.
- Sprinkle the chopped rosemary into the soap batter and gently stir it in.
Molding and Curing
- Pour the soap batter into your mold(s), generously spray the surface with the rubbing alcohol (isopropyl alcohol), and set the soap aside. Come back again after fifteen minutes and spray the surfaces again — the alcohol creates a barrier on the soap and helps stop soda ash from forming.
- Leave the soap to harden inside the mold for at least 48 hours before taking it out. It may be a little sticky, and if this is the case, you can leave the soap in the mold for longer, even a week or more. You can also put the entire mold in the freezer for 30 minutes to an hour. They should pop out easily after that.
- Next, find someplace in the house that's safe from animals and kids and that is airy and out of direct sunlight. Lay a piece of baking paper down and space your bars of soap out over it. You should leave your soap there for four weeks to allow excess water to evaporate out of your soap and for them to fully harden up. This is called curing soap.
- This soap's lather is stable and creamy and its color will be grey-green to grey-blue. When fully cured, you can begin using the soap and gifting it to others. It has a shelf life of up to two years.

I made this recipe today but used the method for mixing clay which you described for the floral soap in your soap making course. So I added the clay to the deionised water ( I couldn’t get distilled water) and it turned a lovely blue colour. As soon as I added the lye it turned to a caramel brown.
Should I have done something differently?
I had made milk soap a couple of days ago with the same ingredients and that is fine.
Thank you
Hi Carolyn, I suspect that you may have accidentally used a fraudulent Cambrian blue clay. Could you send me a photo of your product and/or the product listing to my email, please? It’s tanya at lovelygreens dot com. The reason I suspect this is that it’s becoming more common for unscrupulous ingredient manufacturers to mix ordinary kaolin clay with micas or other pigments. Then try to pass it off as a true colored clay! Many micas do not hold their color in cold process soap and can even turn brown or beige.
Hello Tanya,
I love your recipes and will try a few. One question about this one, I live in Argentina and I cannot find thaty clay. Can you give me an advice on what to use as an additive, either food, or spirulina, or rosemary powser or something else, that could give me a slight greenish hue like your soaps?
thank you!
Sofi
Hi Sofi, long-lasting green color can be illusive in natural soapmaking. However, you could use an infused oil made with either alfalfa or spirulina. They give different greens but are both lovely! I’d make this recipe using about 15% infused oil. For a single batch, that would mean replacing 68 g of the olive oil in the recipe with alfalfa-infused olive oil. You could replace all of the olive oil with infused oil but that would give you a deeper green.
Hi Tanya, tysm for this recipe. I followed it closely but I am not sure what happened as the color is deep blue and I had to leave the soaps in the mold several days bc of the oil on top. Some of the oil reabsorbed but not all. I finally collected the oil and popped the soaps out to cure. Will they be usable? And can the recycled oil be reused in another way? Tysm
Hi Mollena, hmmm, something didn’t go right. Could you email me photos of your soap and a bit more detail? My email is hello at lovelygreens dot com. It could be that you got false trace, didn’t mix enough, or accidentally got the measurements wrong. They could be fine to use after curing but they might also be harsh. Also, I wouldn’t reuse the oil.
I made this soap Tanya. It has come out so good. Thank you!
Can I used dried rosemary instead of fresh? I just dried rosemary from my garden and would love to use that.
Yes you may. Chop it up as finely as you can before adding it to the recipe.
Hi Tanya
Thank you for your very quick answer.
Since I’m not very good at English I’m afraid I don’t know what you mean by “gelling”. Do you mean that the soap wouldn’t cure as quickly as it would in a cavity mold?
If that’s what you mean, can I then just leave the loaf mold in the cardboard box for a longer time or maybe put it in a warm oven overnight?
I apologize that I didn’t fully understand your first answer, but I hope you have patience with me. Thanks in advance for your help.
Yours sincerely
Mai
Gelling is an aesthetic process only. It does not impact anything else, so don’t worry. Gel happens when the soap heats up in the mold after pouring – it does this naturally. This heat causes the soap to turn a more vivid color and is useful when using some natural colorants. If you don’t understand the process and use loaf molds, it’s likely that you’ll get a partial gel inside the soap. A circular area that appears darker than the rest of the soap.
Hi Tanya
Thank you so much for your inspiration and imaginative recipes.
I made lemongrass soap with great success and now I have the following questions.
Can all your recipes be multiplied and made in a loaf mold and cure in a cardboard box using the same method as in the lemongrass soap recipe, or do some of the soaps like this rosemary soap have to be made in flat molds and cure on the kitchen counter?
I really like the rustic look the soaps get when they are cut out of the loaf molds.
Is it possible to use the same procedure for all the soaps in terms of curing?
Yours sincerely Mai
Hi Mai, you’re most welcome! Almost all of my soap recipes can be easily scaled up to larger batches. They can also be made to be poured into boxes/loaf molds. I tend to use cavity molds for beginner soap recipes since they’re so much easier for people to start off with. They’re also very helpful for stopping soap from ‘gelling.’
Hi, Tanya – I made this soap a few days ago and am quite disappointed in the grey color. I will email a photo of the soap to you, and also the brand of Cambrian blue clay I used. What brand(s) of clay are best? I see in another comment that you asked if they gelled the soap? I put mine in individual bar molds but didn’t put them in a pre warmed oven or anything. And the recipe calls for cooler temps.
Thank you.
I’ll keep an eye out for your email and photo. Could you also send me through the exact ingredients you used? I’m curious to know more about the olive oil and the clay, of course.
Do all soap recipes need sprayed with alcohol? I dont remember seeing it in your other recipes I printed.
No, it’s an optional step that helps stop soda ash. I don’t include it in every soap recipe I share and it’s completely up to you if you’d like to do that step.
This recipe is absolutely incredible. The color is exactly like the one on this site. It smells devine and the lather is rich and creamy. I absolutely love it. Thanks a bunch.
You’re most welcome, Chloe :)
Hi, i am hooked on your soap making process so i am going to try this rosmery soap. Wish me luck. Thank you for sharing these free reciepies.
Hi! Thank you for the great recipes and advice. I just have one question. I made this recipe with the following changes: lemongrass EO and virgin olive oil instead of pomace. The cambrian clay was pretty blue, but my soap still turned out white/beige, not even a hint of green…. What could be wrong? Could it be the virgin olive oil? Or just bad clay? Thanx in advance!
Hi Marri, and that’s really odd. Did you gel the soap afterward?
Hi,
I followed the recipe above however I used extra virgin olive oil and I forgot the sodium lactate. The soap at trace was ocre yellow so I added an extra teaspoon of cambrian blue clay. The bars came out still ocre yellow. When I chopped my fresh rosemary I saw the same color on the cutting board. But I added this as last ingredient. Do you have a clue on what went wrong? They smell wonderful.
Kind regards,
Katja
Hi Katja, evoo is the likely culprit for giving your soap a more yellow color. Cambrian blue clay should cover it pretty well, though! Ie the packaging for your clay in Russian? If not, you may not have real Cambrian blue clay.
Hi! I have two questions, what other clays do you recommend and is there a way to make this soap without the clay? I love the oil combinations you use for this soap so I was just curious. Thanks!
Hi Tati and you can absolutely make the recipe without the clay. You can also substitute the clay for loads of others — here are some ideas for different clays in soapmaking.
Thank you Tanya! And just so I’m clear, I can eliminate the clay and water mixture and not change anything else with the other ingredients right? Thank you again!
That’s right, Tati. Clay is an optional ingredient in soap recipes and can be left out.
Sorry one more question, in this recipe it states that we use 2tsp of clay with 6tsp of water, but on your other articles you suggest 1tsp of clay mixed with 3tsp of water. Which should be used?
Hi Tati, you can use different amounts of clay if you wish in soap recipes. 1 tsp is the right amount for most clays but you can add more if it helps deepen the color. You can also use less! I personally wouldn’t use more than 2 tsp of clay PPO though since it won’t add much more color and can cause issues with the soap. Too much clay can make the soap batter unworkable and can impede lather. In some cases, too much clay can cause soap to crack.
Hi Tanya!
You may have stated this somewhere and I missed it (if so, apologies) but can we mix in dry herbs in place of fresh, with a similar result?
Much thanks! Your platform is wonderfully informative!
Andrea
Hi Andrea, dried is usually always better when working with herbs and soapmaking. So yes! Feel free to use dried rosemary :)
Hi, I’m interested in using witch hazel in this recipe as an added ingredient for oily/spot prone skin. The WH I have is 14% alcohol – do you think that this is okay? If so, what amount do you think would be good to add and at which point of the recipe? Thanks so much for your amazing website! :) Kayleigh
Hi Kayleigh, we use toners after cleansing to adjust the skin’s pH after it’s come into contact with soap and water. Using witch hazel in soap wouldn’t allow the toner to work the way it’s supposed to do. Personally, I wouldn’t use the witch hazel you have in soapmaking since the alcohol in it could cause unexpected things to happen. Even when making beer soap, you boil the alcohol off first.
Love this stuff! Your recipes are always best. Continue to share useful resources over these blogs.
Can I omit the water to be added to the clay and replace it with the EO amount that is called for in the recipe? I have made several soaps recently and I’ve learned that combining the EO directly to the clay and letting it set for awhile will help the EO smell stay longer.
Hi Candice, if you add the clay after trace, you must always mix it with 3x its volume in water. If you’d like to stir the essential oil into the clay the day before you can do that as well. It’s a way to help ‘fix’ the scent of soap but essential oil will not stop the clay from cracking your bars. That’s why you mix it with water before stirring it into the soap batter.
Love the scent and the ease of making this wonderful soap. Its been about 3 weeks of curing and it looks like my small pieces of dried herbs are producing an orange color this is coming from each little piece of the added dried rosemary. Is this normal or should I toss the soap and start over? I don’t know if this is called DOS or if this discoloration is part of the dried herbs.
It’s normal Barb, and is the herb infusing into the soap like a tea :)
All I can say is WOW ! What a wonderful scented soap that I will be making again. Rosemary Rocks !! I used white kaolin clay (did not have the blue) and added a touch of green oxide pigment to pull a soft green hue to my soap. I never knew how wonderful rosemary eo smells in a cp soap. I truly enjoyed the easy to follow recipe and the outcome of my cp soap. I’m retired, a hobbyist of trying soaps and lotions recipes, and this one is my favorite to date. Looking forward to trying another one of your recipes. Thank you.
Hi Tanya, I just wanted to take a moment and thank you for publishing your wonderful recipes. I made this soap several weeks ago and have been using it for a few weeks now and absolutely love it! These bars are very hard and are lasting a long time and have the most amazing feel. The lather is soft, creamy, and rinses off very cleanly. I will be trying the basic recipe next, but this one goes in the favorite column. Thank you, again!
You’re so welcome Donna :)
Hi, I was wondering can I put the fresh whole flower of rosemary and the fresh whole mint (different soap) on top of the soap trace as the last step just like you did with lavender ( https://lovelygreens.com/honey-lavender-soap-recipe/ ) ?
I see them here (https://lovelygreens.com/guide-herbs-flowers-soap-recipes/) on the dried list but not on the flower one :(
If I sprinkle alcohol maybe they won`t lose the color?
Hi Petra, you could with rosemary, though the leaves will eventually turn dark green to black. Mint has too much moisture in it though and will mold if you place it on top of soap. Wetter flowers and herbs need to be dried before using as decoration :)
I love this recipe! My only issue is the bars are a dark gray and not a light or medium blue-gray or green-gray. Could it be the batch of cambrian clay I received or maybe I made an error I don’t recall?
Hi Cindy, the blue-green comes through better if you use light-colored oils including pomace olive oil. Extra virgin olive oil has a dark hue that might muddle the colour a bit — is that what you used?
I used Pomace Olive Oil. I looked up the clay I bought from Bulk Naturals and the description says “Russian Cambrian Blue Clay With Silver Ions (Valdai Blue Clay)” Not sure if this is the same thing or if this is why the color is different.
I just sampled the clay. That is definitely the issue. There were large chunks and when I broke them open, it was all black inside. I will reach out to the vendor now. Please feel free to delete my comments since the issue is clearly not your wonderful recipe! Thank you so much for replying :-)
I’m glad that you worked that one out! I’ve not come across that issue with [Cambrian blue] clay before and it’s good information for others who might come across the same issue.
I’ve made this soap twice; both with great results. Can you elaborate on your cleaning process? I tried to scrape out just as much as possible, but how do you go about cleaning all of your tools after making a small batch? Is it ok to place in the kitchen sink and allow the residual oils go down the drain?
Hi Robyn, and I go through how to safely clean up after soapmaking over here. Thanks for the feedback on the recipe too! Really pleased that you’re pleased :)
Hi Tanya, love all of your soap recipes! Your videos are wonderful. My question is, can I use the Eco-friendly recipe as a base, and add essential oils and color at will?
Thank you
Hi LeAnn, and YES :) It’s a fabulous recipe to customize because the natural color is very light, making it ideal for natural colorants. You can also customize it by adding essential oils.
Hello, I am just going to attempt to make the rosemary soap. I don’t have any sunflower oil could I substitute it for any other? love all your recipes and hope to make many more.
Hi Jean, and everything you’d like to know about changing and customizing a soap recipe is over here.
Hi Tanya – I finally decided to make my second batch of the Rosemary soap with Cambrian Blue Clay using the original recipe and not the one in the eBook; thanks for your earlier advice.
I followed the recipe to the letter, or so I thought. As usual I made the soap in the garage so it was cool in there, but I was not particularly concerned as the soaping temperature of the recipe is 80 degrees F. However something clearly went wrong somewhere as the soap was mainly covered in a soft, whitish deposit, particularly on the base of each piece of soap. I used individual type silicone moulds. There is some green showing through in some places on the larger bars, whereas the smaller, 5.5cms square bars are totally white with some flecks. All bars feel soft in the centre. I moulded the soap at a light trace.
I wonder if it was a combination of the cool garage and the low soaping temperature that was responsible for the poor result; my first batch last year was perfect. I also wondered whether I had a false trace and that some of the oils were re-solidifying.
I would very much appreciate your views on this. I suppose that I should be philosophical about this as it’s the first time that anything like this has happened but obviously would like it to be the last.
Hi Nick and it sounds like you’ve got soda ash. It does happen with soaps higher in water, in humid places in the world, and soaping at cool temperatures. It’s perfectly safe though doesn’t look the best.
Hi Tanya, what wonderful recipes you have on your lovely website. I’m fairly new to soapmaking so this is the first of your recipes that I have tried. I stuck very close to the recipe and the temperature of 80 degrees F for both the lye water and the oils. My workshop, as I call it, is unheated so definitely a bit below room temperature. Everything went well; my soap batter looked just the same as in the video when I poured it into the silicone moulds. After a day it was still very damp to touch so I left it for another two days. It was also mostly white in colour. I unmoulded it after 4 days and it was still softish and the bottoms, or top, when in the mould, were almost pure white. I’ve had the soap in the house now for several days and some green colour is showing through but the bottoms are still white. I wonder what I have done wrong, or was it something to do with the temperature, I’d appreciate your help.
Hi Marriane and I suspect that the white that you’re seeing is soda ash. If it washes off with a little water then that confirms it. In that case, I’d recommend working in a warmer environment and/or covering the exposed surface of the soap with cling film. Leave it on for a few days before unmolding. The softness is due to the recipe and the optional sodium lactate should help with the initial firming. Soaps high in olive oil are soft initially but cure to be very hard.
Thanks for your reply Tanya. To help cure the soap I put it into the cupboard where the boiler is to give it a bit of extra warmth. This evening I took the soap out and gently washed each piece under the tap. After washing the softness of the white on the surface had gone but the white colour still remains. The bars feel fairly hard now.
A couple of days ago I wondered if they were lye heavy, so tested the softish white with a little water and a litmus paper; it gave a reading of ph8 so concluded that they were safe in that respect.
The green colouring seems to show up a bit more now; I guess that I’ll have to keep these ones for my own use and make another batch, at a warmer temperature, to give to friends and family.
Many thanks, Marriane.
Hello, can you advise where to buy Cambrian Blue Clay in the uk from a supplier who can also supply an MSDS in English? I bought some for a soap I made but the MSDS is in Russian. Thank you
You’re lucky to even get an MSDS :) They’re very elusive for Cambrian Blue Clay as there doesn’t seem to be a supplier in the UK who distributes it as a cosmetic ingredient. You’ll need to have the MSDS translated if you wish to use it in your products.
Hi Tanya – I made this soap, Rosemary with cambrian blue clay, during the autumn and it is a truly lovely soap. However, recently I purchased your e-book which is very good. Toward the end there is the basic recipe with various additions to give differing results. One recipe is the Clay Sopa recipe with rosemary. Thus, you have two versions of the same recipe. As I am about to make some more soap I wondered which recipe to use; the original one or the one included in the e-book. I’ve run both through soap calc. and the results are naturally different. I wondered if you felt or considered that one recipe was better than the other. I would appreciate your comments.
Hi Nick, the recipes at the end of my ebook are all (pretty much) the same base recipe. Each variation shows how to incorporate clay, botanicals, scent, and additives in different ways. It’s up to you which recipe you’d like to try/use :)
This is next up on my list of your wonderful recipes but your amazon source is out of blue clay… do you have another recommended source?
Hi Lisa! If you can’t find cambrian blue clay, you could also use woad or indigo to naturally color soap blue.
I love your recipes, have made the eucalyptus and the one of carrot and loved it.
I want to ask if you have any recipe of soap with mauve? tjank you. all the best.
Mauve as a color? You can use alkanet root to achieve a purplish color like in this recipe: https://lovelygreens.com/natural-purple-soap-alkanet-root/
I love your website! Have already made several of your recipes for cold process soap. I just finished the Natural Rosemary using fresh rosemary. I ran the recipe thru SoapCalc only because I’m trying to understand and learn SoapCalc, but when I did the water comes up at 150g not 115g in your recipe. I plugged it in as a 33% water discount. I also made the recipe as you indicated. Just trying to understand the difference between your recipe and what I see in SoapCalc. Thank you.
Hi Lisa, the extra water amount is in the clay mixture, making the total water amount 145g :)
Hello! The soap is great, really! Just a question: how do you prevent rosemary to turn the soap brown? Thank you.
There’s no way to prevent it, I’m afraid. Each piece of rosemary will turn a dark brown shade and fortunately I think it looks really pretty in this soap recipe.
I used this recipe to make soap for my friends and family and they all absolutely loved it! I am about to make my 2nd batch :)
I have made this soap a few times now. It is wonderful every time. I have substituted about 1/4 of the rosemary essential oil with peppermint, and I just love it! I find the two oils really complement each other. I have also used the saponification chart to make substitutions for some of the oils and altered all the weights to accommodate the specific molds I like to use. I really like using tallow in this recipe, though I have done it without in deference to friends who prefer vegan products. I really appreciate you sharing your knowledge and expertise so freely, it has awakened a joy of creativity in soap making!
Hi, I am looking for palm free soap recipe about six weeks. I think my search is completed. I am satisfied with your receip . I am making soap first time. Thank you for good recipe. My English is not good enough.
Hi Tanya,
I made this soap and have some soda ash on the top. I did only let it go to a light trace before pouring as I wanted it to be easy to design the top. I am wondering if this soap can be made at a higher temp as I heard temp also affects the possibility of getting soda ash, can I make this soap at 38°C?
Thanks! ?
Hi Jenny, this soap has a high water content, which is the most likely suspect for causing soda ash. But yes, that combined with low soaping temperatures can cause soda ash to form, especially if it’s cold in your house or you have high humidity. To avoid soda ash, I recommend making the recipe at 120F and spraying the tops with rubbing alcohol after you pour the soap into the mold. It creates a barrier that stops carbon dioxide in the air from reacting with lye to cause soda ash. It will evaporate off by the time it comes to unmold the soap.
Hello Tanya,
I love your website and videos! I have just finished my first batch of soap…and did a play on your rosemary soap (I used beautiful mountain lake clay I collected myself). Other than using slightly more dry powdered clay (no more than an extra gram), I followed all your recipe amounts to the letter. I have just removed the soap from the mold, and the loaf (uncured) weighs 654 g (instead of the expected 454 grams that make up a pound). Is this normal? As your recipes are 1lb recipes…what does that weight refer to? The weight of a batch after curing? The weight of just the oils in the recipe? Is my brand new scale perhaps inaccurate? The loaf smells and looks lovely, but now I am worried I have messed something up and perhaps made unsafe soap. Any help would be so greatly appreciated. Thanks!
Hi Sara, the weight in soap recipes refers to the base soaping oils only. The additional weight comes from the water, lye, essential oil, herbs, and clay. Some of that weight will evaporate out during the curing phase though.
Hi:)
I have made 4-5 batches of cold process successfully and 1 batch of hot process soap that never fully hardened. So I’m not completely new, but certainly not experienced either! I found you on you tube yesterday and love your tutorial. I went to one hands on class and this was just as helpful. Thank you so much. My question – doesn’t the tutorial say you picked the sprig of Rosemary the day before you made the soap? So the chopped rosemary that goes in the soap does not have to be dried? One more question- where do you buy your supplies?
Rosemary is one of those rare herbs that you can add to soap undried BUT it must be cut very small and it will turn black. It’s a visual effect more than anything else so you can leave the herbs out if you wish.
Thank you for this wonderful recipe! How would I go about decorating the top of the soap loaves with fresh rosemary? I have tried in the past and the rosemary turned brown/black. Not sure if it was because the temperature was too high during gel phase? Would you suggest waiting 24 hours after gel phase and then attempting to add the rosemary using isopropyl alcohol? Many thanks in advance for your thoughts! x
Hi Leanne, I don’t recommend decorating any soap with fresh herbs or flowers — only dried. Fresh material will mold over, or cause the soap underneath to get icky. To keep the rosemary as green as possible, dry it quickly using a food dehydrator if you have one. Wait until the soap is fully cured, then spray the tops with alcohol or witch hazel and spinkle the chopped rosemary over. When the alcohol dries, the herbs will stick :)
Hi, I’m so excited to make this soap. And I’m also new to soap making . Thinking of sodium Lactate , since it’s optional, I wanted to omit it. So that means do I have to cure the soap for longer time , more than four weeks . Thanks for your detailed recipe . Looking forward more !
Without it, the soap will be sticky at first and be difficult to get out of the mold. You can just leave it in the molds for part of the cure time though.
Made my first batch a few weeks ago! Thank you! Questions: can this recipe be doubled easily? I am thinking of making about 100 as favors for my wedding. They will be made in molds shaped like animals (we are biologists). Also, how long do they keep for? I’d like to start making them now for my wedding in August 2020. Thanks!
Feel free to double, triple, etc, this recipe. I share soap ideas in one-pound batches for the hobby soap maker but all of them can be increased in size. Once made, your soap has a shelf-life that’s the closest best-by date of your ingredients. So use oils that have a long shelf-life. The rosemary in this recipe brings the best-by date down to a maximum of one year though. All the best for your wedding this summer :)
Thank you very much! Is this recipe transferable with other herbs?
Yes, you could use lots of other different dried herbs for this recipe instead of rosemary. Peppermint, oregano, lemon balm, and thyme to name a few. Essential oils are different though and some won’t be safe in the same quantity as the rosemary eo in this recipe. For further guidance on other essential oils, and how much to use, head over here: https://lovelygreens.com/make-soap-with-essential-oils/
Is it okay to substitute the olive oil pomace, for evoo?
Yes of course. It’s darker in color though so your end bars will be a different shade though.
Hi, I’m not going to add the clay as I don’t have any. Should I add the water you use for the clay in with the lye water mix or omit it completely? Can’t wait to make it I love Rosemary.
You can just omit it. It’s only needed to mix the clay, not for anything else.
You state you are using a water discount of 33%.
Soapcalc asks for:
Water as a % of oil, or
Lye concentration, or
Water : lye ratio.
What do you mean water discount 33%?
I was just checking out your recipe with soapcalc trying to learn more.
Thanks so much. This batch will be #2 for me. Batch 1 is great soap but doesn’t smell that good.
Have a read on what water discounting is about half-way down in this piece: https://lovelygreens.com/change-customize-soap-recipe/
Why do you think the soap doesn’t smell great? Are all of your ingredients within their best-by date? Old oil can go rancid quickly in soap making.
Hello Tanya,
Thank you for this recipe! I have rosemary that needs harvesting and this soap fits the bill. But this will be my first soapmaking experience and I haven’t been able to buy the Cambrian Blue Clay ($27 shipping to Canada and cannot find it here) so I need to swap clays.
My question: can I replace the Cambrian Blue Clay with any other type of clay? I understand the color of the clay will change the color of the soap, and also it’s properties. Hence I would probably stick with some green clay which will fit the color and properties – would that be right?
Thank you for a great website, tutorials and information – you are definitely my “go-to” for soapmaking advice (amongst other topics)!
Hi Susan and thanks for being in touch — good question! Yes, you can use most any other clay for this recipe. Stick to using just one teaspoon of clay per pound of oils as a general rule. There are many to choose from!
Hello. I love your recipe. I have one question. Can I change the castor oil for almond oil? thank you :)
Sure, but if you change any oils in a cold-process soap recipe then the Sodium hydroxide amount has to change too. Use the SoapCalc to get the amounts you need: http://soapcalc.net/calc/SoapCalcWP.asp
Thank you so much for your video tutorial and wonderful recipe! Smal batches are so helpful as I am just making soap for myself (and I guess giving to my friends and family!) I am just getting into soap making and excited to try this one!
hi Tanya, thanks for sharing your wonderful soap recipes. Thinking of making some for commercial purposes. but i am in Africa and its quite difficult getting fresh rosemary. I was wondering if i could use dried rosemary instead and if possible how do i use it.
Thank you
Hi Lorraine and yes, you can used dried rosemary. Chop it up finely and only use half the amount of fresh.
Hi Tanya,
Thank you again for sharing another great soap recipe! I made a batch a month ago and am now happily using them. They smell wonderful, feel great and have lots of fluffy lather. I will be making these again soon. Mine turned out a pale greenish grey color.
So glad I discovered your website!
So pleased to hear it :) Doesn’t the rosemary essential oil smell amazing?
I was always told making soap was dangerous. Your video for the lavender soap was wonderful and “scrubbed” my fear of making my on soap. Thank you so much!
You’re so welcome Pam :) I foresee many other soap batches in your future! Have fun making them
I love the scent of rosemary in soap! Always looking for more natural colour options too :)
I have a question..Will the rosemary turn brown in and on the soap? Thanks! I love these! They are lovely!
Yes it will and in the photos you can see how it’s turned brown already. Each little piece of lavender creates a dark speckle in the soap. I think that i’s a pretty effect contrasted against the blue-green of the bar.
Hello, I cannot find cheap refined coconut oil in my area. Can I use coconut cooking oils instead? It says that these oils are refined bleached, and fractionated. Are coconut cooking oils and refined coconut oils similar?
Hi Gabriel, fractionated coconut oil comes as a liquid and does not create the firm bars that solid refined coconut oil does. It also has a different saponification value, meaning a different amount of lye is needed to transform it into soap. I wonder if you have a soapmaking supplier or catering company that could supply refined coconut oil? It’s used as a healthier oil for frying and roasting as it has a high smoke point.